Simple Flight Controller
Blueprint journal of the making of a flight controller guide
Created by
 NotARoomba 🚀
Tier 2
169 views
2 followers
 ivarhak08
gave kudos to Simple Flight Controller ago
ivarhak08
gave kudos to Simple Flight Controller ago
Thanks so much for the guide goat! Made one of my own using it.
 CAN ⚡🚀
approved Simple Flight Controller ago
CAN ⚡🚀
approved Simple Flight Controller ago
Tickets awarded: 475 tickets
Tier: 2
NotARoomba 🚀
submitted Simple Flight Controller for ship review ago
NotARoomba 🚀
added to the journal ago
3D Renders and Figma Design
After finishing it I decided to make some changes to the silkscreen and also render it in blender with some lighting. It took a while to get it just right and I made a few variations. After that I exported it into Figma to create a cool banner/icon.


![]()

NotARoomba 🚀
added to the journal ago
Finishing Touches
After finishing the PCB, I explained how to add 3D models and also edit the silkscreen so that it looks good.

I then explained how to export to JLCPCB and how to add plugins to KiCad/Production files.
After that I explained a bit into the firmware but didn't go in to deep and gave references to good starting points as everyones flight controller would be different. But I at least showed how to export the code from STM32CubeMX and how to edit it with VSCode.
NotARoomba 🚀
added to the journal ago
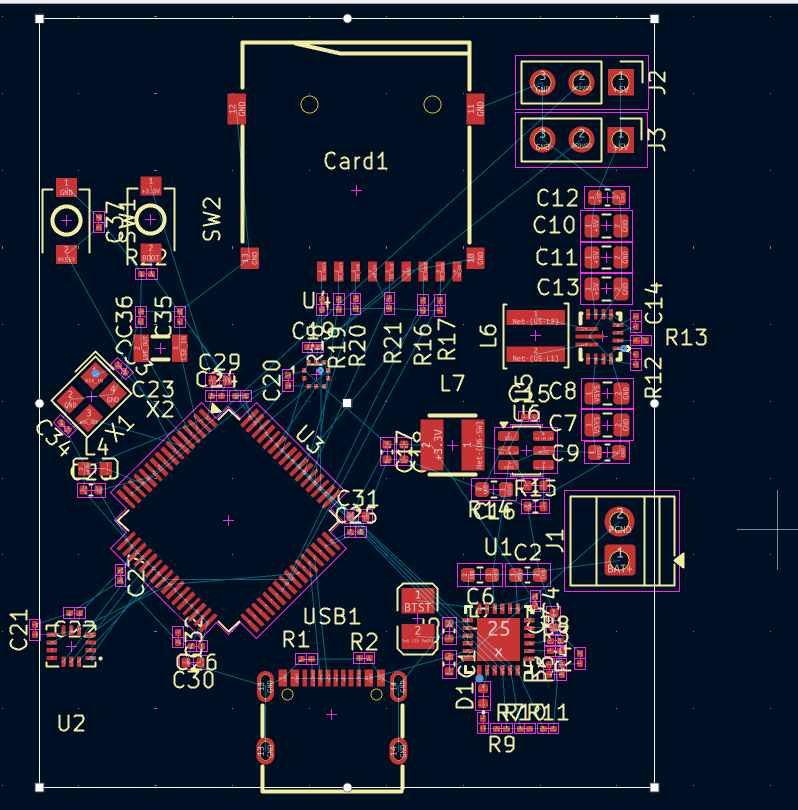
Finish PCB
Here I explained how to route the PCB and also what to take into consideration like the differential pairs for the USB-C.

After that I just explained the different trace widths that I was going to be using and for what and then I finished routing everything else.
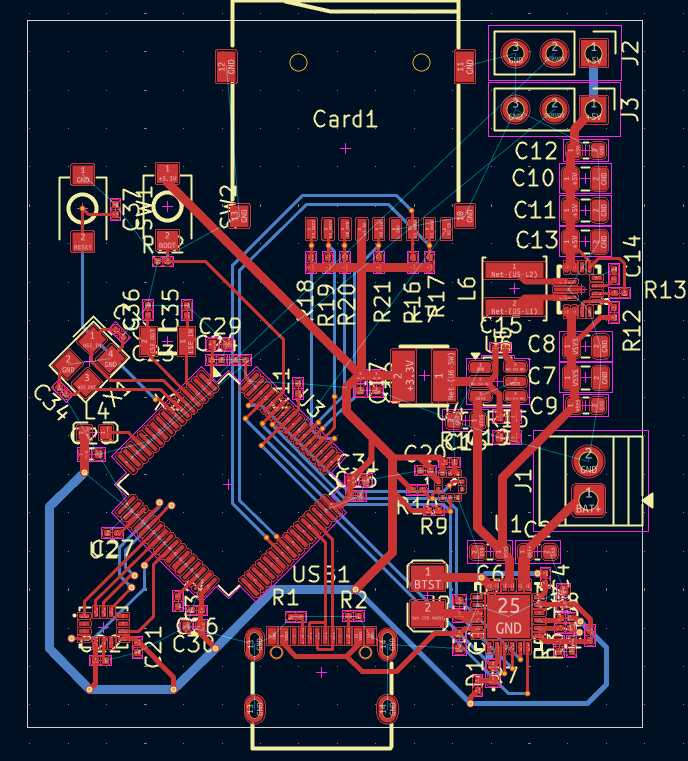
After that I explained how to make a ground plane and also what stitching vias were

NotARoomba 🚀
added to the journal ago
Started General Layout
Here I explained how I was going to layout and what a PCB is, I also exaplined a method that I use to route the PCB's in which I group all of the ICs and their passives together and connect them before joining those groups and wiring them up between themselves.


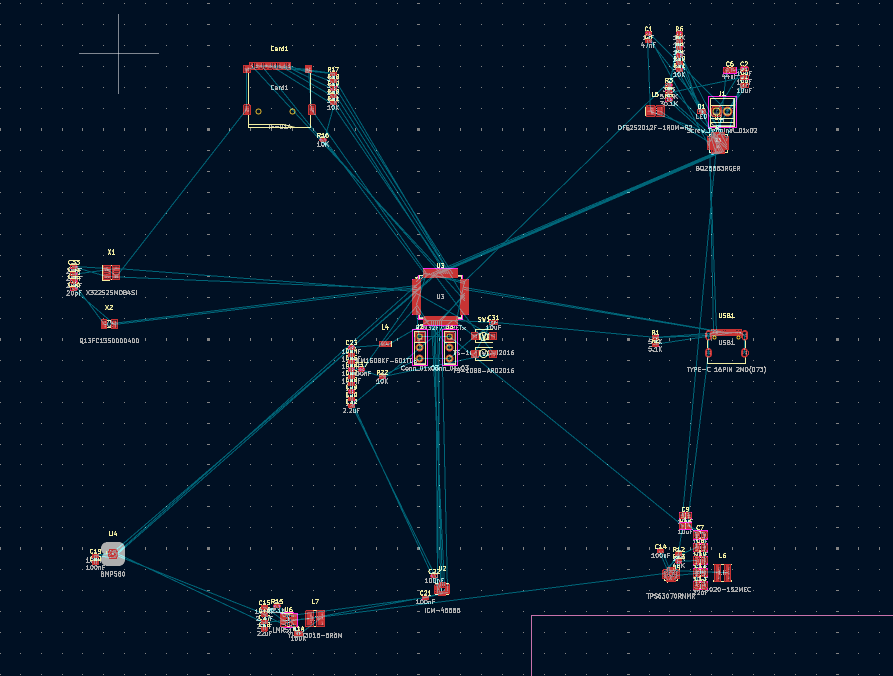
Then I explained how to layout the other ICs and where to place the components and to always reference the datasheet for how.
NotARoomba 🚀
added to the journal ago
Finish Schematic and Footprints
After editing the pins in STM32CubeMX, I went back to KiCad and connected all of the pins that I was going to use to their respective pins on the STM32. I also explained crystals, load capcitors, and decoupling capacitors and their purpouse.

After that I added in the boot and reset buttons from an application note that I was following:
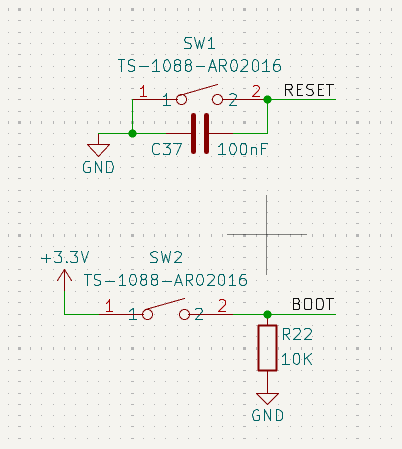
After that I added header pins for the servos and organized the schematic and was done with it.
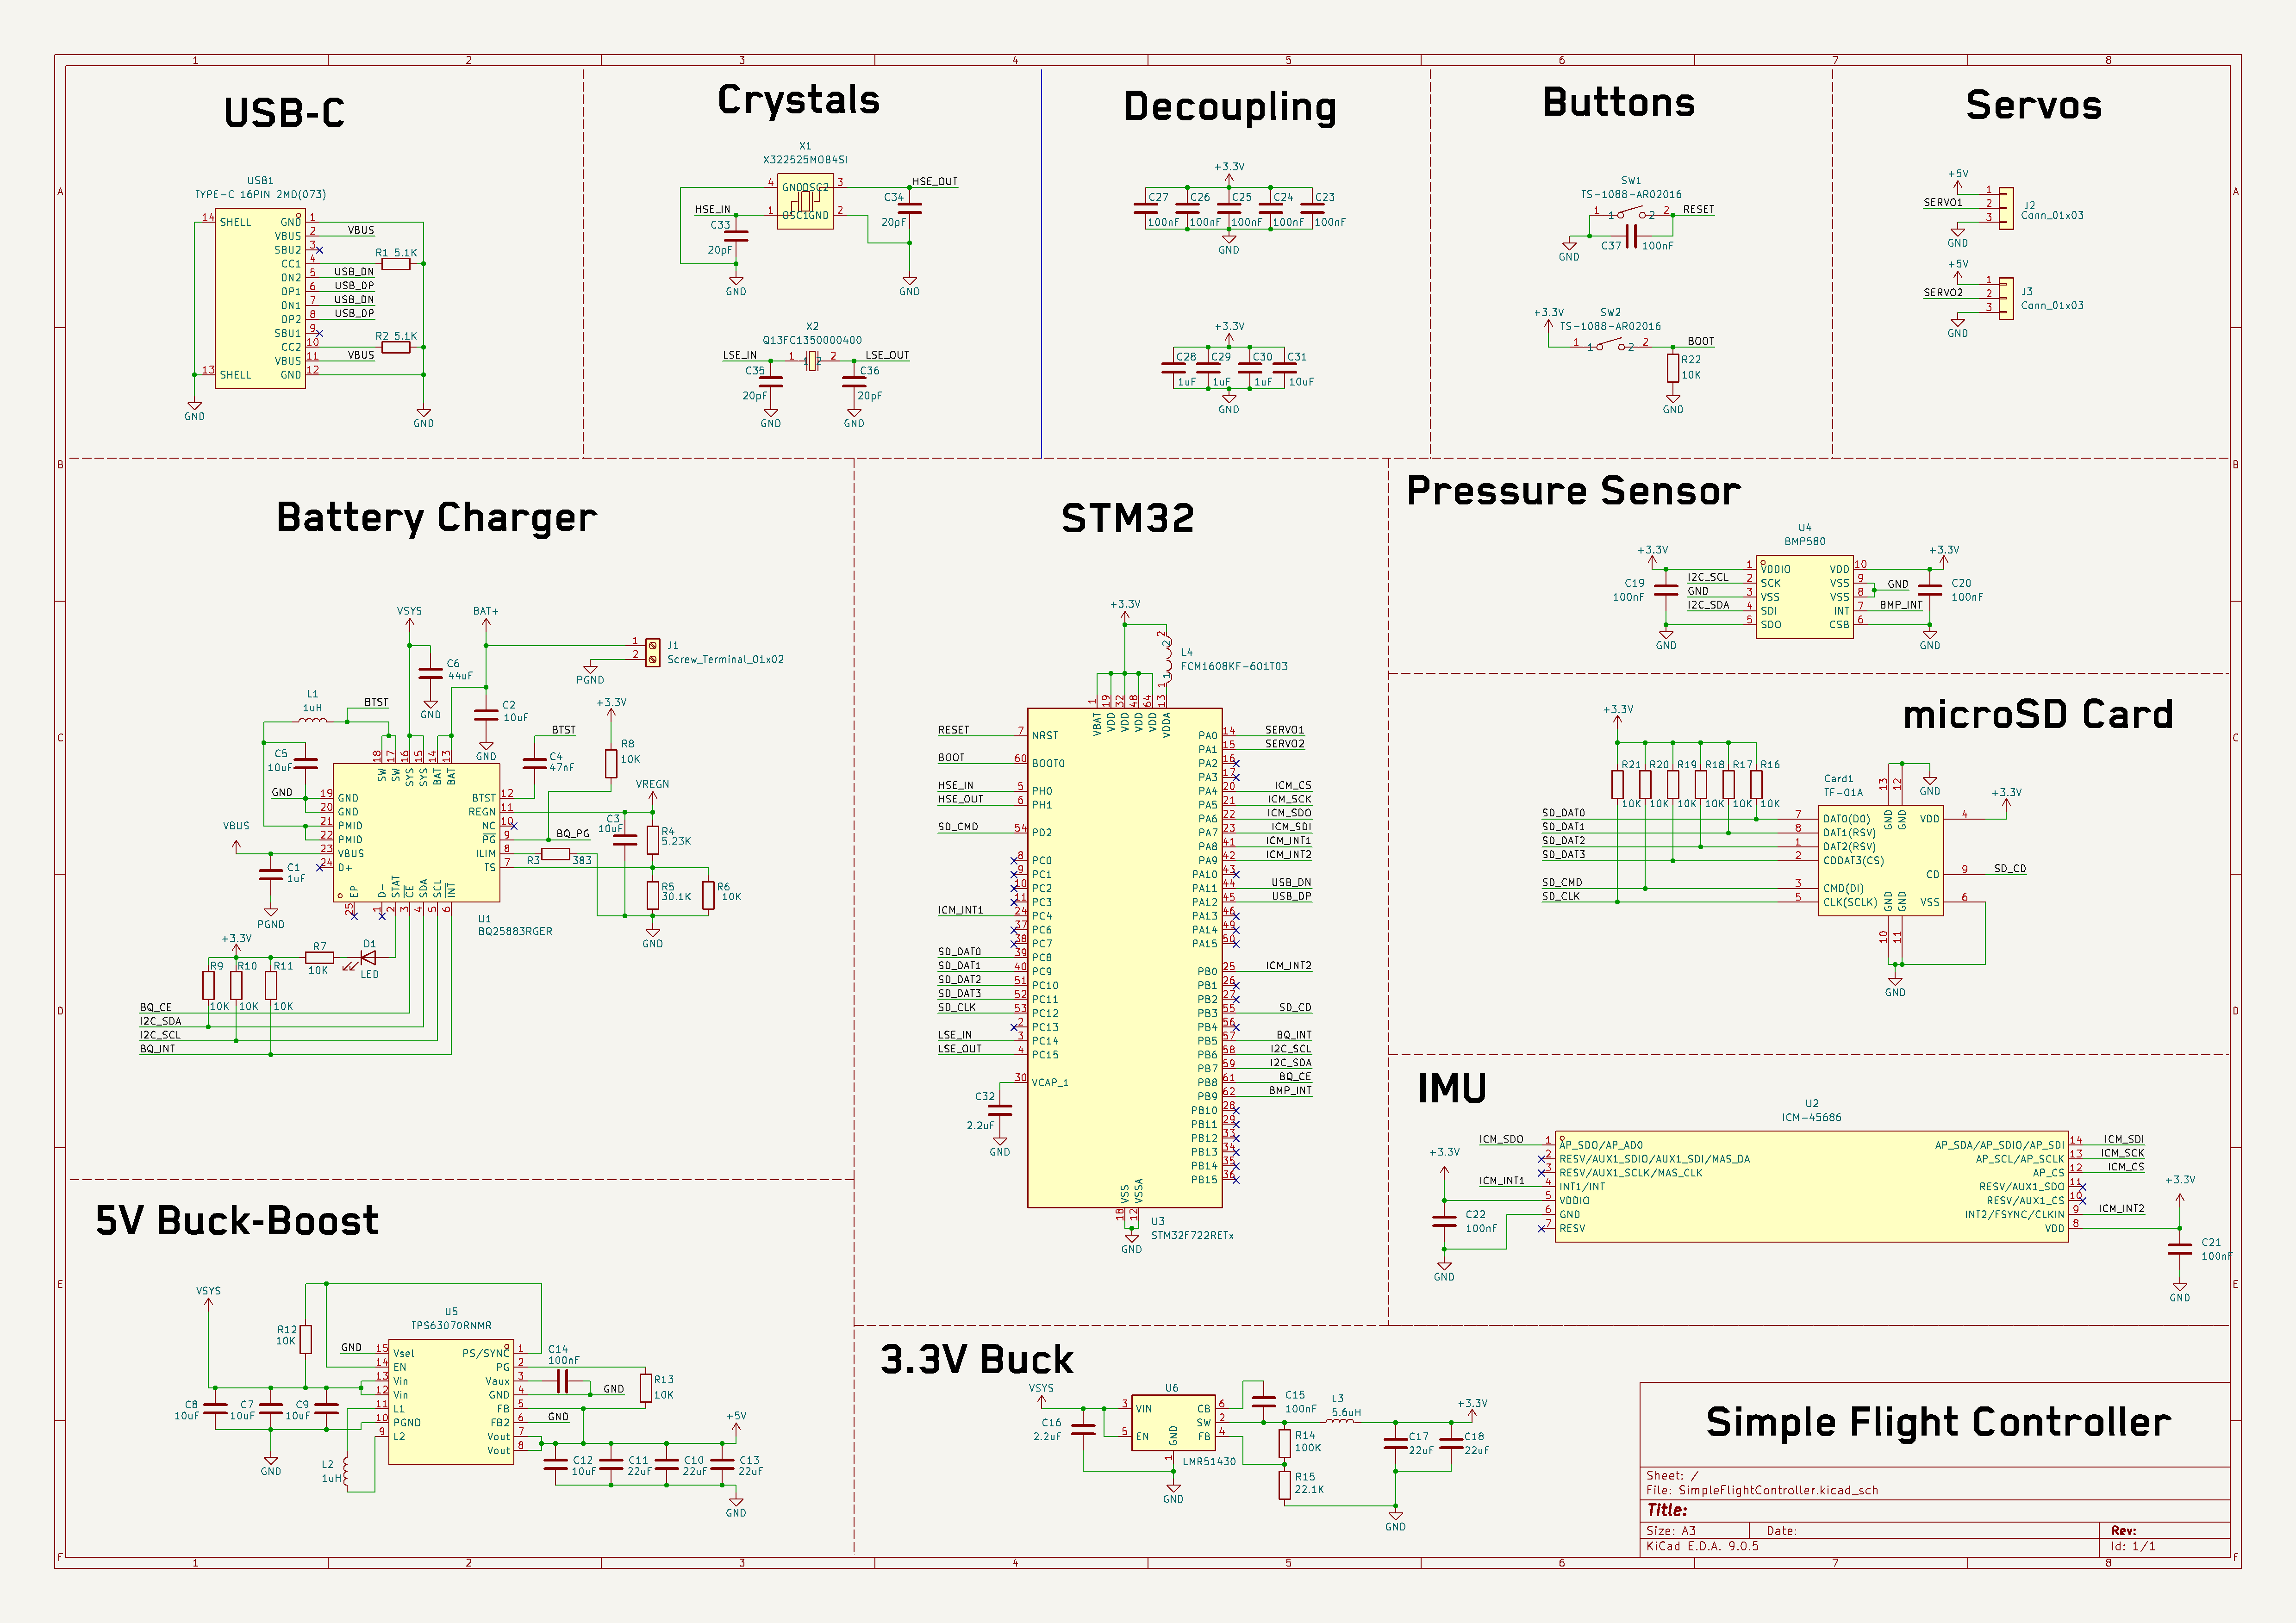
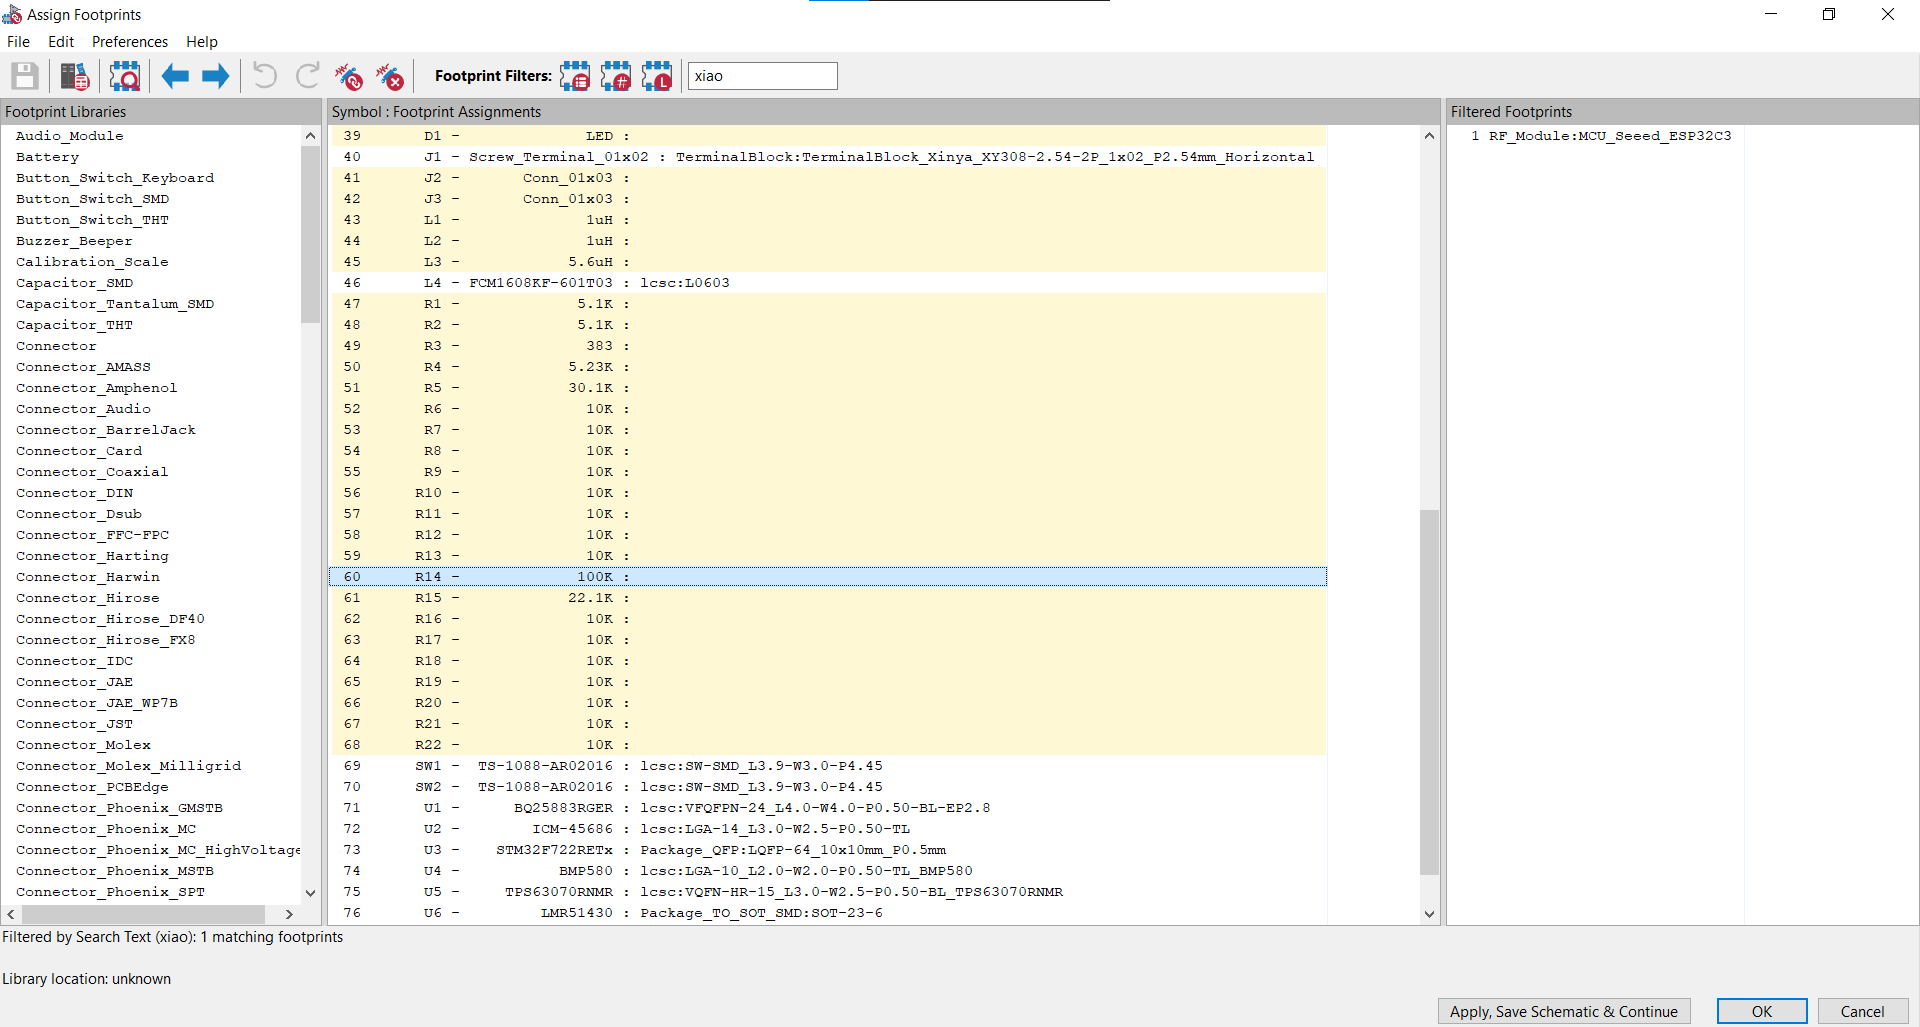
Now after finishing the schematic I explained footprint assignment and the different types of footprints and their recommended sizes and how to find them depending on the datasheets of the chips that you are using.
NotARoomba 🚀
added to the journal ago
STM32CubeMX Explanation
Here I spend a good while explaining how to use STM32CubeMX to connect up the STM32 and plan out which communication protocols that I was going to be using to write the firmware later

I explained interrupts and how to navigate the UI of the software.
CAN ⚡🚀
requested changes for Simple Flight Controller ago
Could you split this into more than 3 journals please?
Tier: 2
NotARoomba 🚀
submitted Simple Flight Controller for ship review ago
NotARoomba 🚀
added to the journal ago
Sensors and Peripherals
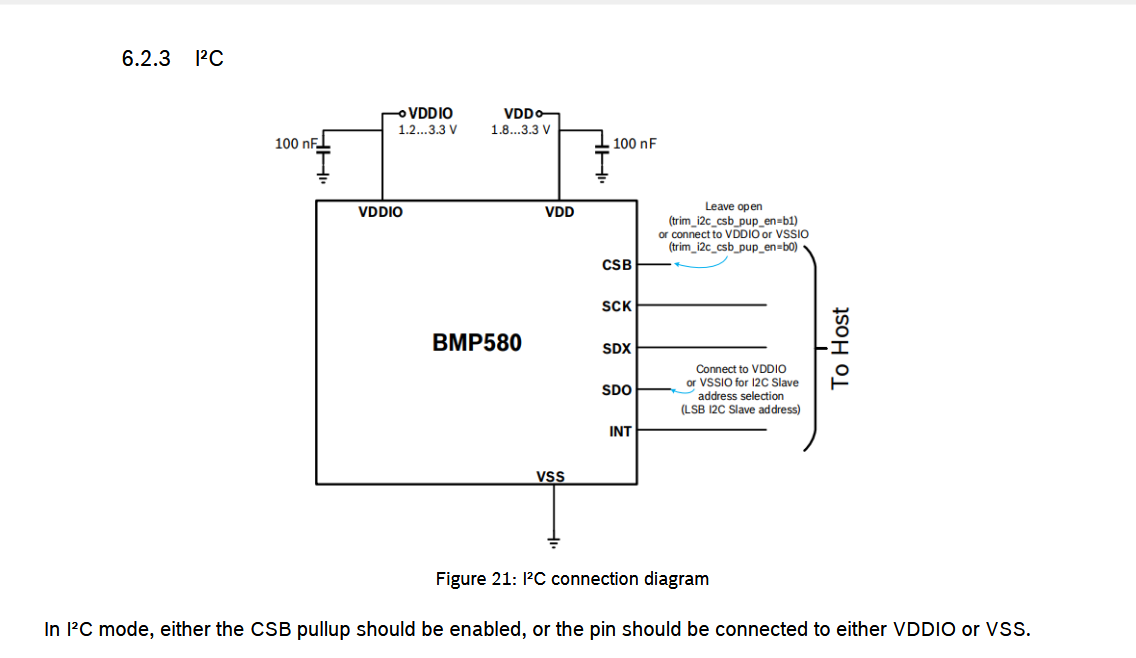
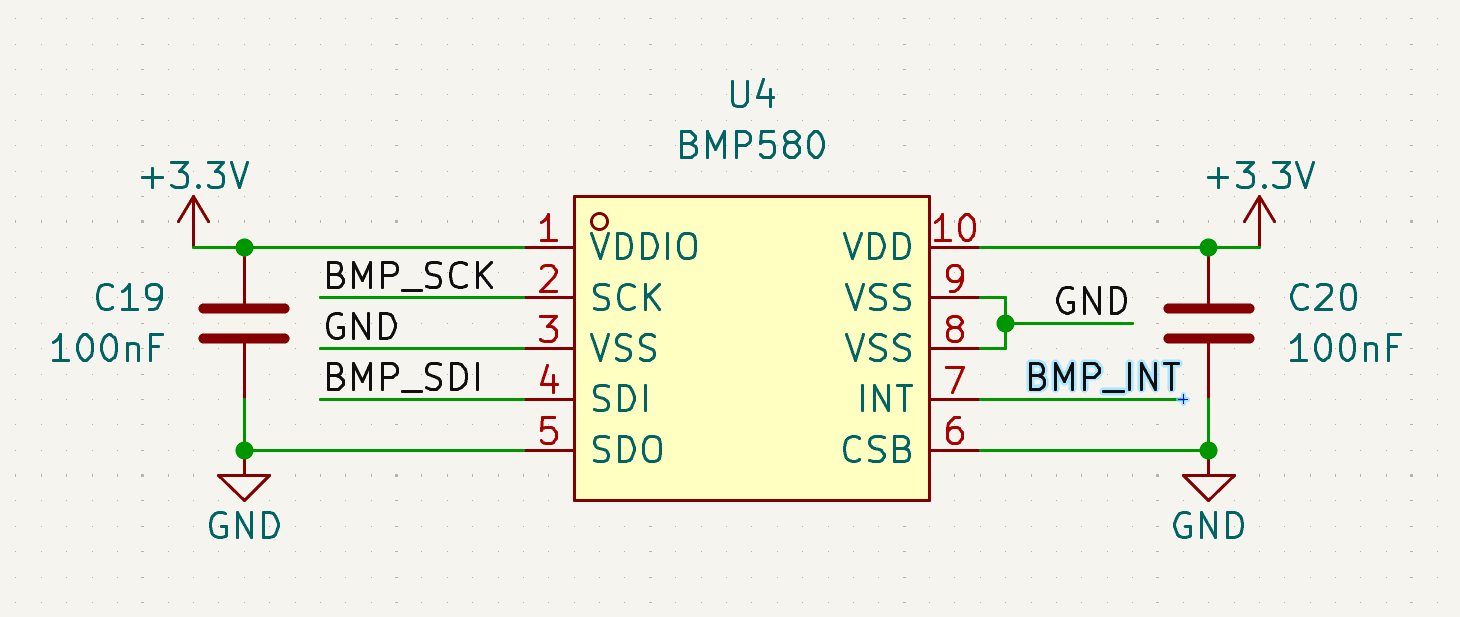
Here I explained how to route the sensors and peripherals starting with the BMP580, I also mentioned the different communication protocols and used one that the chip by default uses.
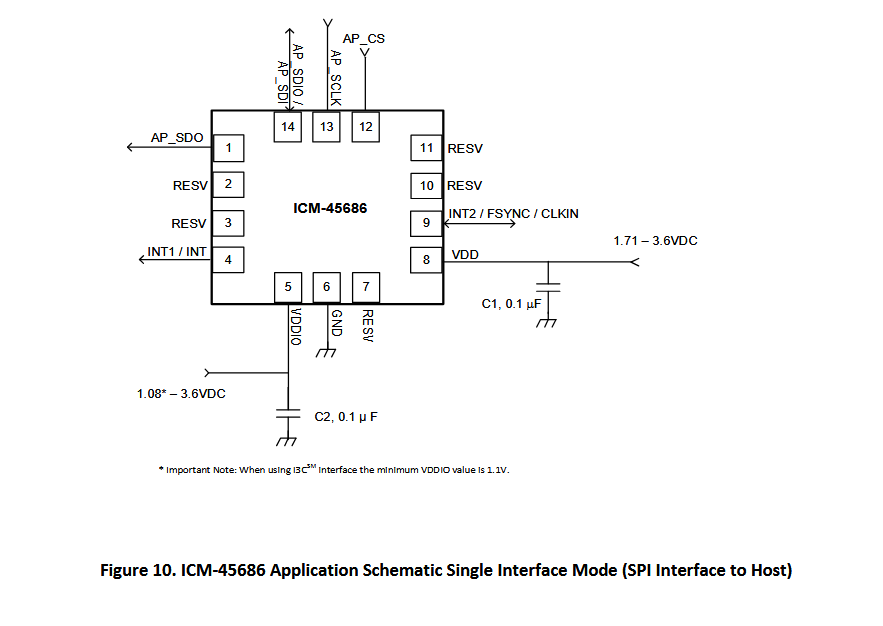
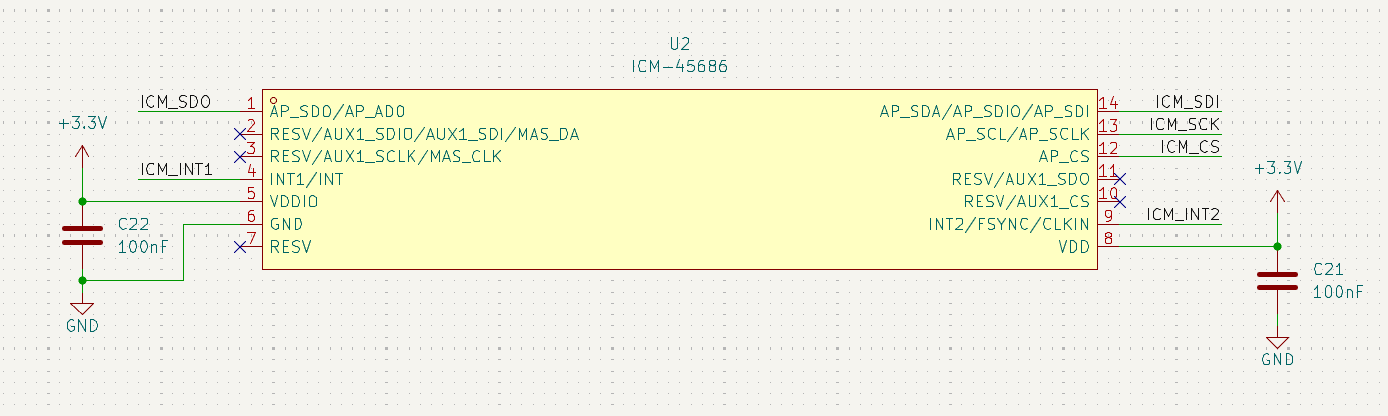
After this I started on the IMU and explained some stuff but I already taught how to read a datasheet so I didn't explain much here aside from where the application note was and which communication protocol I was using.
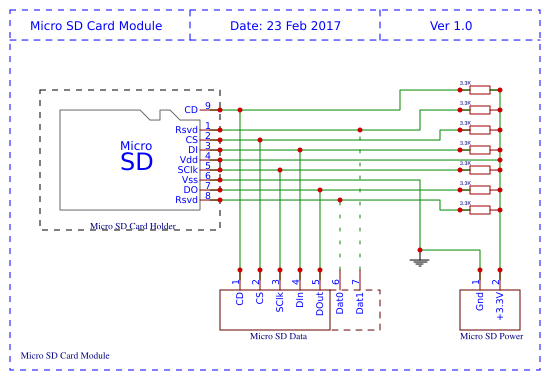
After that I explained how to wire up the microSD and the importance of pullup resistors and why they're used.

NotARoomba 🚀
added to the journal ago
Explain Regulators and Finish Power Section
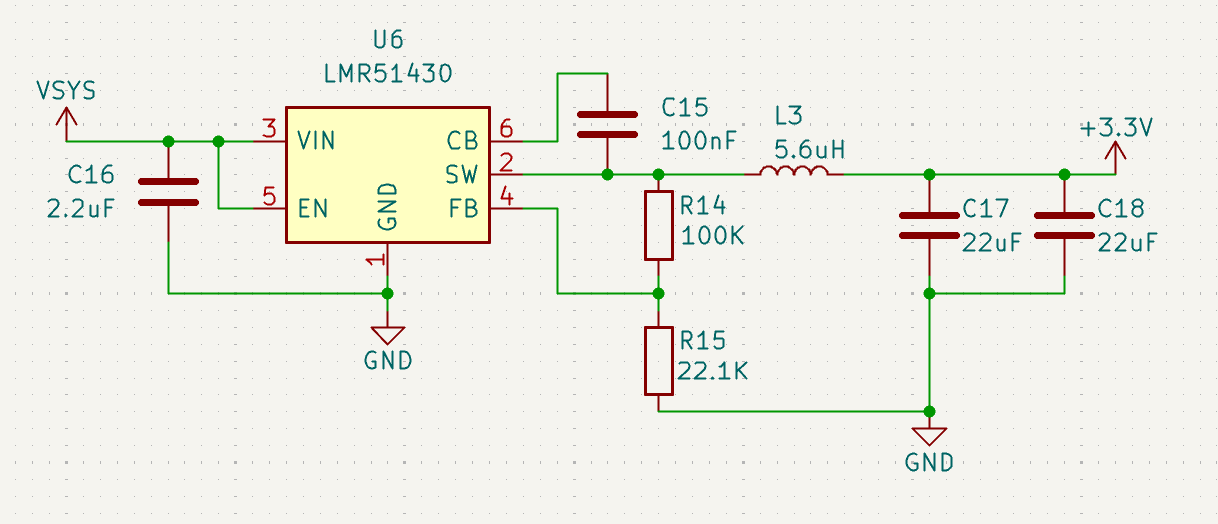
In this chapter, I explained how regulators work and also what switching frequency and all of the various parameters mean on typical regulators.

After this I started on explaining the sensors and peripherals.
NotARoomba 🚀
added to the journal ago
Started Guide and Schematic
I started writing the guide, it is over 400 lines with images and I have also been writing step by step how everything works from the ground so that anyone who reads it can kind of understand the different concepts that there are in advanced PCB design. First, I had to think about how I wanted to structure it, and what I wanted to include. I started by explaining what "problems" you'd want to solve by creating a flight controller. From data logging to communication, and also what other factors to take into account like power management and chip selection.
After defining the chip selection I started explaining how each chip works and the different ways of communicating
I also explained how to add custom parts and using a script I made that automates easyeda2kicad from a text file filled with the LCSC part numbers.
After adding the part numbers, I started the schematic and just finished routing the battery charger and also the USB-C port.

During this, I explained how to read a datasheet and also how design parameters change depending on your needs. I also explained the different communication protocols that exist like i2c, spi, uart, etc.
NotARoomba 🚀
started Simple Flight Controller ago
10/26/2025 - Started Guide and Schematic
I started writing the guide, it is over 400 lines with images and I have also been writing step by step how everything works from the ground so that anyone who reads it can kind of understand the different concepts that there are in advanced PCB design. First, I had to think about how I wanted to structure it, and what I wanted to include. I started by explaining what "problems" you'd want to solve by creating a flight controller. From data logging to communication, and also what other factors to take into account like power management and chip selection.
After defining the chip selection I started explaining how each chip works and the different ways of communicating
I also explained how to add custom parts and using a script I made that automates easyeda2kicad from a text file filled with the LCSC part numbers.
After adding the part numbers, I started the schematic and just finished routing the battery charger and also the USB-C port.
During this, I explained how to read a datasheet and also how design parameters change depending on your needs. I also explained the different communication protocols that exist like i2c, spi, uart, etc.
11/2/2025 - Explain Regulators and Finish Power Section
In this chapter, I explained how regulators work and also what switching frequency and all of the various parameters mean on typical regulators.
After this I started on explaining the sensors and peripherals.
11/5/2025 - Sensors and Peripherals
Here I explained how to route the sensors and peripherals starting with the BMP580, I also mentioned the different communication protocols and used one that the chip by default uses.
After this I started on the IMU and explained some stuff but I already taught how to read a datasheet so I didn't explain much here aside from where the application note was and which communication protocol I was using.
After that I explained how to wire up the microSD and the importance of pullup resistors and why they're used.
11/12/2025 10:04 PM - STM32CubeMX Explanation
Here I spend a good while explaining how to use STM32CubeMX to connect up the STM32 and plan out which communication protocols that I was going to be using to write the firmware later
I explained interrupts and how to navigate the UI of the software.
11/12/2025 10:09 PM - Finish Schematic and Footprints
After editing the pins in STM32CubeMX, I went back to KiCad and connected all of the pins that I was going to use to their respective pins on the STM32. I also explained crystals, load capcitors, and decoupling capacitors and their purpouse.
After that I added in the boot and reset buttons from an application note that I was following:
After that I added header pins for the servos and organized the schematic and was done with it.
Now after finishing the schematic I explained footprint assignment and the different types of footprints and their recommended sizes and how to find them depending on the datasheets of the chips that you are using.
11/12/2025 10:13 PM - Started General Layout
Here I explained how I was going to layout and what a PCB is, I also exaplined a method that I use to route the PCB's in which I group all of the ICs and their passives together and connect them before joining those groups and wiring them up between themselves.
Then I explained how to layout the other ICs and where to place the components and to always reference the datasheet for how.
11/12/2025 10:17 PM - Finish PCB
Here I explained how to route the PCB and also what to take into consideration like the differential pairs for the USB-C.
After that I just explained the different trace widths that I was going to be using and for what and then I finished routing everything else.
After that I explained how to make a ground plane and also what stitching vias were
11/12/2025 10:20 PM - Finishing Touches
After finishing the PCB, I explained how to add 3D models and also edit the silkscreen so that it looks good.
I then explained how to export to JLCPCB and how to add plugins to KiCad/Production files.
After that I explained a bit into the firmware but didn't go in to deep and gave references to good starting points as everyones flight controller would be different. But I at least showed how to export the code from STM32CubeMX and how to edit it with VSCode.
11/12/2025 10:33 PM - 3D Renders and Figma Design
After finishing it I decided to make some changes to the silkscreen and also render it in blender with some lighting. It took a while to get it just right and I made a few variations. After that I exported it into Figma to create a cool banner/icon.
![]()