Robot Tour!
BTW I already have a 3d printed case I used with my old robot but I am reusing that case with this pcb and these parts because the old parts were bad. I also do not need a PCB as this is being funded by Easy EDA. Im on my school's scioly Robot Tour team so this is my bot I am creating for that competition.
Created by
 Nachu Thenappan 🚀
Tier 3
9 views
0 followers
 CAN ⚡🚀
approved Robot Tour! ago
CAN ⚡🚀
approved Robot Tour! ago
Tier approved: 3
Grant approved: $36.00
Goated
Nachu Thenappan 🚀
added to the journal ago
Minor adjustment to input voltage
I got advice that I should change my input voltage to 6V rather than 7V to use these cheaper DC motors so I decided to do that and all i had to do was change one resistor value to 39k ohms to fix this new change. I then went into the PCB and for some reason another GND also became unconnected so I just connected the pad of that to a nearby GND. Then to connect the actual resistor I think I used vias for no reason so I decided to make some room for it in the center of the PCB by moving away some of the routes and placed it in and simply connected!

Nachu Thenappan 🚀
submitted Robot Tour! for ship review ago
Nachu Thenappan 🚀
requested changes for Robot Tour! ago
making it cheaper
Nachu Thenappan 🚀
submitted Robot Tour! for ship review ago
 NotARoomba 🚀
requested changes for Robot Tour! ago
NotARoomba 🚀
requested changes for Robot Tour! ago
Please upload screenshots of your cart showing everything! Also try to look on aliexpress for the motors!
Nachu Thenappan 🚀
submitted Robot Tour! for ship review ago
 koeg 🚀
requested changes for Robot Tour! ago
koeg 🚀
requested changes for Robot Tour! ago
If you are getting motors/sensors and not just the PCB, shouldn't you also design the whole bot?
Nachu Thenappan 🚀
submitted Robot Tour! for ship review ago
Nachu Thenappan 🚀
requested changes for Robot Tour! ago
Self-Rejecting because I realized I can get the PCB for free!
Nachu Thenappan 🚀
submitted Robot Tour! for ship review ago
Nachu Thenappan 🚀
added to the journal ago
Changed IC and Rerouted entire board
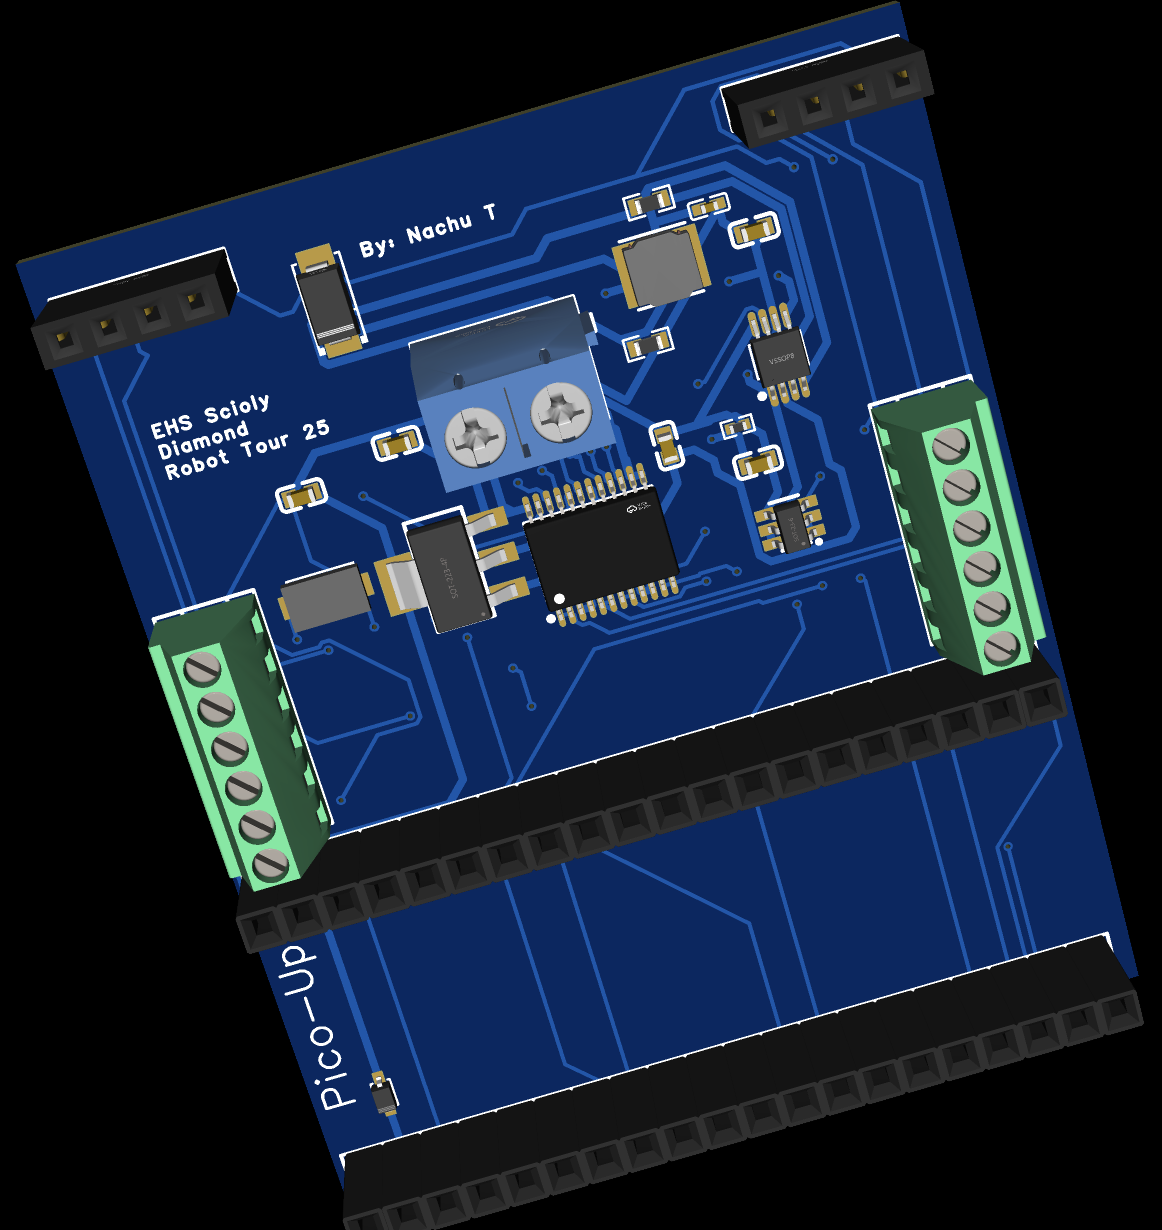
Turns out the Toshiba IC that I was using before will not handle the amperage of this project so I had to redo it with a new Texas Instruments dual-h bridge IC. I tried to just re-do just that part but instead I chose to reroute the entire board along with making the traces for power even thicker just to be safe that it works.


Nachu Thenappan 🚀
added to the journal ago
Fixed Schematic and Finished PCB

First I went ahead and routed the entire PCB's power lines with thicker traces with a probably not very ideal layout but got it done. Next I routed all of the GPIO and data lines which ended up taking a lot more Vias than it should have. After this I was going to write this journal but realized the headers I was using for my 2 sensors were the wrong dimension so I went into the schematic changed those out and went into the PCB layout and replaced+tweaked some of the connections to make it work!
Nachu Thenappan 🚀
added to the journal ago
Actually Finished Schematic?

I forgot to add the motor controller so this PCB wouldn't have worked ... Its there now though! I had to do a little research and it should be fine to have the VCC as 5V so now I think I can finally move to the actual PCB.
Nachu Thenappan 🚀
added to the journal ago
Finished Schematic?

I think I should be done with the Schematics since I got everything connected to headers for the 2 motor encoders, MPU6050 Accelerometer,Button and Ultrasonic Sensor. It honestly wasn't that bad although the encoder documentation wasn't great and I hope these all don't take in too much current for the one 3V3 on he pico.
Nachu Thenappan 🚀
added to the journal ago
Made the Voltage Regulators

Made the buck converter for 9V to 7V and the LDO for 7V to 5V since I don't think the efficiency for the RPI will matter too much and the buck converter is goofy ngl. Also sorry to the ppl out there who use KiCad imma use EasyEda because it is available on the web and saves my projects on the cloud so I can do this outside of my home :).
Nachu Thenappan 🚀
added to the journal ago
Did research on the rules and what i want to do
I just realized that this isnt a racing event so its not all about how fast the car goes and ur accuracy actually matters. I am thinking of using a RPI Pico, accelerometer sensor, Ultrasonic sensor, wheels+dc motor+encoders, and a motor controller. Hopefully, I can make my own custom motor controller to place on the PCB but lets see.


Nachu Thenappan 🚀
started Robot Tour! ago
11/10/2025 - Did research on the rules and what i want to do
I just realized that this isnt a racing event so its not all about how fast the car goes and ur accuracy actually matters. I am thinking of using a RPI Pico, accelerometer sensor, Ultrasonic sensor, wheels+dc motor+encoders, and a motor controller. Hopefully, I can make my own custom motor controller to place on the PCB but lets see.
11/11/2025 3 PM - Made the Voltage Regulators
Made the buck converter for 9V to 7V and the LDO for 7V to 5V since I don't think the efficiency for the RPI will matter too much and the buck converter is goofy ngl. Also sorry to the ppl out there who use KiCad imma use EasyEda because it is available on the web and saves my projects on the cloud so I can do this outside of my home :).
11/11/2025 5 PM - Finished Schematic?
I think I should be done with the Schematics since I got everything connected to headers for the 2 motor encoders, MPU6050 Accelerometer,Button and Ultrasonic Sensor. It honestly wasn't that bad although the encoder documentation wasn't great and I hope these all don't take in too much current for the one 3V3 on he pico.
11/11/2025 9 PM - Actually Finished Schematic?
I forgot to add the motor controller so this PCB wouldn't have worked ... Its there now though! I had to do a little research and it should be fine to have the VCC as 5V so now I think I can finally move to the actual PCB.
11/12/2025 - Fixed Schematic and Finished PCB
First I went ahead and routed the entire PCB's power lines with thicker traces with a probably not very ideal layout but got it done. Next I routed all of the GPIO and data lines which ended up taking a lot more Vias than it should have. After this I was going to write this journal but realized the headers I was using for my 2 sensors were the wrong dimension so I went into the schematic changed those out and went into the PCB layout and replaced+tweaked some of the connections to make it work!
Screenshot 2025-11-12 at 4.51.41 PM
11/22/2025 - Changed IC and Rerouted entire board
Turns out the Toshiba IC that I was using before will not handle the amperage of this project so I had to redo it with a new Texas Instruments dual-h bridge IC. I tried to just re-do just that part but instead I chose to reroute the entire board along with making the traces for power even thicker just to be safe that it works.
11/26/2025 - Minor adjustment to input voltage
I got advice that I should change my input voltage to 6V rather than 7V to use these cheaper DC motors so I decided to do that and all i had to do was change one resistor value to 39k ohms to fix this new change. I then went into the PCB and for some reason another GND also became unconnected so I just connected the pad of that to a nearby GND. Then to connect the actual resistor I think I used vias for no reason so I decided to make some room for it in the center of the PCB by moving away some of the routes and placed it in and simply connected!