DIY_Keyboard
I made a Diy Keyboard - further information in my Readme (on github)
Created by
 Willz
Willz
Tier 2
27 views
0 followers
 Taran the Unc 🚀
requested changes for DIY_Keyboard ago
Taran the Unc 🚀
requested changes for DIY_Keyboard ago
hihi, this is a really cool keeb! However there are quite a few things that need to be fixed before I can approve this.
- Could you please upload .step files of your assembled case and put it in the cad folder
- Your firmware is incorrect. QMK needs other stuff to have a proper setup. You can generate a startup template with this tutorial -> https://docs.qmk.fm/newbs . Also ask in #blueprint for help with this, I know it can be confusing to learn sometimes(me personally I spent like 20 hours trying to figure out how to write code with QMK)
- In your pcb folder, could you zip the pdf files and then replace them with the zip. it helps clean up the repo and make it look better
- Could you please add your bom to your readme and also add it as a CSV file, not xlsx.
- could you please add more detail to your journal, specifically the entry where you spend 10 hours on the case. right now I dont really know what you did during those 10 hours.
- I apologise but we do not fund filament until after you print your case, in which case we will give you a grant depending on how much filament you used. because of this I am demoting you down to tier 3 and to a $96 grant(that was written in your readme)
- Could you please include photos of your schematic in your readme.
Unless I have missed something, that should be all the problems related to your ship. Once you dix those, it should be good for me to approve :)
Recommended tier: 3
Grant to expect: $96.00
Willz
submitted DIY_Keyboard for review ago
 zsharpminor
requested changes for DIY_Keyboard ago
zsharpminor
requested changes for DIY_Keyboard ago
This is a really cool project - your repo is a bit flooded; can you please organize it into PCB, CAD, and Firmware folders? Additionally, please add a description of what your project is, what it does, and why you built it to your README. Finally, please try to source your parts from AliExpress as they will usually be way cheaper.
Willz
submitted DIY_Keyboard for review ago
Willz
added to the journal ago
I finished the bom and the project

I created the bom. Sadly the total was too high. Thats why I am going to buy some of the parts myself. I hope my project gets accepted. Now I am finished.
Willz
added to the journal ago
I started with the bom.
I discovered that cnc machining is way more expensive than expected. that is why i am probably going to use a 3d printed case. machined by printer legion.
Willz
added to the journal ago
I finished designing the case

I finished desining the case. I went with a classic case design (cnc machined). That has small bezels on the sides and a bit bigger ones on the top and bottom. Next up: BOM and firmware
Willz
added to the journal ago
Started the case and plate design
I started the plate and case design. I am going to use a top mount. I am currently trying to lay every component out and check the clearance. (e.g pcb, switches)
Willz
added to the journal ago
Finalized the pcb
I finalized the pcb design with changes like:
- rotary encoder better aligned
- enter key rotated by 90 degrees
- etc You can view my design on my Github: https://github.com/moritz-prenner/DIY_Keyboard or via kicanvas: https://kicanvas.org/?github=https%3A%2F%2Fgithub.com%2Fmoritz-prenner%2FDIY_Keyboard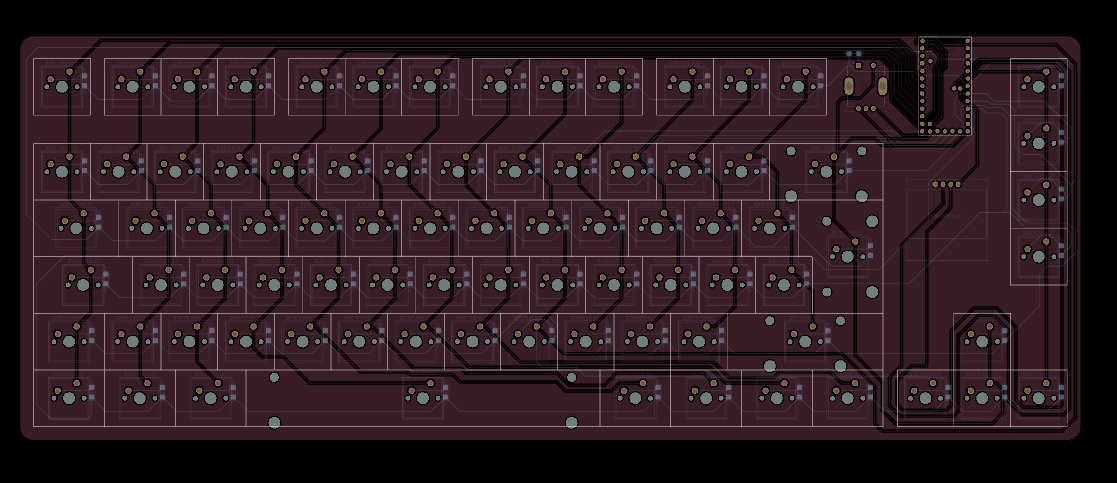
Willz
added to the journal ago
I updated the pcb.
I fixed most of the errors in the DRC. I changed the footprint of the oled screen. And I also improved my ground plane. I think I am now going to move on to the case. 
Willz
added to the journal ago
Routed the PCB
I updated the schematic to make wiring easier. Then I layed out all of the components and added an OLED screen. Then I routed everything and exported some pictures.
Willz
added to the journal ago
I updated the schematic.

I used labels. I used a new symbol for the microcontroller. I updated the matrix. I assigned footprints and decided on diodes I am going to use. I am going to use smd diodes. Hopefully blueprint will add helping hands or some sort of smd soldering accesories to the toobag.
Willz
added to the journal ago
New Layout and schematic


I rearranged the layout and made the schematic. I settled on the rp2040 based RP2040 Pro Micro 16MB/128Mbit USB-C Controller from Keeb.io. I am going to use 84 switches (12 rows, 7 columns). And I am going to implement a rotary encoder (PEC11R-4215F-S0024). And I am probaply going to include a acrylic glass window in the case which I am going to start working on next.
Willz
added to the journal ago
I created the layout i am going to use.

I want to use a ISO - Layout (German) and I want one number row and one Shortcut row. Also a volume knob is important for me. I also decided on some shortcut keys on the right hand side which i am going to bind on discord mute and some other useful functions.
Willz
started DIY_Keyboard ago
10/4/2025 - I created the layout i am going to use.
I want to use a ISO - Layout (German) and I want one number row and one Shortcut row. Also a volume knob is important for me. I also decided on some shortcut keys on the right hand side which i am going to bind on discord mute and some other useful functions.
10/5/2025 - New Layout and schematic
I rearranged the layout and made the schematic. I settled on the rp2040 based RP2040 Pro Micro 16MB/128Mbit USB-C Controller from Keeb.io. I am going to use 84 switches (12 rows, 7 columns). And I am going to implement a rotary encoder (PEC11R-4215F-S0024). And I am probaply going to include a acrylic glass window in the case which I am going to start working on next.
10/12/2025 - I updated the schematic.
I used labels. I used a new symbol for the microcontroller. I updated the matrix. I assigned footprints and decided on diodes I am going to use. I am going to use smd diodes. Hopefully blueprint will add helping hands or some sort of smd soldering accesories to the toobag.
10/26/2025 - Routed the PCB
I updated the schematic to make wiring easier. Then I layed out all of the components and added an OLED screen. Then I routed everything and exported some pictures.
10/27/2025 - I updated the pcb.
I fixed most of the errors in the DRC. I changed the footprint of the oled screen. And I also improved my ground plane. I think I am now going to move on to the case.
10/28/2025 - Finalized the pcb
I finalized the pcb design with changes like:
- rotary encoder better aligned
- enter key rotated by 90 degrees
- etc You can view my design on my Github: https://github.com/moritz-prenner/DIY_Keyboard or via kicanvas: https://kicanvas.org/?github=https%3A%2F%2Fgithub.com%2Fmoritz-prenner%2FDIY_Keyboard
10/29/2025 - Started the case and plate design
I started the plate and case design. I am going to use a top mount. I am currently trying to lay every component out and check the clearance. (e.g pcb, switches)
11/16/2025 - I finished designing the case
I finished desining the case. I went with a classic case design (cnc machined). That has small bezels on the sides and a bit bigger ones on the top and bottom. Next up: BOM and firmware
11/23/2025 - I started with the bom.
I discovered that cnc machining is way more expensive than expected. that is why i am probably going to use a 3d printed case. machined by printer legion.
12/14/2025 - I finished the bom and the project
I created the bom. Sadly the total was too high. Thats why I am going to buy some of the parts myself. I hope my project gets accepted. Now I am finished.