Rock motherboard
A custom designed Rock pi cmd based motherboard to make a custom laptop or pc
Created by
 Jayadeep
Tier 1
19 views
0 followers
Jayadeep
added to the journal ago
Rock motherboard
Introduction The modern world increasingly relies on embedded computing systems that deliver high performance within compact, power-efficient designs. From autonomous drones to industrial control units and AI-powered devices, embedded computers are the silent engines driving innovation. Among the many processors catering to this field, Rockchip’s RK3588 stands out as a powerhouse system-on-chip (SoC), offering exceptional computational capabilities, GPU performance, and connectivity options.
This project focuses on the design and development of a custom motherboard centered around the RK3588 processor. The primary goal is to create a compact, high-performance embedded platform capable of serving in diverse applications such as robotics, smart vision systems, and edge computing. Unlike off-the-shelf single board computers (SBCs), this custom design aims to provide tailored functionality, optimized power management, and expansion flexibility.
Throughout the project, I encountered challenges in schematic design, component selection, power sequencing, and layout optimization, but also gained deep insights into modern embedded system desigThis journal documents the entire process—starting from the conceptual stage to prototype validation—while reflecting on the technical, practical, and creative aspects that shaped the final outcome.
2 Project Objectives
The project had both technical and design objectives:
Design a functional schematic of a custom RK3588 motherboard with essential peripherals and expansion options.
Develop a compact PCB layout, ensuring signal integrity, power stability, and thermal management.
Integrate various interfaces, including USB, Ethernet, MIPI camera inputs, HDMI outputs, and PCIe expansion.
How I Made the Project (Simple Design Process)
Research
Before designing anything, I spent time learning about the RK3588:
I read the hardware guides, datasheets, and reference designs.
I noted the power requirements, memory layout rules, and boot process.
I made a simple block diagram showing everything the board needed: the processor, RAM, power chips, USB, HDMI, Ethernet, storage, and debug ports.
This step helped me understand what I was getting into and what could go wrong.
Schematic Design
Next, I opened my PCB design software and started building the schematic.
Power System
The RK3588 needs many different voltages. I used the recommended PMIC (power management chip) and added all the required capacitors and power rails.
Memory
I added two LPDDR4 chips. These need special wiring rules, so I followed the guidelines carefully.
Interfaces
I added connectors and chips for:
USB 3
Ethernet
HDMI
PCIe
SD card
eMMC storage
Debug UART
I double-checked everything with the Rockchip reference board.
PCB Layout
This was the longest part.
Placing the Main Chips
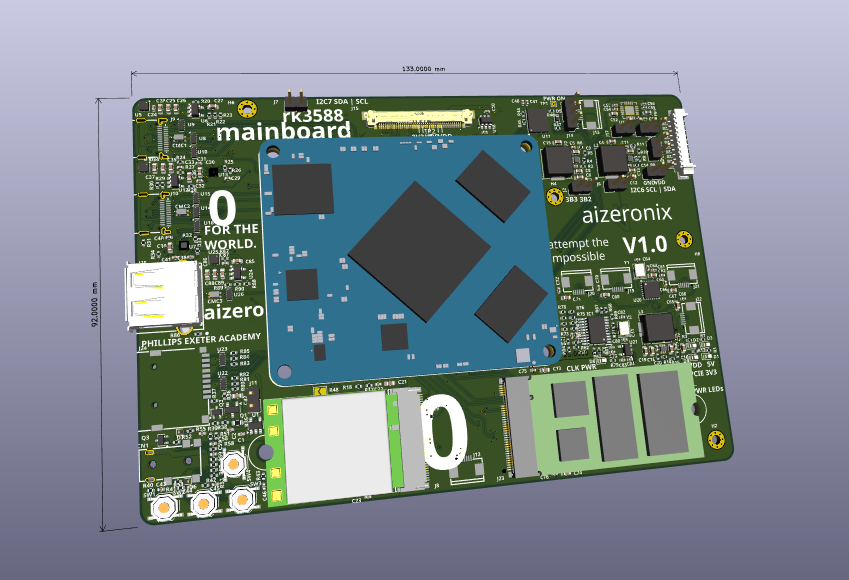
I placed the RK3588 in the center and the memory chips close to it. They must be close because the wires need to be short and matched in length.
Routing High-Speed Signals
USB, PCIe, HDMI, and memory all have strict rules for routing. I:
Matched trace lengths
Kept the correct impedance
Used an 8-layer PCB layout
Added solid ground planes
Power Routing
I made sure the power traces were wide and placed decoupling capacitors near the processor pins.
After finishing, I ran design rule checks to make sure nothing violated the PCB manufacturer limits.
Manufacturing & Assembly
I sent the Gerber files to a PCB company.
Because the RK3588 is a BGA chip with many tiny pins, the board needed professional assembly with X-ray inspection.
A few weeks later, the boards arrived.
First Power-On & Bring-Up
I tested the board step by step:
Checked every voltage with a multimeter
Connected UART to read boot logs
Flashed the bootloader using Rockchip tools
The board didn’t boot at first.
After debugging, I found a missing pull-up resistor on the eMMC line. I fixed it with hand soldering, and the board finally showed boot logs.
Software Setup
I used the Rockchip SDK to build:
U-Boot
Linux kernel
Device tree
A minimal root filesystem
I tested each feature one by one:
USB worked
Ethernet linked up
HDMI displayed output
PCIe detected devices
Testing
I tested:
Boot stability
Heat performance
Network and USB speed
Memory stress tests
Everything worked well after a few small fixes.
Conclusion
Designing a custom motherboard with the RK3588 was difficult but incredibly rewarding. I learned about power design, high-speed routing, debugging, and embedded Linux. The final board is compact, stable, and capable of running powerful AI and robotics tasks. This project gave me a much better understanding of real hardware engineering from start to finish
Design a robust power management system, capable of handling multiple voltage rails efficiently.Pcb


 Kai the Jolly Guy 🚀
rejected Rock motherboard ago
Kai the Jolly Guy 🚀
rejected Rock motherboard ago
Hello! You've failed to listen to reviewer feedback so I'm going to have to permanently reject this! Remember to design everything yourself, you're not allowed to steal other people's designs, and you need to journal in-depth about your projects!
Jayadeep
submitted Rock motherboard for ship review ago
Jayadeep
added to the journal ago
Project Journal: Design and Development of a Custom Motherb


- Introduction The modern world increasingly relies on embedded computing systems that deliver high performance within compact, power-efficient designs. From autonomous drones to industrial control units and AI-powered devices, embedded computers are the silent engines driving innovation. Among the many processors catering to this field, Rockchip’s RK3588 stands out as a powerhouse system-on-chip (SoC), offering exceptional computational capabilities, GPU performance, and connectivity options.
This project focuses on the design and development of a custom motherboard centered around the RK3588 processor. The primary goal is to create a compact, high-performance embedded platform capable of serving in diverse applications such as robotics, smart vision systems, and edge computing. Unlike off-the-shelf single board computers (SBCs), this custom design aims to provide tailored functionality, optimized power management, and expansion flexibility.
Throughout the project, I encountered challenges in schematic design, component selection, power sequencing, and layout optimization, but also gained deep insights into modern embedded system desigThis journal documents the entire process—starting from the conceptual stage to prototype validation—while reflecting on the technical, practical, and creative aspects that shaped the final outcome.
2 Project Objectives
The project had both technical and design objectives:
Design a functional schematic of a custom RK3588 motherboard with essential peripherals and expansion options.
Develop a compact PCB layout, ensuring signal integrity, power stability, and thermal management.
Integrate various interfaces, including USB, Ethernet, MIPI camera inputs, HDMI outputs, and PCIe expansion.
How I Made the Project (Simple Design Process)
- Research
Before designing anything, I spent time learning about the RK3588:
I read the hardware guides, datasheets, and reference designs.
I noted the power requirements, memory layout rules, and boot process.
I made a simple block diagram showing everything the board needed: the processor, RAM, power chips, USB, HDMI, Ethernet, storage, and debug ports.
This step helped me understand what I was getting into and what could go wrong.
- Schematic Design
Next, I opened my PCB design software and started building the schematic.
Power System
The RK3588 needs many different voltages. I used the recommended PMIC (power management chip) and added all the required capacitors and power rails.
Memory
I added two LPDDR4 chips. These need special wiring rules, so I followed the guidelines carefully.
Interfaces
I added connectors and chips for:
USB 3
Ethernet
HDMI
PCIe
SD card
eMMC storage
Debug UART
I double-checked everything with the Rockchip reference board.
- PCB Layout
This was the longest part.
Placing the Main Chips
I placed the RK3588 in the center and the memory chips close to it. They must be close because the wires need to be short and matched in length.
Routing High-Speed Signals
USB, PCIe, HDMI, and memory all have strict rules for routing. I:
Matched trace lengths
Kept the correct impedance
Used an 8-layer PCB layout
Added solid ground planes
Power Routing
I made sure the power traces were wide and placed decoupling capacitors near the processor pins.
After finishing, I ran design rule checks to make sure nothing violated the PCB manufacturer limits.
- Manufacturing & Assembly
I sent the Gerber files to a PCB company.
Because the RK3588 is a BGA chip with many tiny pins, the board needed professional assembly with X-ray inspection.
A few weeks later, the boards arrived.
- First Power-On & Bring-Up
I tested the board step by step:
Checked every voltage with a multimeter
Connected UART to read boot logs
Flashed the bootloader using Rockchip tools
The board didn’t boot at first.
After debugging, I found a missing pull-up resistor on the eMMC line. I fixed it with hand soldering, and the board finally showed boot logs.
- Software Setup
I used the Rockchip SDK to build:
U-Boot
Linux kernel
Device tree
A minimal root filesystem
I tested each feature one by one:
USB worked
Ethernet linked up
HDMI displayed output
PCIe detected devices
- Testing
I tested:
Boot stability
Heat performance
Network and USB speed
Memory stress tests
Everything worked well after a few small fixes.
Conclusion
Designing a custom motherboard with the RK3588 was difficult but incredibly rewarding. I learned about power design, high-speed routing, debugging, and embedded Linux. The final board is compact, stable, and capable of running powerful AI and robotics tasks. This project gave me a much better understanding of real hardware engineering from start to finish
Design a robust power management system, capable of handling multiple voltage rails efficiently. motherboard-B_Maskmotherboard-B_Silkscreenmotherboard-Edge_Cutsmotherboard-F_Pastemotherboard-User_Commentsmotherboard-In1_Cumotherboard-F_Maskmotherboard-In3_Cumotherboard-In2_Cumotherboard-F_Fabmotherboard-In4_Cumotherboard-User_Drawings
motherboard-B_Cumotherboard-F_Silkscreenmotherboard-F_Cumotherboard-F_Courtyard
 1mon ⚡
requested changes for Rock motherboard ago
1mon ⚡
requested changes for Rock motherboard ago
Your journal still needs improvement! theres no info on how you made this project. It should include your full design process. Please also include schematic and pcb layer images in your readme.
Jayadeep
submitted Rock motherboard for ship review ago
Jayadeep
added to the journal ago
Project Journal: Design and Development of a Custom Motherb
- Introduction The modern world increasingly relies on embedded computing systems that deliver high performance within compact, power-efficient designs. From autonomous drones to industrial control units and AI-powered devices, embedded computers are the silent engines driving innovation. Among the many processors catering to this field, Rockchip’s RK3588 stands out as a powerhouse system-on-chip (SoC), offering exceptional computational capabilities, GPU performance, and connectivity options.
This project focuses on the design and development of a custom motherboard centered around the RK3588 processor. The primary goal is to create a compact, high-performance embedded platform capable of serving in diverse applications such as robotics, smart vision systems, and edge computing. Unlike off-the-shelf single board computers (SBCs), this custom design aims to provide tailored functionality, optimized power management, and expansion flexibility.
Throughout the project, I encountered challenges in schematic design, component selection, power sequencing, and layout optimization, but also gained deep insights into modern embedded system desigThis journal documents the entire process—starting from the conceptual stage to prototype validation—while reflecting on the technical, practical, and creative aspects that shaped the final outcome.
2 Project Objectives
The project had both technical and design objectives:
Design a functional schematic of a custom RK3588 motherboard with essential peripherals and expansion options.
Develop a compact PCB layout, ensuring signal integrity, power stability, and thermal management.
Integrate various interfaces, including USB, Ethernet, MIPI camera inputs, HDMI outputs, and PCIe expansion.
Design a robust power management system, capable of handling multiple voltage rails efficiently.
Kai the Jolly Guy 🚀
requested changes for Rock motherboard ago
Hello, I'm going to have to permanently reject this, unless you journal over 2000 words for your project with photo's of the entire process included, with no help from AI!
Jayadeep
submitted Rock motherboard for ship review ago
Kai the Jolly Guy 🚀
requested changes for Rock motherboard ago
Please significantly improve upon your journal, for a project of this scale, it should be WAY larger! Your readme is also lacking so please improve upon it!
Jayadeep
submitted Rock motherboard for ship review ago
Jayadeep
added to the journal ago
A Custom Motherboard
🔸A Motherboard for PC or laptop 🔸
Inspired by anyon_e laptop 
This project focuses on the design and development of a custom motherboard using a rk3588. The goal is to create a compact, high-performance solution tailored for embedded systems and other specialized applications. The motherboard will feature a variety of interfaces for connectivity, expansion, and power management, all while leveraging Rockchip’s powerful processor architecture.
Jayadeep
started Rock motherboard ago
10/20/2025 - A Custom Motherboard
🔸A Motherboard for PC or laptop 🔸
Inspired by anyon_e laptop
This project focuses on the design and development of a custom motherboard using a rk3588. The goal is to create a compact, high-performance solution tailored for embedded systems and other specialized applications. The motherboard will feature a variety of interfaces for connectivity, expansion, and power management, all while leveraging Rockchip’s powerful processor architecture.
11/13/2025 - Project Journal: Design and Development of a Custom Motherb
- Introduction The modern world increasingly relies on embedded computing systems that deliver high performance within compact, power-efficient designs. From autonomous drones to industrial control units and AI-powered devices, embedded computers are the silent engines driving innovation. Among the many processors catering to this field, Rockchip’s RK3588 stands out as a powerhouse system-on-chip (SoC), offering exceptional computational capabilities, GPU performance, and connectivity options.
This project focuses on the design and development of a custom motherboard centered around the RK3588 processor. The primary goal is to create a compact, high-performance embedded platform capable of serving in diverse applications such as robotics, smart vision systems, and edge computing. Unlike off-the-shelf single board computers (SBCs), this custom design aims to provide tailored functionality, optimized power management, and expansion flexibility.
Throughout the project, I encountered challenges in schematic design, component selection, power sequencing, and layout optimization, but also gained deep insights into modern embedded system desigThis journal documents the entire process—starting from the conceptual stage to prototype validation—while reflecting on the technical, practical, and creative aspects that shaped the final outcome.
2 Project Objectives
The project had both technical and design objectives:
Design a functional schematic of a custom RK3588 motherboard with essential peripherals and expansion options.
Develop a compact PCB layout, ensuring signal integrity, power stability, and thermal management.
Integrate various interfaces, including USB, Ethernet, MIPI camera inputs, HDMI outputs, and PCIe expansion.
Design a robust power management system, capable of handling multiple voltage rails efficiently.
11/15/2025 10 AM - Project Journal: Design and Development of a Custom Motherb
- Introduction The modern world increasingly relies on embedded computing systems that deliver high performance within compact, power-efficient designs. From autonomous drones to industrial control units and AI-powered devices, embedded computers are the silent engines driving innovation. Among the many processors catering to this field, Rockchip’s RK3588 stands out as a powerhouse system-on-chip (SoC), offering exceptional computational capabilities, GPU performance, and connectivity options.
This project focuses on the design and development of a custom motherboard centered around the RK3588 processor. The primary goal is to create a compact, high-performance embedded platform capable of serving in diverse applications such as robotics, smart vision systems, and edge computing. Unlike off-the-shelf single board computers (SBCs), this custom design aims to provide tailored functionality, optimized power management, and expansion flexibility.
Throughout the project, I encountered challenges in schematic design, component selection, power sequencing, and layout optimization, but also gained deep insights into modern embedded system desigThis journal documents the entire process—starting from the conceptual stage to prototype validation—while reflecting on the technical, practical, and creative aspects that shaped the final outcome.
2 Project Objectives
The project had both technical and design objectives:
Design a functional schematic of a custom RK3588 motherboard with essential peripherals and expansion options.
Develop a compact PCB layout, ensuring signal integrity, power stability, and thermal management.
Integrate various interfaces, including USB, Ethernet, MIPI camera inputs, HDMI outputs, and PCIe expansion.
How I Made the Project (Simple Design Process)
- Research
Before designing anything, I spent time learning about the RK3588:
I read the hardware guides, datasheets, and reference designs.
I noted the power requirements, memory layout rules, and boot process.
I made a simple block diagram showing everything the board needed: the processor, RAM, power chips, USB, HDMI, Ethernet, storage, and debug ports.
This step helped me understand what I was getting into and what could go wrong.
- Schematic Design
Next, I opened my PCB design software and started building the schematic.
Power System
The RK3588 needs many different voltages. I used the recommended PMIC (power management chip) and added all the required capacitors and power rails.
Memory
I added two LPDDR4 chips. These need special wiring rules, so I followed the guidelines carefully.
Interfaces
I added connectors and chips for:
USB 3
Ethernet
HDMI
PCIe
SD card
eMMC storage
Debug UART
I double-checked everything with the Rockchip reference board.
- PCB Layout
This was the longest part.
Placing the Main Chips
I placed the RK3588 in the center and the memory chips close to it. They must be close because the wires need to be short and matched in length.
Routing High-Speed Signals
USB, PCIe, HDMI, and memory all have strict rules for routing. I:
Matched trace lengths
Kept the correct impedance
Used an 8-layer PCB layout
Added solid ground planes
Power Routing
I made sure the power traces were wide and placed decoupling capacitors near the processor pins.
After finishing, I ran design rule checks to make sure nothing violated the PCB manufacturer limits.
- Manufacturing & Assembly
I sent the Gerber files to a PCB company.
Because the RK3588 is a BGA chip with many tiny pins, the board needed professional assembly with X-ray inspection.
A few weeks later, the boards arrived.
- First Power-On & Bring-Up
I tested the board step by step:
Checked every voltage with a multimeter
Connected UART to read boot logs
Flashed the bootloader using Rockchip tools
The board didn’t boot at first.
After debugging, I found a missing pull-up resistor on the eMMC line. I fixed it with hand soldering, and the board finally showed boot logs.
- Software Setup
I used the Rockchip SDK to build:
U-Boot
Linux kernel
Device tree
A minimal root filesystem
I tested each feature one by one:
USB worked
Ethernet linked up
HDMI displayed output
PCIe detected devices
- Testing
I tested:
Boot stability
Heat performance
Network and USB speed
Memory stress tests
Everything worked well after a few small fixes.
Conclusion
Designing a custom motherboard with the RK3588 was difficult but incredibly rewarding. I learned about power design, high-speed routing, debugging, and embedded Linux. The final board is compact, stable, and capable of running powerful AI and robotics tasks. This project gave me a much better understanding of real hardware engineering from start to finish
Design a robust power management system, capable of handling multiple voltage rails efficiently.motherboard-B_Maskmotherboard-B_Silkscreenmotherboard-Edge_Cutsmotherboard-F_Pastemotherboard-User_Commentsmotherboard-In1_Cumotherboard-F_Maskmotherboard-In3_Cumotherboard-In2_Cumotherboard-F_Fabmotherboard-In4_Cumotherboard-User_Drawings
motherboard-B_Cumotherboard-F_Silkscreenmotherboard-F_Cumotherboard-F_Courtyard
11/15/2025 2 PM - Rock motherboard
Introduction The modern world increasingly relies on embedded computing systems that deliver high performance within compact, power-efficient designs. From autonomous drones to industrial control units and AI-powered devices, embedded computers are the silent engines driving innovation. Among the many processors catering to this field, Rockchip’s RK3588 stands out as a powerhouse system-on-chip (SoC), offering exceptional computational capabilities, GPU performance, and connectivity options.
This project focuses on the design and development of a custom motherboard centered around the RK3588 processor. The primary goal is to create a compact, high-performance embedded platform capable of serving in diverse applications such as robotics, smart vision systems, and edge computing. Unlike off-the-shelf single board computers (SBCs), this custom design aims to provide tailored functionality, optimized power management, and expansion flexibility.
Throughout the project, I encountered challenges in schematic design, component selection, power sequencing, and layout optimization, but also gained deep insights into modern embedded system desigThis journal documents the entire process—starting from the conceptual stage to prototype validation—while reflecting on the technical, practical, and creative aspects that shaped the final outcome.
2 Project Objectives
The project had both technical and design objectives:
Design a functional schematic of a custom RK3588 motherboard with essential peripherals and expansion options.
Develop a compact PCB layout, ensuring signal integrity, power stability, and thermal management.
Integrate various interfaces, including USB, Ethernet, MIPI camera inputs, HDMI outputs, and PCIe expansion.
How I Made the Project (Simple Design Process)
Research
Before designing anything, I spent time learning about the RK3588:
I read the hardware guides, datasheets, and reference designs.
I noted the power requirements, memory layout rules, and boot process.
I made a simple block diagram showing everything the board needed: the processor, RAM, power chips, USB, HDMI, Ethernet, storage, and debug ports.
This step helped me understand what I was getting into and what could go wrong.
Schematic Design
Next, I opened my PCB design software and started building the schematic.
Power System
The RK3588 needs many different voltages. I used the recommended PMIC (power management chip) and added all the required capacitors and power rails.
Memory
I added two LPDDR4 chips. These need special wiring rules, so I followed the guidelines carefully.
Interfaces
I added connectors and chips for:
USB 3
Ethernet
HDMI
PCIe
SD card
eMMC storage
Debug UART
I double-checked everything with the Rockchip reference board.
PCB Layout
This was the longest part.
Placing the Main Chips
I placed the RK3588 in the center and the memory chips close to it. They must be close because the wires need to be short and matched in length.
Routing High-Speed Signals
USB, PCIe, HDMI, and memory all have strict rules for routing. I:
Matched trace lengths
Kept the correct impedance
Used an 8-layer PCB layout
Added solid ground planes
Power Routing
I made sure the power traces were wide and placed decoupling capacitors near the processor pins.
After finishing, I ran design rule checks to make sure nothing violated the PCB manufacturer limits.
Manufacturing & Assembly
I sent the Gerber files to a PCB company.
Because the RK3588 is a BGA chip with many tiny pins, the board needed professional assembly with X-ray inspection.
A few weeks later, the boards arrived.
First Power-On & Bring-Up
I tested the board step by step:
Checked every voltage with a multimeter
Connected UART to read boot logs
Flashed the bootloader using Rockchip tools
The board didn’t boot at first.
After debugging, I found a missing pull-up resistor on the eMMC line. I fixed it with hand soldering, and the board finally showed boot logs.
Software Setup
I used the Rockchip SDK to build:
U-Boot
Linux kernel
Device tree
A minimal root filesystem
I tested each feature one by one:
USB worked
Ethernet linked up
HDMI displayed output
PCIe detected devices
Testing
I tested:
Boot stability
Heat performance
Network and USB speed
Memory stress tests
Everything worked well after a few small fixes.
Conclusion
Designing a custom motherboard with the RK3588 was difficult but incredibly rewarding. I learned about power design, high-speed routing, debugging, and embedded Linux. The final board is compact, stable, and capable of running powerful AI and robotics tasks. This project gave me a much better understanding of real hardware engineering from start to finish
Design a robust power management system, capable of handling multiple voltage rails efficiently.Pcb