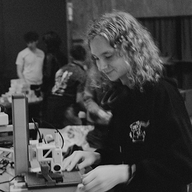
animaltrackr
A primarily 3d-printed turret capable of tracking, taking pictures of, and (eventually) identifying passing wildlife. Also has a watergun feature for anti bird/cat poop feature. Features: - 360 degree yaw/20ish degree pitch movement of the water squirter/camera - Motion tracking - Day/night picture taking - Water gun for deterrence - LCD menu controlled by two buttons/joystick - Motion detection through PIR sensor - *Theoretically* self-sufficient given enough sun *Note about cart - The BOM lists the regular non-discounted prices of the items *Note about hours: This was essentially my first major project in Onshape, so the whole process likely took me a lot more time than what someone already proficient in Onshape would take. There isn't a PCB; Everything is planned just to be wired with wires
Created by
 apinguen
Tier 3
45 views
0 followers
 CAN ⚡🚀
approved animaltrackr ago
CAN ⚡🚀
approved animaltrackr ago
Tier approved: 3
Grant approved: $93.00
Nice project
apinguen
submitted animaltrackr for ship review ago
 Shaurya Bisht
requested changes for animaltrackr ago
Shaurya Bisht
requested changes for animaltrackr ago
Needs screenshot of PCB wired from kicad in readme
apinguen
submitted animaltrackr for ship review ago
 1mon ⚡
requested changes for animaltrackr ago
1mon ⚡
requested changes for animaltrackr ago
do you need such an expensive camera? half the cost of the project is coming from that, maybe consider something cheaper.
apinguen
submitted animaltrackr for ship review ago
apinguen
added to the journal ago
Wiring Schematic
First time using KiCAD
It was...an interesting learning experience.
Wasn't too bad of a struggle to figure out (even with not bothering to learn too much before diving in) but it worked out kinda fine in the end
And I also discovered Ultra Librarian and SnapMagic, who did not end up having the parts I needed


at this point I don't really care if its ai generated; a cat's a cat
 Kai the Jolly Guy 🚀
requested changes for animaltrackr ago
Kai the Jolly Guy 🚀
requested changes for animaltrackr ago
Sick project (and I love the cat photo's) :D Could you please add some photo's of the interior aspects of your turret and also include a wiring diagram showing how all the electronics will be wired!
apinguen
submitted animaltrackr for ship review ago
Shaurya Bisht
requested changes for animaltrackr ago
Need to have screenshots of CAD and any schematics or anything in README
apinguen
added to the journal ago
CAD renders


  \    /\
   )  ( ')
  (  /  )
   \(__)|
mewo
ฅ^•ﻌ•^ฅ
≽^•⩊•^≼
^. .^₎⟆
meowwwwwwwwwwwwwwwwwwwwwwwwwwwwwwwwwwwwwwwwwwwwwwwwwwwwwwwwwwwwwwwwwwwwwwwwwwwwwwwwwwwwwwwwwwwwwww
apinguen
added to the journal ago
Cool Blender render

Blenderrrrrrrrrrrrrrrrrrrrrrrrrrrrrrrrrrrrrrrrrrrrrrrrrrrrrrrrrrrrrrrrrrrrrrrrrrrrrrrrrrrrrrrrrrrrrrrrrrrrrrrrrrrrrrrrr (150 char min) (ミ⚈ᆽ⚈ミ)/ (o_o)
apinguen
submitted animaltrackr for ship review ago
apinguen
added to the journal ago
Code time! And basically finished project I think
Code!!!
Not really sure what to put for a picture so

I have a completish thing that I can run on the Pi once I assemble everything, though obviously, there will probably be some errors.
The core of the code is a state machine for 4 modes at the moment:
Default: Does nothing
Picture: Wakes Pi when motion; Uses camera to move turret towards the motion and takes a picture
Turret: Slowly moves turret side to side; When motion is detected, aim towards the motion and shoot water
Picture + Turret: Essentially turret but also takes pictures
The overall architecture of the software is mainly just the main state machine, a state machine for the menu, and helper functions/apis for the hardware in other files.
Some other stuff like tests for all the components and LED feedback
AI was used for parts of the code since I don't really have much experience with Python/Pis in general

Also yay hackatime exists for code so I can have precise hours tracked
Time for BOM
apinguen
added to the journal ago
Add stuff to repository
Got sidetracked instead of starting to write code
For some reason I never made a local folder for this project yet, so I made one right now. I then realized I had no idea how to push files to Github normally, so I ended up doing it through VS code.

apinguen
added to the journal ago
CAD done!! (at least for now...)


Finished the control panel and did some fixing up of the features and stuff
The CAD is finally pretty much done - all the features I intended have been completed and I'm happy with the overall look.
Now it's just time to get the BOM done and tentative software done.
Sighh now time to learn how to program a Pi.

mmm adobe stock photos :pp
apinguen
added to the journal ago
It was not fixed | Control Panel
Sooo it turns out that there was deeper issues with the internal gears, placement of the servos, etc. I spent a while on that and eventually got it fixed to the point where it looked like how it was intended to look.
I figured that I would need some way to actually control the turret itself, so I added on a control panel. Originally I planned just to add 4 switches and an LCD screen for it, but I realized you wouldn't be able to navigate a menu of any kind with just 4 on/off switches, so I'm currently in the process of adding a joystick and two pushbuttons to it. And a power switch somewhere for the Pi.


gamer cat
apinguen
added to the journal ago
Why is everything dying...
I tried to hollow out the lid to add space for wiring
It should be simple, right?

The whole design kinda blew up, so I had to go through everything and fix references
Whichhhhh probably could have been averted with better CAD practices butttt its a learning experience
I guess this is what happens when you do stuff as you go
Its intact now at least after some restructuring/redoing the turntable and base stuff.


BREAKING NEWS: A GIANT MONSTER HAS BEEN SPOTTED TERRORIZING LEGO CITY
apinguen
added to the journal ago
Motion Sensor and IR Lights
As you can see in the last entry I added on a mount for a PIR motion sensor. It's a bit exposed but I'm planning to cover it with plastic wrap (some people on the SmartThings forums said it was a good and budget friendly idea) for weather protection.

For some reason it took me an hour to add this. Again, my Onshape skills are not great.
I also discovered that the sketch of my base was a bit off so I had to work through a bunch of constraint problems trying to fix that.
It turns out there's more than just slapping on a board of IR lights for the night vision; It took a while to find one with the right specifications, optimal wavelength, etc to use. After that, I just need to mount an LCD screen somewhere, add some LEDs to the turret, and some switches. Should be easy.........

stuff of nightmares
apinguen
added to the journal ago
Lofts

I have finally found a use for the loft feature in my project
Also kinda convoluted wiring tunnel/passage/whatever you call it, but we'll see if it actually works later
The hours I've spent working on the project since the last entry will be added in the next journal entry
apinguen
added to the journal ago
Starting to get closer to the end of CAD (hopefully?)
Struggling with the use command to copy dimensions of stuff onto sketches.
Eventually found a super cool featurescript to do a similar thing.
Random problems with constraints that I have no idea why happen
Other random problems I ran into:
- You'll see that between this entry and the last, the gear side of the turret is different-this was because I mixed up the two sides and yeah..
- The pivot point needed to be moved up 3 cm in order to have a full range of motion... which was painful
- I realized that the whole design was about 4x too big, especially for a 3d printer, so I scaled everything down by that, which came with a whole bunch of other problems and a lot of manually changing dimensions since it didn't seem like there was another good alternative
The CAD is coming along.. it looks like something now.


I've mostly just been getting everything to fit together - encasing the water squirter and camera, getting a pi mount, etc.
Stuff I still need to add:
- IR lights for night vision
- Some kind of switch to have some control over the turret/its power supply
- LEDs for feedback would be cool; I also have a small LCD screen that I can maybe use??
- Aesthetics
After that I'll write some base code, and then the project should be ready to ship
Lesson of the day: fillets are amazing and make every edge look better (most of the time :) )!!

cats also like fillets
apinguen
added to the journal ago
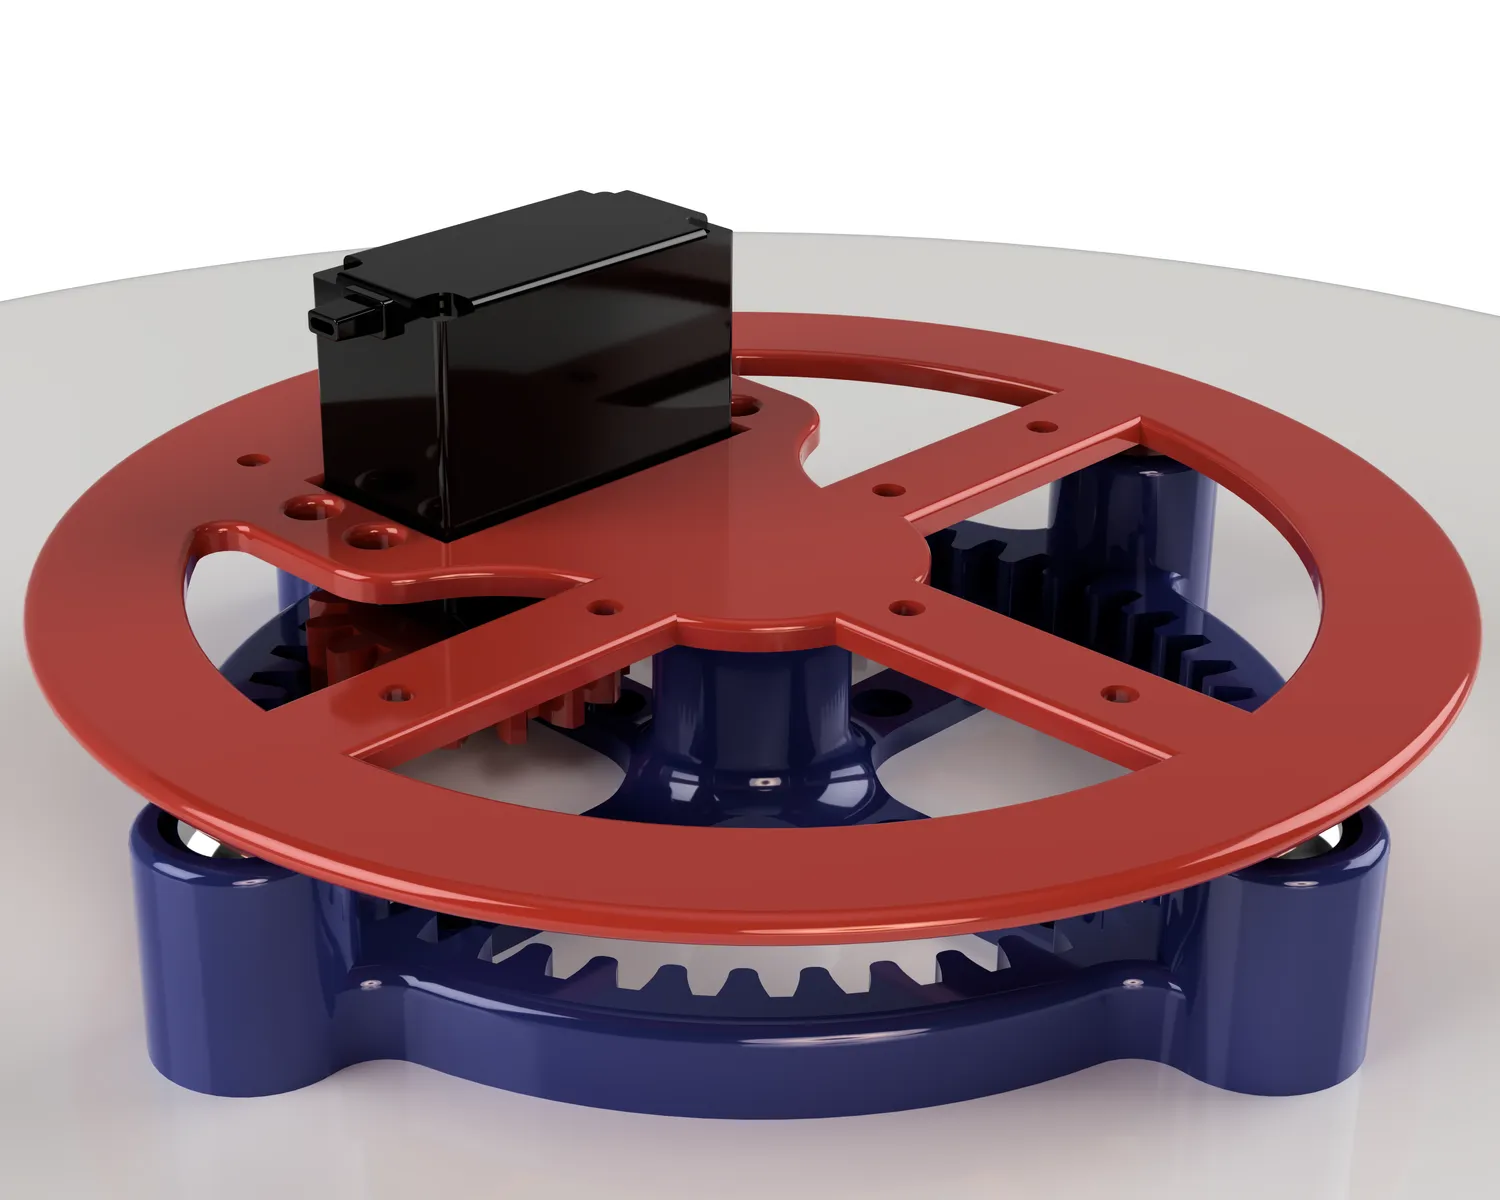
Working on Turret
Some progress on the turret!
Mostly just getting a layout of the components and getting everything fitting together. I'll be using a large stationary inner gear with a bearing in the middle and a smaller servo gear (attached to moving part) for the up and down motion of the turret.


elephant kinda like a turret. kinda..... see the resemblance? no? ok fine
apinguen
added to the journal ago
Spinny gear!!
.gif)
That took too long
A bunch of mate shenanigans and research
Two revolute mates on the turn table -> base and gear -> turn table
Gear relation between them
apinguen
added to the journal ago
Almost done with turntable
Worked on turntable.
Learned a lot about mates in the process
and discovered the magic of "use" in sketches (before I was manually copying the dimensions of the servo)
and figuring out to integrate a bearing.
Next step is to finally finish the servo mount and start working on mounting everything else/the other degree of freedom for the turret.


This CAD thing is so much more time-consuming than I thought it'd be...
apinguen
added to the journal ago
Working on the turn table
I'd like to say the CAD went smoothly from earlier, but sad to say, it did not. It took me a while to manage all the different layers of features and modifiers until I came upon this:

The ridge is for the ball bearings I'll be putting in the final product.
I don't know why it took me so long, it probably shouldn't have, but it did.


Seal pic this time
apinguen
added to the journal ago
Starting CAD!
I started with CADding the base of the turret. It should theoretically be simple and quick, since it's mostly just a box, but that's assuming you have experience CADding, which I do not.
It took me about 1.5 hours of struggling and Google to achieve this result:

It won't win any awards, but it looks okay I guess.
After trying to figure out the best way to integrate the hardware into the design, it seems like keeping everything in the moving part (turret) will be the easiest way to avoid wiring issues and somewhat waterproof the whole design. I found this cool turntable off of Printables that I'll be using for inspiration.
nerfturntable2023-jun-0905-43-46am-000customizedview15298840655_png.webp

apinguen
added to the journal ago
More hardware research
So apparently it's a pain to connect two cameras to a Pi Zero.

This thing, to connect 4 cameras (the two camera one was discontinued), is almost $60. Yay.
Originally I was planning to get another Pi Zero and use that, but the cost of everything is adding up to a lot, and I went back to one of the other ideas I had - using a NOIR camera with an IR filter that can be toggled on and off. Eventually I was able to find a camera with a motorized IR cut filter for a reasonable amount.
This is my first time doing a full scale hardware project, so it took me a while to figure out things that might be considered simple, like how to go about controlling a servo with a Pi. Initially I thought things like a servo controller to run servos, but then I learned that you can just connect it directly. It's that simple.
I also happened to have a motion sensor at home, so I'll be implementing that to conserve battery life.
The next step is to get initial CAD done, and while I have worked with Onshape before, I only have around a beginner level experience, so it'll definitely be a learning experience.

meow.
apinguen
added to the journal ago
Going down the rabbit hole of hardware
It's been certainly a journey looking through what hardware to use...
With some research/consulting AI, it seems feasible to use a Pi Zero for the main processing, which is also a lot cheaper than the alternative of a full Pi. Though there will be some latency for the processing, a few seconds to identify the animal should be quick enough.
For the water spraying function, I looked over many different pumps and sprayers to find a cheap option. Interestingly, the water gun kit that Bambu Labs sells was relatively cheap compared to other options, and its reliability can be confirmed online, as opposed to sketchy ones on Ali Express. It also beats having to buy a full water gun and then disassemble it. The kit, for only 10.99, also comes with a battery so I don't have to run it on the Pi's power.
Cameras
A lot of resources online used the Raspberry Pi AI Camera, which can essentially run detection models on the camera itself, so the Pi itself doesn't have to do that work. It's just a litteee pricey at upwards of $70 a unit.
I then looked into the normal Pi Camera Module 3s, which seemed more budget friendly while promising the high quality needed for the capture and detection of animals. After a while of searching and reading Reddit about how IR filters work with cameras, if I was to have both night and day animal detecting capabilities, those wouldn't work.
Arducams were another option I considered, with motorized IR-CUT filters to automatically switch between day and night modes, but they lacked the quality needed for MegaDetector, in addition to the lack of many other essential features like autofocus. A similar option was available through PiHut, but again, it lacked the capabilities required.
As of right now, it seems that using two cameras, one with IR and one without might work the best.


ฅ^•ﻌ•^ฅ
apinguen
added to the journal ago
Research
Now that the initial ideas are done, I've been researching a lot since I'm new to a lot of this stuff-electronics in general, CADding something from scratch in Onshape, working with Raspberry Pis/Arduinos, etc.
Some stuff I came across:
Turret inspirations
This super cool 3d-printed watergun turret

A remake of the turret from Mark Rober's Hack Pack

Mini ball turret for model B-17

Animal Classification
I plan to use MegaDetector, a model trained on camera trap images and already in use by many organizations that track animals, so it should be perfect for the job. However, it only recognizes animals, and classification will be done by CameraTrapAI, AI models trained specifically for camera traps.
Hardware
- Servos will be used for the turret motion
- Processing will likely done with a Raspberry Pi, unless an Orange Pi is necessary for the image processing
- I already have an Arduino at home, so I'll see if I can maybe integrate that into the design
Resources I found for trail/trap cameras with a Raspberry Pi:
https://pestpunch.com/raspberry-pi-pest-camera-trap/
https://projects-raspberry.com/trail-camera/
https://projects-raspberry.com/whats-destroying-my-yard-pest-detection-with-raspberry-pi/

Yet another cat picture :)
apinguen
added to the journal ago
The Plan
Note that every effort possible will be made to ensure that cats/other animals are not harmed, just discouraged from pooping on the lawn. I love animals and don't want to hurt them; This project is not meant to do that.
General Capabilities/Features
Should be able to:
- Mechanism placed on a turret base capable of moving in all directions
- Have two cameras, one for day and one for night
- Night vision
- Motion detection of some sort to only turn the camera on when needed, saving battery
- Options for direct and battery power
- Store photos locally
- Water gun feature
- Ability to classify animals in real time
It would be cool if it:
- Solar-powered to make it self-sustaining or at the very least extend the battery life
- Water/weatherproof
- Detect humans ;)
- Automatically upload photos to another computer through wifi
- It could point towards cats
- Some sort of algorithm to only target cats on the lawn
- Image processing can be done locally on the device instead of an external computer

Another cat picture
apinguen
added to the journal ago
Origin of Idea
For around a year now, I've had the idea to build some sort of device to repel cats from my front lawn. In my neighborhood, there are people who let their cats simply roam around, so there often ends up being cat on the lawn. Of course, something like motion-activated sprinklers are a thing, but where's the fun in that? An idea that I've had in the back of my mind was to create a turret-like device to detect cats using some sort of AI image recognition and spray some water at them to make them not poop on the lawn.
After finding out about Blueprint, this seemed like the perfect opportunity to finally design this, where I would able to potentially get funding for the parts needed. While looking at AI datasets and methods for cat detection, I came across animal datasets that are traditionally used for the classification of wildlife captured on wildlife cameras. I figured that since I was already planning to build a setup that was essentially like a wildlife camera, why not give it that capability?!

Cat picture for your enjoyment
apinguen
started animaltrackr ago
10/22/2025 9 AM - Origin of Idea
For around a year now, I've had the idea to build some sort of device to repel cats from my front lawn. In my neighborhood, there are people who let their cats simply roam around, so there often ends up being cat on the lawn. Of course, something like motion-activated sprinklers are a thing, but where's the fun in that? An idea that I've had in the back of my mind was to create a turret-like device to detect cats using some sort of AI image recognition and spray some water at them to make them not poop on the lawn.
After finding out about Blueprint, this seemed like the perfect opportunity to finally design this, where I would able to potentially get funding for the parts needed. While looking at AI datasets and methods for cat detection, I came across animal datasets that are traditionally used for the classification of wildlife captured on wildlife cameras. I figured that since I was already planning to build a setup that was essentially like a wildlife camera, why not give it that capability?!
Cat picture for your enjoyment
10/22/2025 10 AM - The Plan
Note that every effort possible will be made to ensure that cats/other animals are not harmed, just discouraged from pooping on the lawn. I love animals and don't want to hurt them; This project is not meant to do that.
General Capabilities/Features
Should be able to:
- Mechanism placed on a turret base capable of moving in all directions
- Have two cameras, one for day and one for night
- Night vision
- Motion detection of some sort to only turn the camera on when needed, saving battery
- Options for direct and battery power
- Store photos locally
- Water gun feature
- Ability to classify animals in real time
It would be cool if it:
- Solar-powered to make it self-sustaining or at the very least extend the battery life
- Water/weatherproof
- Detect humans ;)
- Automatically upload photos to another computer through wifi
- It could point towards cats
- Some sort of algorithm to only target cats on the lawn
- Image processing can be done locally on the device instead of an external computer
Another cat picture
10/22/2025 1 PM - Research
Now that the initial ideas are done, I've been researching a lot since I'm new to a lot of this stuff-electronics in general, CADding something from scratch in Onshape, working with Raspberry Pis/Arduinos, etc.
Some stuff I came across:
Turret inspirations
This super cool 3d-printed watergun turret
A remake of the turret from Mark Rober's Hack Pack
Mini ball turret for model B-17
Animal Classification
I plan to use MegaDetector, a model trained on camera trap images and already in use by many organizations that track animals, so it should be perfect for the job. However, it only recognizes animals, and classification will be done by CameraTrapAI, AI models trained specifically for camera traps.
Hardware
- Servos will be used for the turret motion
- Processing will likely done with a Raspberry Pi, unless an Orange Pi is necessary for the image processing
- I already have an Arduino at home, so I'll see if I can maybe integrate that into the design
Resources I found for trail/trap cameras with a Raspberry Pi:
https://pestpunch.com/raspberry-pi-pest-camera-trap/
https://projects-raspberry.com/trail-camera/
https://projects-raspberry.com/whats-destroying-my-yard-pest-detection-with-raspberry-pi/
Yet another cat picture :)
10/22/2025 7 PM - Going down the rabbit hole of hardware
It's been certainly a journey looking through what hardware to use...
With some research/consulting AI, it seems feasible to use a Pi Zero for the main processing, which is also a lot cheaper than the alternative of a full Pi. Though there will be some latency for the processing, a few seconds to identify the animal should be quick enough.
For the water spraying function, I looked over many different pumps and sprayers to find a cheap option. Interestingly, the water gun kit that Bambu Labs sells was relatively cheap compared to other options, and its reliability can be confirmed online, as opposed to sketchy ones on Ali Express. It also beats having to buy a full water gun and then disassemble it. The kit, for only 10.99, also comes with a battery so I don't have to run it on the Pi's power.
Cameras
A lot of resources online used the Raspberry Pi AI Camera, which can essentially run detection models on the camera itself, so the Pi itself doesn't have to do that work. It's just a litteee pricey at upwards of $70 a unit.
I then looked into the normal Pi Camera Module 3s, which seemed more budget friendly while promising the high quality needed for the capture and detection of animals. After a while of searching and reading Reddit about how IR filters work with cameras, if I was to have both night and day animal detecting capabilities, those wouldn't work.
Arducams were another option I considered, with motorized IR-CUT filters to automatically switch between day and night modes, but they lacked the quality needed for MegaDetector, in addition to the lack of many other essential features like autofocus. A similar option was available through PiHut, but again, it lacked the capabilities required.
As of right now, it seems that using two cameras, one with IR and one without might work the best.
ฅ^•ﻌ•^ฅ
10/23/2025 7 AM - More hardware research
So apparently it's a pain to connect two cameras to a Pi Zero.
This thing, to connect 4 cameras (the two camera one was discontinued), is almost $60. Yay.
Originally I was planning to get another Pi Zero and use that, but the cost of everything is adding up to a lot, and I went back to one of the other ideas I had - using a NOIR camera with an IR filter that can be toggled on and off. Eventually I was able to find a camera with a motorized IR cut filter for a reasonable amount.
This is my first time doing a full scale hardware project, so it took me a while to figure out things that might be considered simple, like how to go about controlling a servo with a Pi. Initially I thought things like a servo controller to run servos, but then I learned that you can just connect it directly. It's that simple.
I also happened to have a motion sensor at home, so I'll be implementing that to conserve battery life.
The next step is to get initial CAD done, and while I have worked with Onshape before, I only have around a beginner level experience, so it'll definitely be a learning experience.
meow.
10/23/2025 5 PM - Starting CAD!
I started with CADding the base of the turret. It should theoretically be simple and quick, since it's mostly just a box, but that's assuming you have experience CADding, which I do not.
It took me about 1.5 hours of struggling and Google to achieve this result:
It won't win any awards, but it looks okay I guess.
After trying to figure out the best way to integrate the hardware into the design, it seems like keeping everything in the moving part (turret) will be the easiest way to avoid wiring issues and somewhat waterproof the whole design. I found this cool turntable off of Printables that I'll be using for inspiration.
nerfturntable2023-jun-0905-43-46am-000customizedview15298840655_png.webp
10/24/2025 - Working on the turn table
I'd like to say the CAD went smoothly from earlier, but sad to say, it did not. It took me a while to manage all the different layers of features and modifiers until I came upon this:
The ridge is for the ball bearings I'll be putting in the final product.
I don't know why it took me so long, it probably shouldn't have, but it did.
Seal pic this time
10/25/2025 8 PM - Almost done with turntable
Worked on turntable.
Learned a lot about mates in the process
and discovered the magic of "use" in sketches (before I was manually copying the dimensions of the servo)
and figuring out to integrate a bearing.
Next step is to finally finish the servo mount and start working on mounting everything else/the other degree of freedom for the turret.
This CAD thing is so much more time-consuming than I thought it'd be...
10/25/2025 10 PM - Spinny gear!!
That took too long
A bunch of mate shenanigans and research
Two revolute mates on the turn table -> base and gear -> turn table
Gear relation between them

Music to go along with it for your pleasure :))
11/3/2025 - Working on Turret
Some progress on the turret!
Mostly just getting a layout of the components and getting everything fitting together. I'll be using a large stationary inner gear with a bearing in the middle and a smaller servo gear (attached to moving part) for the up and down motion of the turret.
elephant kinda like a turret. kinda..... see the resemblance? no? ok fine
11/5/2025 - Starting to get closer to the end of CAD (hopefully?)
Struggling with the use command to copy dimensions of stuff onto sketches.
Eventually found a super cool featurescript to do a similar thing.
Random problems with constraints that I have no idea why happen
Other random problems I ran into:
- You'll see that between this entry and the last, the gear side of the turret is different-this was because I mixed up the two sides and yeah..
- The pivot point needed to be moved up 3 cm in order to have a full range of motion... which was painful
- I realized that the whole design was about 4x too big, especially for a 3d printer, so I scaled everything down by that, which came with a whole bunch of other problems and a lot of manually changing dimensions since it didn't seem like there was another good alternative
The CAD is coming along.. it looks like something now.
I've mostly just been getting everything to fit together - encasing the water squirter and camera, getting a pi mount, etc.
Stuff I still need to add:
- IR lights for night vision
- Some kind of switch to have some control over the turret/its power supply
- LEDs for feedback would be cool; I also have a small LCD screen that I can maybe use??
- Aesthetics
After that I'll write some base code, and then the project should be ready to ship
Lesson of the day: fillets are amazing and make every edge look better (most of the time :) )!!
cats also like fillets
11/7/2025 8 PM - Lofts
I have finally found a use for the loft feature in my project
Also kinda convoluted wiring tunnel/passage/whatever you call it, but we'll see if it actually works later
The hours I've spent working on the project since the last entry will be added in the next journal entry
11/7/2025 10 PM - Motion Sensor and IR Lights
As you can see in the last entry I added on a mount for a PIR motion sensor. It's a bit exposed but I'm planning to cover it with plastic wrap (some people on the SmartThings forums said it was a good and budget friendly idea) for weather protection.
For some reason it took me an hour to add this. Again, my Onshape skills are not great.
I also discovered that the sketch of my base was a bit off so I had to work through a bunch of constraint problems trying to fix that.
It turns out there's more than just slapping on a board of IR lights for the night vision; It took a while to find one with the right specifications, optimal wavelength, etc to use. After that, I just need to mount an LCD screen somewhere, add some LEDs to the turret, and some switches. Should be easy.........
stuff of nightmares
11/12/2025 - Why is everything dying...
I tried to hollow out the lid to add space for wiring
It should be simple, right?
The whole design kinda blew up, so I had to go through everything and fix references
Whichhhhh probably could have been averted with better CAD practices butttt its a learning experience
I guess this is what happens when you do stuff as you go
Its intact now at least after some restructuring/redoing the turntable and base stuff.
BREAKING NEWS: A GIANT MONSTER HAS BEEN SPOTTED TERRORIZING LEGO CITY
11/17/2025 - It was not fixed | Control Panel
Sooo it turns out that there was deeper issues with the internal gears, placement of the servos, etc. I spent a while on that and eventually got it fixed to the point where it looked like how it was intended to look.
I figured that I would need some way to actually control the turret itself, so I added on a control panel. Originally I planned just to add 4 switches and an LCD screen for it, but I realized you wouldn't be able to navigate a menu of any kind with just 4 on/off switches, so I'm currently in the process of adding a joystick and two pushbuttons to it. And a power switch somewhere for the Pi.
gamer cat
11/18/2025 9:13 PM - CAD done!! (at least for now...)
Finished the control panel and did some fixing up of the features and stuff
The CAD is finally pretty much done - all the features I intended have been completed and I'm happy with the overall look.
Now it's just time to get the BOM done and tentative software done.
Sighh now time to learn how to program a Pi.
mmm adobe stock photos :pp
11/18/2025 9:40 PM - Add stuff to repository
Got sidetracked instead of starting to write code
For some reason I never made a local folder for this project yet, so I made one right now. I then realized I had no idea how to push files to Github normally, so I ended up doing it through VS code.
11/27/2025 6 PM - Code time! And basically finished project I think
Code!!!
Not really sure what to put for a picture so
I have a completish thing that I can run on the Pi once I assemble everything, though obviously, there will probably be some errors.
The core of the code is a state machine for 4 modes at the moment:
Default: Does nothing
Picture: Wakes Pi when motion; Uses camera to move turret towards the motion and takes a picture
Turret: Slowly moves turret side to side; When motion is detected, aim towards the motion and shoot water
Picture + Turret: Essentially turret but also takes pictures
The overall architecture of the software is mainly just the main state machine, a state machine for the menu, and helper functions/apis for the hardware in other files.
Some other stuff like tests for all the components and LED feedback
AI was used for parts of the code since I don't really have much experience with Python/Pis in general
Also yay hackatime exists for code so I can have precise hours tracked
Time for BOM
11/27/2025 8:20 PM - Cool Blender render
Blenderrrrrrrrrrrrrrrrrrrrrrrrrrrrrrrrrrrrrrrrrrrrrrrrrrrrrrrrrrrrrrrrrrrrrrrrrrrrrrrrrrrrrrrrrrrrrrrrrrrrrrrrrrrrrrrrr (150 char min) (ミ⚈ᆽ⚈ミ)/ (o_o)
11/27/2025 8:34 PM - CAD renders
  \    /\
   )  ( ')
  (  /  )
   \(__)|
mewo
ฅ^•ﻌ•^ฅ
≽^•⩊•^≼
^. .^₎⟆
meowwwwwwwwwwwwwwwwwwwwwwwwwwwwwwwwwwwwwwwwwwwwwwwwwwwwwwwwwwwwwwwwwwwwwwwwwwwwwwwwwwwwwwwwwwwwwww
12/1/2025 - Wiring Schematic
First time using KiCAD
It was...an interesting learning experience.
Wasn't too bad of a struggle to figure out (even with not bothering to learn too much before diving in) but it worked out kinda fine in the end
And I also discovered Ultra Librarian and SnapMagic, who did not end up having the parts I needed
at this point I don't really care if its ai generated; a cat's a cat