Blueboard
A Custom 109 ANSI Keyboard Keyboard. - .91inch OLED display - Two Potentiomiters - 5 Macro Keys
Created by
 Lawri 🚀
Tier 2
16 views
1 follower
 alexren ⚡🚀
approved Blueboard ago
alexren ⚡🚀
approved Blueboard ago
Tier approved: 2
Grant approved: $113.00
Awesome job with updating everything! Make sure to send pictures in #blueprint once you're done building!
Lawri 🚀
submitted Blueboard for ship review ago
Lawri 🚀
added to the journal ago
Note To Reviewer - BOM Prices
The GSDL Shipping Price for JLC PCB latley has been going up alot so the price has increased alot. As well as this i didnt realised about the duties and taxes charge in my calculation. ive updated the cart screenshots. This dose now mean that ill need a little over $100.

 1mon ⚡
requested changes for Blueboard ago
1mon ⚡
requested changes for Blueboard ago
really clean keyboard! please upload cart screenshots that include the entire checkout price, not just the individual parts. same for the pcb, please include final checkout price.
Lawri 🚀
submitted Blueboard for ship review ago
Lawri 🚀
added to the journal ago
Firmware
Across the Past Few Days ive been Doing the firmware. Its Just some skeleton code it just initializes all the Devices and the keyboard. ill add more features once ive actualy got the keyboard so i can test it all works. I also added a BOM.csv To the Repo.
This is what took the most time writing out the keyboard pns and there keymaping

Lawri 🚀
added to the journal ago
Made Some Renders
I made some renders of my keyboard in blender. i used the pcb2blender pluggin in kicad to produce a high quality model in blender. i then exported the case as a stl.


This Journal Post was ment to be posted last night but i forgot to press publish
Lawri 🚀
added to the journal ago
Case Design
I Finaly Stopped Procrastinating on the Case Design and decided to start and finnish it in one night. i used ai03's plate generator to make the keyboard plate. Here are sine Renders in fusion.
Evoloution


Result
Bottom part Of The Case

Base With PCB

Assembeled Case

Assembeled Case With PCB

Lawri 🚀
added to the journal ago
PCB + BOM
I completley redid the PCB from scratch after repositioning the keys. i cleaned up the traces and redesigned the silk screen. i shed around about 3cm of the pcb size to cut costs a bit but its stil a massive pcb because its a full sized keyboard. I also to cut space and size of the pcb stacked traces on the top of the PCB
Completed PCB

GPIO Expanders

OLED and Potentiomeiter

Stacked Traces

I then spent some time doing the BOM where things came out to be verry verry expesive that i didnt realise.


Lawri 🚀
added to the journal ago
Cleaning Up the PCB
Spet a couple hours after school today making small changes to the traces and some silk screen to make the board more visualy appealing. However @Krunch on slack pointed out my keys arnt aligned correctly so i will neeed to re align them. I need to work on my board size and weight as its currently 52x10 and 268g without components.
Silk screen added around major trace groups

Silk Screen Added for More Vizual Spice

New PCB Design

Lawri 🚀
added to the journal ago
Finalising the PCB
I Spent Today Redoing all my Traces and Finalizing the PCB. I learnt how to use vias inorder to change a trace from F.Cu to B.Cu. This allowed me to greatly improve my traces and make some of the cleanest ones ive ever done.


Lawri 🚀
added to the journal ago
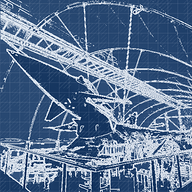
Routing the PCB
I started my decent into routing hell. how do pepole route keyboards Ive atached an immage of my atempt at hell. Im thinking i might need to make this a 6 layer pcb but the price would skyrocket

Lawri 🚀
added to the journal ago
Finished Schematic and Layed Out Components On PCB
Today i spend aroud 4 Hours Finsihing off the Schematic and Deciding what GPIO Expander to use. I was initialy going to use the TCA9539PWR From Texas Instruments But after researching that didnt have any support with the KMK firmware so in the end i used the MCP23017. I also learnt about how Rotary Encoder Switches work and added 2 to the schematic.
Schematic

TCA9539PWR

MCP23017

Working On the PCB
Then i Asigned all the footprints and started work on the PCB. i aranged all the Keys, OLED and Rotary Encoders.

Lawri 🚀
added to the journal ago
Research + Keymatrix
Today i spent around 2 Hours Doing Research on the specific key set i would like to do. seting up the github repository and planning what i would like to do.
These are the Keycaps i would like to use from Ali Express.

Then i spent the rest of my time Doing the most Repetitive and irritatingly complex task the Keyboard Matrix Schematic. This is Quite literaly my most complex and messy schematic.

Lawri 🚀
started Blueboard ago
10/27/2025 - Research + Keymatrix
Today i spent around 2 Hours Doing Research on the specific key set i would like to do. seting up the github repository and planning what i would like to do.
These are the Keycaps i would like to use from Ali Express.
Then i spent the rest of my time Doing the most Repetitive and irritatingly complex task the Keyboard Matrix Schematic. This is Quite literaly my most complex and messy schematic.
10/29/2025 - Finished Schematic and Layed Out Components On PCB
Today i spend aroud 4 Hours Finsihing off the Schematic and Deciding what GPIO Expander to use. I was initialy going to use the TCA9539PWR From Texas Instruments But after researching that didnt have any support with the KMK firmware so in the end i used the MCP23017. I also learnt about how Rotary Encoder Switches work and added 2 to the schematic.
Schematic
TCA9539PWR
MCP23017
Working On the PCB
Then i Asigned all the footprints and started work on the PCB. i aranged all the Keys, OLED and Rotary Encoders.
11/9/2025 - Routing the PCB
I started my decent into routing hell. how do pepole route keyboards Ive atached an immage of my atempt at hell. Im thinking i might need to make this a 6 layer pcb but the price would skyrocket
11/10/2025 - Finalising the PCB
I Spent Today Redoing all my Traces and Finalizing the PCB. I learnt how to use vias inorder to change a trace from F.Cu to B.Cu. This allowed me to greatly improve my traces and make some of the cleanest ones ive ever done.
11/12/2025 - Cleaning Up the PCB
Spet a couple hours after school today making small changes to the traces and some silk screen to make the board more visualy appealing. However @Krunch on slack pointed out my keys arnt aligned correctly so i will neeed to re align them. I need to work on my board size and weight as its currently 52x10 and 268g without components.
Silk screen added around major trace groups
Silk Screen Added for More Vizual Spice
New PCB Design
11/13/2025 - PCB + BOM
I completley redid the PCB from scratch after repositioning the keys. i cleaned up the traces and redesigned the silk screen. i shed around about 3cm of the pcb size to cut costs a bit but its stil a massive pcb because its a full sized keyboard. I also to cut space and size of the pcb stacked traces on the top of the PCB
Completed PCB
GPIO Expanders
OLED and Potentiomeiter
Stacked Traces
I then spent some time doing the BOM where things came out to be verry verry expesive that i didnt realise.
11/24/2025 - Case Design
I Finaly Stopped Procrastinating on the Case Design and decided to start and finnish it in one night. i used ai03's plate generator to make the keyboard plate. Here are sine Renders in fusion.
Evoloution
Result
Bottom part Of The Case
Base With PCB
Assembeled Case
Assembeled Case With PCB
11/25/2025 - Made Some Renders
I made some renders of my keyboard in blender. i used the pcb2blender pluggin in kicad to produce a high quality model in blender. i then exported the case as a stl.
This Journal Post was ment to be posted last night but i forgot to press publish
11/30/2025 - Firmware
Across the Past Few Days ive been Doing the firmware. Its Just some skeleton code it just initializes all the Devices and the keyboard. ill add more features once ive actualy got the keyboard so i can test it all works. I also added a BOM.csv To the Repo.
This is what took the most time writing out the keyboard pns and there keymaping
12/1/2025 - Note To Reviewer - BOM Prices
The GSDL Shipping Price for JLC PCB latley has been going up alot so the price has increased alot. As well as this i didnt realised about the duties and taxes charge in my calculation. ive updated the cart screenshots. This dose now mean that ill need a little over $100.