numpad
a macropad to make a numpad to have next to my 60% keyboard so if i need id i can use it and otherwise i can hide it
Created by
 schuilchristiaan
Hackpad
11 views
0 followers
 m0.hid ⚡
approved numpad ago
m0.hid ⚡
approved numpad ago
Tickets awarded: 50 tickets
Tier: 4
This is an awesome hackpad! I love that you actually made stickers for your keys which isnt something ive seen anyone else do!
schuilchristiaan
submitted numpad for ship review ago
schuilchristiaan
added to the journal ago
Finished the numpad
*i did some work earlier but forgot to log it (making the stickers)
I changed my layout since i didnt like it anymore after making the stickers for the keys and actualy seeing the layout so i changed it, i also 3d printed the knob for the volume button so it looks better and made all the stickers for the keys and tested if everything was working.

schuilchristiaan
added to the journal ago
designed a knob and stickers
i designed some stickers to go onto my hackpad since i had toi use Cricut design space for this it took quit a bit of time since its an awful program but i got it to work:

I also designed a knob to go onto my rotary encoder so it looks better:

schuilchristiaan
added to the journal ago
firmware
I finnaly got the firmware working i first had to find out how to upload the firmware to the numpad since QMK flash didnt work so i had to do it myself, then the keys werent in the right spot so i had to change that and i forgot to code the rotary encoder so i had to find out how to do that and code it and make a ne rules.mk file since i didnt have one yet.
keymap.c:

Keyboar.json:

schuilchristiaan
added to the journal ago
solderd everything
I soldered everything together, and snipped all the pins short so it will fit bettter in the case. Before soldering everything i first measured all the diodes using a multi function tester to know 100% certain that they are in the right orientation.

schuilchristiaan
added to the journal ago
parts arrived + printed the case
I got all the parts for the numpad and 3d printed the bottom of my case to test fit the PCB which fitted very snug, i unfortuantly had to pay 13 euro in custom fees since postNL charges 10 euro to ask for BTW which was a bit sad but i can now start soldering everything together,

 CAN ⚡🚀
approved numpad ago
CAN ⚡🚀
approved numpad ago
Nice hackpad
schuilchristiaan
submitted numpad for ship review ago
 Iamalive 🚀
requested changes for numpad ago
Iamalive 🚀
requested changes for numpad ago
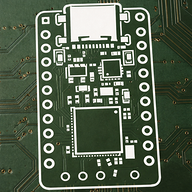
Please include the full pcb picture, not just the 3d render!
schuilchristiaan
submitted numpad for ship review ago
Iamalive 🚀
requested changes for numpad ago
Hey, it looks like your readme is generated by ai, which is something we do not tolerate. Please write it yourself and resubmit!
schuilchristiaan
submitted numpad for ship review ago
 PenguinMo
requested changes for numpad ago
PenguinMo
requested changes for numpad ago
This is really cool but you need a BOM could you add this
schuilchristiaan
submitted numpad for ship review ago
PenguinMo
requested changes for numpad ago
Your missing 2 things, 1 your BOM is missing and 2 ALL CAD should be in .step
schuilchristiaan
submitted numpad for ship review ago
schuilchristiaan
started numpad ago
1/21/2026 2 PM - parts arrived + printed the case
I got all the parts for the numpad and 3d printed the bottom of my case to test fit the PCB which fitted very snug, i unfortuantly had to pay 13 euro in custom fees since postNL charges 10 euro to ask for BTW which was a bit sad but i can now start soldering everything together,
1/21/2026 7 PM - solderd everything
I soldered everything together, and snipped all the pins short so it will fit bettter in the case. Before soldering everything i first measured all the diodes using a multi function tester to know 100% certain that they are in the right orientation.
1/21/2026 8 PM - firmware
I finnaly got the firmware working i first had to find out how to upload the firmware to the numpad since QMK flash didnt work so i had to do it myself, then the keys werent in the right spot so i had to change that and i forgot to code the rotary encoder so i had to find out how to do that and code it and make a ne rules.mk file since i didnt have one yet.
keymap.c:
Keyboar.json:
1/24/2026 2 PM - designed a knob and stickers
i designed some stickers to go onto my hackpad since i had toi use Cricut design space for this it took quit a bit of time since its an awful program but i got it to work:
I also designed a knob to go onto my rotary encoder so it looks better:
1/24/2026 3 PM - Finished the numpad
*i did some work earlier but forgot to log it (making the stickers)
I changed my layout since i didnt like it anymore after making the stickers for the keys and actualy seeing the layout so i changed it, i also 3d printed the knob for the volume button so it looks better and made all the stickers for the keys and tested if everything was working.