Custom 3d printer
Custom 3d printer with klipper, and lan functionality
Created by
 Arnost55
Tier 1
42 views
0 followers
 Anirudh 🚀
gave kudos to Custom 3d printer ago
Anirudh 🚀
gave kudos to Custom 3d printer ago
very awesome project! I hope you get your tickets :D
Arnost55
submitted Custom 3d printer for ship review ago
 CAN ⚡🚀
and
CAN ⚡🚀
and
 alexren ⚡🚀
approved Custom 3d printer ago
alexren ⚡🚀
approved Custom 3d printer ago
Tickets awarded: 2 tickets
Tier: 1
Awesome project!
nice work!
Arnost55
added to the journal ago
Address the video
So on my video there is a bad print since I got some issues with extruding, overflow and underflow and I did not have time since I needed to make my video. Hope you understand... 
Arnost55
submitted Custom 3d printer for ship review ago
CAN ⚡🚀
approved Custom 3d printer ago
Tier approved: 1
Grant approved: $358.00
Awesome project!
Arnost55
added to the journal ago
Address the potential questions for this project
Firstly I want to thank everyone that helped me out. The next thing that I would like to address is the hours that I have put (they are an estimate and if you think the job does not match the hours, I get it. But they were evenly spread out since I had the journals made before I uploaded them. So the total hours that are up there those are real it took me a lot of time. So I hope you understand.) The next thing are the titles. They are sometimes not finished That is because I did not count the Characters. I really hope that you understand this and thank you.
Arnost55
added to the journal ago
Phase 5: Klipper Installation and Configuration (Continued)
We did the final tidy up — the config file was organized, all the settings were documented with comments, and the printer was cleaned up physically. Any leftover swarf or paint marks were cleaned off. The printer was now completely finished. From the first material test at hour 0 to this final session at hour 415, my grandfather and I built a fully working 3D printer entirely from scratch. 
Arnost55
added to the journal ago
Phase 5: Klipper Installation and Configuration (Continued)
We printed a final batch of test pieces to verify everything one last time. All prints came out accurate, consistent, and with no defects. We measured the key dimensions and they were all within tolerance. The printer was fully calibrated and working as intended, closing out the entire build and calibration process at 410
hours.
Arnost55
added to the journal ago
Phase 5: Klipper Installation and Configuration (Continued)
We ran a final bed mesh after all the testing to make sure nothing had shifted from the extended use. The mesh was clean and matched our previous results closely which confirmed the mechanical side of the printer was stable. We saved the final mesh and locked all the settings in the config.
Arnost55
added to the journal ago
Phase 5: Klipper Installation and Configuration (Continued)
We ran stress test prints to make sure the printer held up over longer sessions. We ran prints for several hours at a time and checked them periodically. The temperatures stayed stable, the axes moved consistently, and there were no failures. The printer was working reliably under sustained use.
Arnost55
added to the journal ago
Phase 5: Klipper Installation and Configuration (Continued)
We did a final review of all the key settings in the config — rotation distances, PID values, z-offset, bed mesh, speed and acceleration limits. Each one was confirmed as correct and the printer was printing reliably. This session closed out the calibration phase and marked the end of ~400 hours of work from the first piece of steel to a fully working custom 3D printer.
Arnost55
added to the journal ago
Phase 5: Klipper Installation and Configuration (Continued)
We cleaned up the printer.cfg file. We removed old test values, organized the sections, and added comments to explain what each setting does and why we set it to that value. A clean and well-commented config file makes it much easier to make changes later without breaking something by accident.
Arnost55
added to the journal ago
Phase 5: Klipper Installation and Configuration (Continued)
We ran a final bed mesh calibration and locked in the z-offset. We also did a final PID tune for the hotend and bed now that the printer was fully stable. All the results were saved to the config. The printer was now producing consistent output with accurate dimensions and a reliable first layer on every print.
Arnost55
added to the journal ago
Phase 5: Klipper Installation and Configuration (Continued)
We used calipers to measure several printed test pieces and compare them to the intended dimensions from the slicer. Most were within 0.1 to 0.2mm which is acceptable for a printer like this. We made small adjustments to the rotation distance for the axes to get the dimensions even closer, then printed and measured again to confirm the improvement.
Arnost55
added to the journal ago
Phase 5: Klipper Installation and Configuration (Continued)
We ran a set of longer and more complex test prints to check that the printer was working reliably over an extended period. We printed multi-layer pieces that took over an 20 minutes each. They came out with no layer shifting, consistent extrusion, and good adhesion all the way through. This was the first time the printer had produced good quality prints consistently. But I threw them away since they were not required but later I needed to calibrate the printer again since it started to print worse.
Arnost55
added to the journal ago
Phase 5: Klipper Installation and Configuration (Continued)
We ran a fresh bed mesh calibration now that all the hardware and config problems were sorted out. The mesh results were much cleaner than the earlier attempts. We also re-did the z-offset after the extruder work since anything that changes the nozzle height needs the offset to be rechecked. The first layer was printing consistently across the whole bed.
Arnost55
added to the journal ago
Phase 5: Klipper Installation and Configuration (Continued)
After fixing the extruder grip tension we ran more test prints. The inconsistent extrusion was gone and the layers looked much more even. We then did another extruder calibration from scratch since we had physically changed the extruder setup. The new rotation distance value was slightly different from before and we saved it to the config.
Arnost55
added to the journal ago
Phase 5: Klipper Installation and Configuration (Continued)
We ran into an issue with the extruder. The prints were showing inconsistent extrusion where some layers looked normal and others were under-extruded. We took the extruder apart and found that the tension on the filament grip was not consistent. We reassembled it and adjusted the tension screw to give the filament a firmer and more even grip.
Arnost55
added to the journal ago
Phase 5: Klipper Installation and Configuration (Continued)
The layer shifting was much better after the current fix but not completely gone. We printed more test pieces and carefully watched each print to see exactly when and where the shift was happening. We noticed it happened most often during fast moves so we lowered the print speed and acceleration in the config to reduce the load on the motors during those moves.
Arnost55
added to the journal ago
Phase 5: Klipper Installation and Configuration (Continued)
We checked the stepper motor driver current settings in the config. The drivers were set too low which can cause the motors to skip steps under load, which would explain the layer shifting. We increased the current to a more appropriate level for our motors and ran test prints again to see if the shifting had stopped.
Arnost55
added to the journal ago
Phase 5: Klipper Installation and Configuration (Continued)
We found a loose connection in the wiring during our hardware check. One of the crimped connectors going to the mainboard was not making solid contact. We re-crimped it and re-seated it firmly. We also went around and checked every other connector to make sure nothing else was about to come loose.
Arnost55
added to the journal ago
Phase 5: Klipper Installation and Configuration (Continued)
We ran into bigger problems during printing. The prints were showing inconsistent layers and in some cases the print head would shift position mid-print. We suspected there might be a hardware issue rather than just a config problem so we started checking the machine physically — looking at belt tension, checking for any loose bolts, and inspecting all the wiring connections.
Arnost55
added to the journal ago
Phase 5: Klipper Installation and Configuration (Continued)
We fixed the over-extrusion by fine tuning the rotation distance further. Even though we calibrated it earlier it needed a small correction. We printed another test cube, measured it with calipers, and calculated how much to adjust the value. After one more correction the dimensions were much closer to what they should be.
Arnost55
added to the journal ago
Phase 5: Klipper Installation and Configuration (Continued)
We fixed the first layer adhesion issue by adjusting the z-offset. The nozzle was sitting slightly too far from the bed so the first layer was not squishing down properly. We lowered the z-offset a tiny amount and ran another test. The adhesion was much better and the first layer was sticking evenly across the whole surface.
Arnost55
added to the journal ago
Phase 5: Klipper Installation and Configuration (Continued)
We ran our first real test prints. We printed a small flat square to check the first layer and a small cube to check the overall dimensions. The first layer had some adhesion issues in a few spots and the cube came out slightly over-extruded. We took notes on exactly what was wrong so we could fix each issue one at a time. Sorry I threw them away.
Arnost55
added to the journal ago
Phase 5: Klipper Installation and Configuration (Continued)
We configured the BTT Eddy probe and ran a bed mesh calibration. The probe scans a grid of points across the bed surface and maps out any high or low spots. Klipper uses this map to automatically adjust the Z height as the print head moves, so even if the bed is not perfectly flat the first layer still comes out even.
Arnost55
added to the journal ago
Phase 5: Klipper Installation and Configuration (Continued)
We calibrated the extruder rotation distance. We marked 100mm of filament with a marker, told Klipper to push 100mm through the extruder, and then measured how much filament actually moved. It was not exactly 100mm so we calculated the correct rotation distance value and updated the config. We repeated this a few times until it was pushing exactly the right amount.
Arnost55
added to the journal ago
Phase 5: Klipper Installation and Configuration
We ran PID tuning on the hotend and the heated bed. PID tuning makes the temperature control stable — without it the temperature would overshoot and drop repeatedly instead of staying steady. Klipper has a built in command to do this automatically. We ran it for the hotend, saved the result, then ran it for the bed and saved that too.
Arnost55
added to the journal ago
Phase 5: Klipper Installation and Configuration (Continued)
We finished correcting the motor directions and endstop logic in the config. All three axes were now moving in the right direction and homing correctly. The printer could home itself without crashing into anything. This was a big step because it meant the basic config was working and we could start doing the real calibration.
Arnost55
added to the journal ago
Phase 5: Klipper Installation and Configuration (Continued)
We tested each axis through Mainsail after writing the config. We jogged each motor from the interface and watched which direction it moved. Some motors were going the wrong way so we added a direction invert in the config and tested again. We also triggered each endstop by hand and confirmed Klipper detected it correctly. 
Arnost55
added to the journal ago
Phase 5: Klipper Installation and Configuration (Continued)
We wrote the printer.cfg file from scratch. This file tells Klipper everything about our printer — which pin controls which motor, which pin reads which endstop, what thermistor type is on the hotend and bed, and so on. Because we built the printer ourselves we had to map every single pin manually by looking at our own wiring.
Arnost55
added to the journal ago
Phase 5: Klipper Installation and Configuration (Continued)
We installed Moonraker and set up Mainsail. Moonraker is the software that sits between Klipper and the web interface. Mainsail is the web page we use to control the printer. After installing both and setting them up we opened Mainsail in a browser and saw the dashboard for the first time. It was connected to Klipper and showing the printer status.
Arnost55
added to the journal ago
Phase 5: Klipper Installation and Configuration (Continued)
We compiled Klipper manually and flashed it to the mainboard. We downloaded the Klipper code, set the right options for our specific mainboard chip, and built the firmware file. We then connected the mainboard to the CB1 over USB and flashed the firmware onto it. When it was done the mainboard was running Klipper firmware and the CB1 could talk to it.
Arnost55
added to the journal ago
Phase 5: Klipper Installation and Configuration
We set up the BTT CB1 to run Klipper. We flashed the CB1 with its OS image, connected it to our network, and got SSH access working so we could type commands into it from a computer. This was the first step before we could install any software onto it.
Arnost55
added to the journal ago
Phase 4: Assembly, Troubleshooting, and Final Touches (more)
We applied more coats of paint and let each one cure before adding the next. By the end the finish was solid and even with no thin spots or drips. The frame looked clean and professional in black. Once the paint was fully cured we started putting the disassembled parts back together.
Arnost55
added to the journal ago
Phase 4: Assembly, Troubleshooting, and Final Touches (more)
We painted the frame and parts with the first coat of black paint. We let it dry fully before deciding if another coat was needed. The first coat covered most areas well but there were a few thin spots that needed another pass. We kept the coats thin so the paint would not run or drip.
Arnost55
added to the journal ago
Phase 4: Assembly, Troubleshooting, and Final Touches (more)
We went through all the wiring one more time to double check every connection. We also tidied up the cables, bundled them together where possible, and secured them properly with cable ties and clips. The inside of the base now looked clean and organized with no loose wires hanging around.
Arnost55
added to the journal ago
Phase 4: Assembly, Troubleshooting, and Final Touches (more)
We connected the final cables. This was the wiring for all the motors, and thermistors. We went through each one systematically, connecting it to the right pin on the mainboard and securing it in place. By the end of this session every single wire in the printer was connected and the machine was electrically complete.
Arnost55
added to the journal ago
Phase 4: Assembly, Troubleshooting, and Final Touches (more)
We finished wiring the display and the BTT Eddy probe. All cables were run through the routing holes to the mainboard and connected to the correct pins. We checked each connection before powering anything on. The display lit up and showed the interface correctly, which confirmed the mainboard was working and the wiring was right.
Arnost55
added to the journal ago
Phase 4: Assembly, Troubleshooting, and Final Touches
We installed the front display screen and mounted the BTT Eddy probe. The display was screwed into its cutout on the front of the base and wired up to the mainboard. The probe was mounted next to the nozzle at a set distance so the firmware would know exactly how far the probe is from the nozzle when calculating bed level compensation.
Arnost55
added to the journal ago
We reworked the Y-axis mounting geometry. We unbolted the re
We finished fixing the Y-axis travel issue. After the final mounting adjustment the bed was able to reach its full intended travel length with clearance at both ends. We ran it back and forth many times to confirm it was consistent and that nothing was catching. The Y-axis was now working correctly.
Arnost55
added to the journal ago
Phase 4: Assembly, Troubleshooting, and Final Touches (Conti
We reworked the Y-axis mounting geometry. We unbolted the relevant parts, repositioned the mounting points, and reassembled. After each change we tested how far the bed could travel. It took a few attempts to find the right position but by the end of this session the bed was getting much closer to its full travel range.
Arnost55
added to the journal ago
Phase 4: Assembly, Troubleshooting, and Final Touches (Conti
We found that the Y-axis bed could only move about three quarters of the distance it was supposed to. It was hitting a physical limit before reaching the end of its travel range. We looked at where the issue was coming from and found that the way the bed was mounted was blocking it from going further. We started planning how to rework the mounting to fix this.
Arnost55
added to the journal ago
Phase 4: Assembly, Troubleshooting, and Final Touches (Conti
We adjusted the spring tension at each corner and did a first manual level of the bed. We moved the nozzle to each corner and adjusted the thumb screw under each spring until the gap between the nozzle and the bed was the same at all four corners. This is called tramming and it is the starting point before the probe can do its job.
Arnost55
added to the journal ago
Phase 4: Assembly, Troubleshooting, and Final Touches
We mounted the build plate and fitted the leveling springs. The build plate sits on four corners each held up by a spring and a thumb screw. We set each spring to roughly the same compression so the bed was starting from a level-ish position. Getting the springs even meant we would not have to make huge adjustments when we did the proper leveling later.
Arnost55
added to the journal ago
Phase 4: Assembly, Troubleshooting, and Final Touches (Conti
We finished fixing the Z-axis. After several rounds of adjusting and testing the rods was aligned and the axis moved smoothly all the way up and down with no sticking. We tightened all the clamps back down and tested the full travel again to confirm the fix was solid before moving on.
Arnost55
added to the journal ago
Phase 4: Assembly, Troubleshooting, and Final Touches (Conti
We realigned the Z-axis rod. We loosened the clamps at the top and bottom of the rod and carefully moved it until the rod was sitting parallel. We used a square and a ruler to check the spacing at multiple points along the height. After each small adjustment we moved the axis by hand to see if the binding was getting better.
Arnost55
added to the journal ago
Phase 4: Assembly, Troubleshooting, and Final Touches
We ran into a problem with the Z-axis — it was binding as it moved up and down. It would move a little then stick or grind slightly. We started by looking at the rod to see if they were straight. We found that the rod was slightly out of alignment and that was causing the binding. We loosened the mounts to start fixing it.
Arnost55
added to the journal ago
Phase 4: Assembly, Troubleshooting, and Final Touches
We finished the extruder assembly. All bolts were fully secured and the final nozzle height check confirmed it was sitting correctly across the whole bed area. With the extruder done the printer had all its main moving parts fully assembled for the first time.
Arnost55
added to the journal ago
Phase 4: Assembly, Troubleshooting, and Final Touches (Conti
We tightened down all the bolts on the extruder mount and checked the nozzle height. We moved the carriage to different positions across the bed and measured the gap between the nozzle and the bed surface at each spot to make sure it was consistent. A consistent height means the first layer of any print will come out evenly.
Arnost55
added to the journal ago
Phase 4: Assembly, Troubleshooting, and Final Touches
We fitted the extruder mount onto the X-axis carriage and attached the extruder to it. We positioned the mount carefully to make sure the nozzle would end up at the right height above the bed. Once it was in the right spot we tightened all the bolts down and checked that the extruder was sitting straight with no tilt.
Arnost55
added to the journal ago
Phase 4: Assembly, Troubleshooting, and Final Touches (Conti
We finished the Y-axis. The carriage was moving smoothly across its full range with consistent belt tension. All bolts were tightened and we ran a final travel test. The Y-axis was done and working as expected so we moved on to fitting the extruder assembly.
Arnost55
added to the journal ago
Phase 4: Assembly, Troubleshooting, and Final Touches
We assembled the Y-axis. We fitted the bed carriage onto the Y-axis rods and started building up the assembly. We tensioned the belt at the same time as fitting the parts so we could fine tune both together. The bed carriage slid along the rods and we kept testing it as we went to make sure everything stayed aligned.
Arnost55
added to the journal ago
Phase 4: Assembly, Troubleshooting, and Final Touches (Conti
We finished the X-axis. The belt was tensioned correctly and the carriage moved smoothly across the full travel with no slack or binding. We did a final check of all the bolts and confirmed everything was tight. The X-axis was fully assembled and working correctly.
Arnost55
added to the journal ago
Phase 4: Assembly, Troubleshooting, and Final Touches (Conti
We continued the X-axis assembly, focusing on belt routing and tensioning. We ran the belt through the carriage and around the motor pulley and idler, then tightened it until the belt had the right amount of tension. Too loose and the carriage would have backlash, too tight and it would put too much load on the motor.
Arnost55
added to the journal ago
Phase 4: Assembly, Troubleshooting, and Final Touches
We put the X-axis together. We fitted the carriage onto the rails and started connecting all the parts that mount onto it. We tested the travel as we built it up to make sure adding more parts did not cause any binding. The carriage moved smoothly so we kept going and got all the main X-axis parts bolted into place.
Arnost55
added to the journal ago
Phase 4: Assembly, Troubleshooting, and Final Touches (Conti
We finished the heated bed frame. All the bolts were tightened down and the wiring was fully secured. We checked the frame one last time to make sure it was level and that nothing was loose. With the bed frame done we moved on to assembling the X-axis components.
Arnost55
added to the journal ago
Phase 4: Assembly, Troubleshooting, and Final Touches (Conti
We continued the heated bed frame assembly and wiring. The wiring was routed carefully through the routing holes and secured with clips. We made sure the cable had enough slack to move with the bed as it travels on the Y-axis but not so much that it would drag on the frame or get caught on anything.
Arnost55
added to the journal ago
Phase 4: Assembly, Troubleshooting, and Final Touches
We assembled the heated bed frame. This meant bringing all the separate pieces together and bolting them into their final positions. We checked the frame was square as we went and made sure the surface the bed would sit on was flat. We also started running the heated bed wiring at the same time so we would not have to take things apart again later.
Arnost55
added to the journal ago
Phase 3: Custom Machining and Fabrication (Continued)
We finished drilling all the ventilation holes. We deburred each hole and checked that the airflow path through the base made sense. With that done, Phase 3 was complete. Every part of the frame and base had been machined, all the mounting points were in place, and the machine was ready to be fully assembled.
Arnost55
added to the journal ago
Phase 3: Custom Machining and Fabrication (Continued)
We made the extruder mount and started drilling the ventilation holes in the base. The extruder mount was cut from steel and shaped to hold the extruder in the right position on the X-axis carriage. The ventilation holes were drilled in the areas near the PSU and mainboard where heat builds up the most during long prints.
Arnost55
added to the journal ago
Phase 3: Custom Machining and Fabrication (Continued)
We filed and cleaned up all the port holes. Each one got a pass with the file to remove any burrs and rough edges. We then test fitted a plug through each hole to confirm the size was right. Everything lined up correctly with the mainboard connectors behind it.
Arnost55
added to the journal ago
Phase 3: Custom Machining and Fabrication
We cut the port holes in the base so the mainboard's connectors could be accessed from outside. We marked each hole directly from the board's connector positions and cut them out carefully. Too small and the plugs would not fit, too big and it would look messy. After cutting we filed each hole smooth so no sharp edges were left..jpg)
Arnost55
added to the journal ago
Phase 3: Custom Machining and Fabrication (Continued)
We finished the mainboard cable connections. All the wires were connected and we went through the full wiring diagram one more time to confirm nothing was missed or plugged into the wrong spot. Once we were happy with it all we secured the cables with clips so they could not pull loose.
Arnost55
added to the journal ago
Phase 3: Custom Machining and Fabrication (Continued)
We continued connecting cables to the mainboard. We worked through each connection one at a time and checked it against the wiring diagram before moving on. Getting this right was important because a wrong connection could damage the board or the motors when we first power it on. 
BTW sorry for the bad title of my journal below. I cannot change it for now since my project is in review.
Arnost55
added to the journal ago
Phase 3: Custom Machining and Fabrication (Continued)
We put the mainboard into its housing. We used standoffs to lift it off the metal so it would not short circuit against the frame. We positioned it so that all its connectors would line up with the port holes we would cut later. Once it was in the right spot we started connecting the first cables from the PSU to the board.
Arnost55
added to the journal ago
Phase 3: Custom Machining and Fabrication (Continued)
We continued wiring from the PSU and finished securing it completely. All the bolts were tightened down and the wires that had been run so far were clipped into place along their routing paths. The PSU was now fully installed and its connections were ready to meet the mainboard once that was in position.
Arnost55
added to the journal ago
Phase 3: Custom Machining and Fabrication
We mounted the PSU inside the base and started securing it in place. We bolted it down and checked that it sat firmly without any movement. Once it was fixed in place we started running the first wires from the PSU toward the mainboard, keeping them tidy and following the routing holes we had drilled earlier.
Arnost55
added to the journal ago
Phase 3: Custom Machining and Fabrication (Continued)
We finished all the routing holes. We then did a test run with a piece of wire to check that each hole was in the right position and that the wire could pass through cleanly. All paths were confirmed to be clear and the routing plan was ready to be used during the wiring stage later.
Arnost55
added to the journal ago
Phase 3: Custom Machining and Fabrication (Continued)
We drilled the cable routing holes through the frame and base. We went through each planned hole one by one, drilling carefully so nothing cracked or split. After drilling each hole we deburred it so the cable insulation would not get damaged when wires were pushed through later.
Arnost55
added to the journal ago
Phase 3: Custom Machining and Fabrication
We planned out how all the cables would be routed inside the printer. We looked at where every wire needed to go — from the motors, the heated bed, the thermistors — and mapped a path for each one that would keep them away from moving parts and hot areas. Once we had a plan we marked where each routing hole needed to be drilled.
Arnost55
added to the journal ago
Phase 3: Custom Machining and Fabrication (Continued)
We finished the bed holder. After the final round of adjustments it sat flat and solid with no rocking. We drilled the last mounting holes and confirmed the fit one more time. With the bed holder done we moved on to planning the wire management for the whole machine.
Arnost55
added to the journal ago
Phase 3: Custom Machining and Fabrication (Continued)
We continued refining the bed holder. We test fitted it multiple times and removed small amounts of material where it was not sitting flat. Getting it to sit perfectly took several rounds of fitting and adjusting. We used a flat surface to check how level it was after each adjustment.
Arnost55
added to the journal ago
Phase 3: Custom Machining and Fabrication
We started making the main bed holder. This piece needed to hold the heated bed flat and steady, so we were careful about keeping the dimensions exact. We cut the steel to size and started drilling the mounting holes. We kept checking our measurements as we went because a warped or uneven bed holder would cause problems with every single print.
Arnost55
added to the journal ago
Phase 3: Custom Machining and Fabrication (Continued)
We finished cutting and fitting all the stepper motor mounts. Each one was shaped, filed down where needed, and test fitted to its axis before we moved on to the next. By the end we had mounts done for all axes and they all held the motors in the right position without any wobble.
Arnost55
added to the journal ago
Phase 3: Custom Machining and Fabrication
We designed and machined the steel stepper motor mounts. Since every axis needed its own mount and we had no existing design to copy, we figured out the shape for each one separately. We cut the first ones out and test fitted them to see if the motor sat at the right angle and height. A few needed small adjustments before they sat correctly.
Arnost55
added to the journal ago
Phase 3: Custom Machining and Fabrication (Continued)
We finished the X-axis work. The carriage was moving smoothly all the way across with no dragging or sticking. We did a final check of all the rail screws to make sure nothing would come loose during printing. The X-axis was now complete and we moved on to the stepper motor mounts.
Arnost55
added to the journal ago
Phase 3: Custom Machining and Fabrication (Continued)
We continued fitting the X-axis and testing the travel. We mounted the carriage onto the rails and ran it back and forth to check for smooth movement. There were a couple of spots where it dragged slightly, so we loosened the rail screws, nudged the rail slightly, and retightened until the movement was even across the full length.
Arnost55
added to the journal ago
Phase 3: Custom Machining and Fabrication
We built the X-axis and got all the linear rails mounted onto it. Getting the two rails perfectly in the right angle to each other took the most time — if they are not exactly right angle the carriage will bind and not slide smoothly. We slid the carriage back and forth many times after each adjustment until it moved freely from one end to the other with no sticking. 
Arnost55
added to the journal ago
Phase 3: Custom Machining and Fabrication (Continued)
We finished off the Z-axis frame problems from the previous session. After remaking the bad parts and refitting everything, the frame finally sat square and solid. We checked the alignment from multiple angles and confirmed it was straight. By the end of this session the Z-axis frame was done and ready to move on.
Arnost55
added to the journal ago
Phase 3: Custom Machining and Fabrication (Continued)
We continued working on the Z-axis frame. We ran into problems where some of the parts did not fit the way we expected, so we had to remake them. After remaking the pieces we fitted them again and checked that the frame was square. This part of the build took much longer than we planned because we had to redo several pieces before they were right.
Arnost55
added to the journal ago
Phase 3: Custom Machining and Fabrication (Continued)
We started building the main Z-axis frame. This was one of the bigger parts of the printer and it took a lot of time to get right. We kept test fitting the frame as we built it to make sure our measurements were correct and that nothing was leaning or twisted. We had to stop and redo some parts because they were not sitting straight.
Arnost55
added to the journal ago
Phase 3: Custom Machining and Fabrication (Continued)
We made a custom steel mount that would hold the Y-axis onto the linear rods. Because we had no blueprint to copy, we had to figure out the exact shape and size ourselves by measuring the rods and the spacing we needed. We made the piece, test fitted it, adjusted it slightly, and fitted it again until it sat properly.
Arnost55
added to the journal ago
Phase 3: Custom Machining and Fabrication
We drilled the mounting holes for the linear rails on both the Z and X axes. This had to be very precise because if the holes were even slightly off, the rails would sit crooked and the whole axis would move badly. We also made the bracket that the bed would mount onto. We measured everything twice before drilling.
Arnost55
added to the journal ago
Phase 2: Material Testing and Base Construction (Continued)
We cut out the main base plate from steel and also cut the piece that would hold the bottom of the Z-axis. After cutting, we measured where the mounting holes needed to go and carefully marked them out. We then drilled all the holes needed to bolt the Z-axis base onto the main bed base. We checked the fit several times to make sure everything lined up.
Arnost55
added to the journal ago
Phase 2: Material Testing and Base Construction
We started by making test pieces out of four different materials — standard steel, aluminum, wood, and thin steel. We bent them, pressed on them, and tried to flex them to see which one would hold up best as the base of the printer. After testing all four, we picked standard steel because it was the most rigid and didn't flex at all under pressure.

Arnost55
submitted Custom 3d printer for ship review ago
 Shadow
requested changes for Custom 3d printer ago
Shadow
requested changes for Custom 3d printer ago
user req - needs few updates
Arnost55
submitted Custom 3d printer for ship review ago
CAN ⚡🚀
requested changes for Custom 3d printer ago
This is a cool project but you have one 330 hour journal entry. Please split the journal entry into multiple smaller ones to show your whole process.
Arnost55
added to the journal ago
Videos not avaible fix
I have made the video now at these links, since the notion video link is not avaible and made new BTT eddy cable since the old one did brek sometimes it works sometimes it doesnt.
Videos are here
The first video is about the extruder mount and the second one is about the steel frame.
Here is a photo of the new cable

Arnost55
submitted Custom 3d printer for ship review ago
Arnost55
added to the journal ago
Specifications of my printer
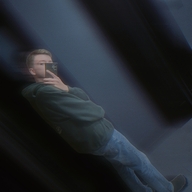
Since I've been receiving feedback about not providing detailed specifications for the build, I want to thank William for the constructive suggestions. I'm now going to review the specifications of my printer, explain how it's built, and include real-life photos since the printer is already complete.
Photo of the printer


Steel Frame
The steel frame is essentially a hollow block structure around the base. It uses M8 hexagon-head screws to mount to the base.
Photo of steel block from inside and outside
Screws

I used the following screws:
- M3 3 mm or M3 6 mm (around 70 screws in total, with spares)
- M4 (8 screws, with spares)
- M8 hexagon-head screws (14 in total, with no spares)
3D Printed Parts
There are two parts that required 3D printing. Everything else is made of steel.
The BTT EDDY duo mount for the extruder
BTT eddy holder for extruder (my creation).stl
The display mount
Extruder
William mentioned that the extruder mount appeared too thin. However, it isn't. It fits perfectly since it's made of steel and doesn't produce any micromovements.
Video demonstrating the mount stability
Wiring Schematic
Here is how to connect the wires to the printer:
Wiring diagram

Conclusion
Since I updated my 3D model, all the measurements are now correct. The process of building the 3D printer is up to you, including how you make the threads and everything else. For example, I made my 3D printer with my grandpa in his steel garage. You can also build it with wood, but I personally prefer steel.
 William 🚀
requested changes for Custom 3d printer ago
William 🚀
requested changes for Custom 3d printer ago
Hi, you print looks cool, however you still haven't listened to previous reviewers feedback
Your entire frame is just one block of who knows what, you need to add proper mounting holes, and it needs to be really obvious what your printer is made out of. This needs some significant improvements and it should be really simple and straightforward for someone to look at it, and be able to build it themselves.
To list a few things that you should improve:
- I saw you mentioned steel for the frame, using that is okay , you just need to be more specific, a couple of sentences maybe with a couple of photos explaining what you mean would massively help.
- you dont mention anywhere which screws/bolts are needed, personally i model/import bolts so its clear to me and anyone else
- its not easy to tell what's needs 3d printing in your frame parts, you could either put plastic in the part name in fusion, or perhaps use materials in fusion to colour all the plastic part a different colour , like purple
- your hotend/extrude doesn't clearly mount to the carriage, its just hovers around it, it also looks a bit thin given the weight of the extruder that's hanging off of it
- you will also need some sort of schematic showing the wiring for you 3d printer (this doesn't have to be fancy, i drew mine on paper and took a photo)
some good resources that i think might help you
https://hwdocs.hackclub.dev/shipping/ - this is good for working out when you've shipped and what standards you should try and meet
https://blueprint.hackclub.com/about/submission-guidelines - make sure you read these before submitting as these are part of what we review on
looking at how other similar 3d printers are made for inspiration can also help
some examples of good references for you might be:
https://vorondesign.com/voron_switchwire
https://github.com/lhndo/LH-Stinger
https://help.prusa3d.com/article/360-viewer_1877
Good luck, having a steel frame sounds cool and isnt something i see super commonly
if you need help feel free to ask in #blueprint!
 worm
gave kudos to Custom 3d printer ago
worm
gave kudos to Custom 3d printer ago
also this is pretty poorly specified, i have no idea if it's even 12v or 24v, and you can find way cheaper motors on aliexpress - this is far more powerful and a quarter the cost https://www.aliexpress.us/item/3256808273084374.html
worm
gave kudos to Custom 3d printer ago
that extruder seems quite expensive and super overkill, an e3d v6 clone, a fan or two, and a 3d printed fan duct would be more appropriate and way cheaper
Arnost55
submitted Custom 3d printer for ship review ago
 Kai the Jolly Guy 🚀
requested changes for Custom 3d printer ago
Kai the Jolly Guy 🚀
requested changes for Custom 3d printer ago
Hey there! Your 3D printer is looking good so far, but it needs a lot more polish. Your entire frame is just one block of who knows what, you need to add proper mounting holes, and it needs to be really obvious what your printer is made out of. This needs some significant improvements and it should be really simple and straightforward for someone to look at it, and be able to build it themselves. If you need any help, feel free to reach out in #blueprint!
Arnost55
submitted Custom 3d printer for ship review ago
 Sidd 🚀
requested changes for Custom 3d printer ago
Sidd 🚀
requested changes for Custom 3d printer ago
This is currently not polished enough for tier 1. The CAD also seems to be missing some features, like mounting holes, the build plate, the bed, pulleys, or idlers. I'd recommend looking at existing printer designs for inspiration.
Grant to expect: $0.02
Arnost55
submitted Custom 3d printer for ship review ago
 Tanuki ⚡🚀
requested changes for Custom 3d printer ago
Tanuki ⚡🚀
requested changes for Custom 3d printer ago
Hi! Blueprint is for complete project designs - read through the submission guidelines and resubmit once you have a complete CAD and/or PCB design proposal. Thanks!
Arnost55
submitted Custom 3d printer for ship review ago
 Shaurya Bisht
requested changes for Custom 3d printer ago
Shaurya Bisht
requested changes for Custom 3d printer ago
"Hi! Blueprint is for complete project designs - read through the submission guidelines and resubmit once you have a complete CAD and/or PCB design proposal. Thanks!"
Arnost55
submitted Custom 3d printer for ship review ago
Arnost55
added to the journal ago
Full 3D/CAD model
SO made the full CAD 3D model with all the parts taken to consideration after my design rejection and in the meantime I am building it in my grandpas steel .png)
.png)
.png)
.png)
garage....
 zsharpminor ⚡
requested changes for Custom 3d printer ago
zsharpminor ⚡
requested changes for Custom 3d printer ago
Hi! Blueprint is for complete project designs - read through the submission guidelines and resubmit once you have a complete CAD and/or PCB design proposal. Thanks!
Arnost55
submitted Custom 3d printer for ship review ago
Arnost55
added to the journal ago
Create a high resolution 3D model of the printer
Past 2 weeks i made the highest quality 3D model of the printer i could do. there is everything and i will be doing a steel assembly for the printer and then assemble the parts. It includes everything. here are some photos and the model is in my github repo....png)
.png)
.png)
.png)
Arnost55
added to the journal ago
Recalculate the things and made progress on my 3D model
So. I am basically recalculating everything now here is the list:
Mainboard: BIGTREETECH Manta E3EZ V1.0 with CB2.2 Native klipper, but not installed. (56.56€)
Display: BTT TFT35 SPI (13.72€)
Probe: BTT EDDY (18.72€)
Motors: BIQU Nema17 c42 motor CNC stepper motor (3×11.33=33.98)
Belt: 10M belt for reserve (9.11€)
Teeth: aluminium teeth for motors and belts (6.93€)
Extruder: BIQU H2 V2S Lite Extruder; cheapest i could find, but great for the price (55.77€)
Body: will be done in my grandpa's garage since he works with metal. (calculated later or probably for free)
Bed: 220mm×220mm (21.48€)
Motion: rails and screw heads etc... (95.08€)
forgot some products werent in the cart: the belts and ribbon cables so this is the total for the project which is 302€ and i hope this is good, that i didnt forget anything...

Arnost55
started Custom 3d printer ago
12/28/2025 2:25 PM - Recalculate the things and made progress on my 3D model
So. I am basically recalculating everything now here is the list:
Mainboard: BIGTREETECH Manta E3EZ V1.0 with CB2.2 Native klipper, but not installed. (56.56€)
Display: BTT TFT35 SPI (13.72€)
Probe: BTT EDDY (18.72€)
Motors: BIQU Nema17 c42 motor CNC stepper motor (3×11.33=33.98)
Belt: 10M belt for reserve (9.11€)
Teeth: aluminium teeth for motors and belts (6.93€)
Extruder: BIQU H2 V2S Lite Extruder; cheapest i could find, but great for the price (55.77€)
Body: will be done in my grandpa's garage since he works with metal. (calculated later or probably for free)
Bed: 220mm×220mm (21.48€)
Motion: rails and screw heads etc... (95.08€)
forgot some products werent in the cart: the belts and ribbon cables so this is the total for the project which is 302€ and i hope this is good, that i didnt forget anything...
12/28/2025 2:26 PM - Create a high resolution 3D model of the printer
Past 2 weeks i made the highest quality 3D model of the printer i could do. there is everything and i will be doing a steel assembly for the printer and then assemble the parts. It includes everything. here are some photos and the model is in my github repo...
12/29/2025 - Full 3D/CAD model
SO made the full CAD 3D model with all the parts taken to consideration after my design rejection and in the meantime I am building it in my grandpas steel
garage....
2/14/2026 - Specifications of my printer
Since I've been receiving feedback about not providing detailed specifications for the build, I want to thank William for the constructive suggestions. I'm now going to review the specifications of my printer, explain how it's built, and include real-life photos since the printer is already complete.
Photo of the printer
Steel Frame
The steel frame is essentially a hollow block structure around the base. It uses M8 hexagon-head screws to mount to the base.
Photo of steel block from inside and outside
Screws
I used the following screws:
- M3 3 mm or M3 6 mm (around 70 screws in total, with spares)
- M4 (8 screws, with spares)
- M8 hexagon-head screws (14 in total, with no spares)
3D Printed Parts
There are two parts that required 3D printing. Everything else is made of steel.
The BTT EDDY duo mount for the extruder
BTT eddy holder for extruder (my creation).stl
The display mount
Extruder
William mentioned that the extruder mount appeared too thin. However, it isn't. It fits perfectly since it's made of steel and doesn't produce any micromovements.
Video demonstrating the mount stability
Wiring Schematic
Here is how to connect the wires to the printer:
Wiring diagram
Conclusion
Since I updated my 3D model, all the measurements are now correct. The process of building the 3D printer is up to you, including how you make the threads and everything else. For example, I made my 3D printer with my grandpa in his steel garage. You can also build it with wood, but I personally prefer steel.
2/20/2026 - Videos not avaible fix
I have made the video now at these links, since the notion video link is not avaible and made new BTT eddy cable since the old one did brek sometimes it works sometimes it doesnt.
Videos are here
The first video is about the extruder mount and the second one is about the steel frame.
Here is a photo of the new cable
3/23/2026 4:03 PM - Phase 2: Material Testing and Base Construction
We started by making test pieces out of four different materials — standard steel, aluminum, wood, and thin steel. We bent them, pressed on them, and tried to flex them to see which one would hold up best as the base of the printer. After testing all four, we picked standard steel because it was the most rigid and didn't flex at all under pressure.
3/23/2026 4:14 PM - Phase 2: Material Testing and Base Construction (Continued)
We cut out the main base plate from steel and also cut the piece that would hold the bottom of the Z-axis. After cutting, we measured where the mounting holes needed to go and carefully marked them out. We then drilled all the holes needed to bolt the Z-axis base onto the main bed base. We checked the fit several times to make sure everything lined up.
3/23/2026 4:24 PM - Phase 3: Custom Machining and Fabrication
We drilled the mounting holes for the linear rails on both the Z and X axes. This had to be very precise because if the holes were even slightly off, the rails would sit crooked and the whole axis would move badly. We also made the bracket that the bed would mount onto. We measured everything twice before drilling.
3/23/2026 4:27 PM - Phase 3: Custom Machining and Fabrication (Continued)
We made a custom steel mount that would hold the Y-axis onto the linear rods. Because we had no blueprint to copy, we had to figure out the exact shape and size ourselves by measuring the rods and the spacing we needed. We made the piece, test fitted it, adjusted it slightly, and fitted it again until it sat properly.
3/23/2026 4:28 PM - Phase 3: Custom Machining and Fabrication (Continued)
We started building the main Z-axis frame. This was one of the bigger parts of the printer and it took a lot of time to get right. We kept test fitting the frame as we built it to make sure our measurements were correct and that nothing was leaning or twisted. We had to stop and redo some parts because they were not sitting straight.
3/23/2026 4:29 PM - Phase 3: Custom Machining and Fabrication (Continued)
We continued working on the Z-axis frame. We ran into problems where some of the parts did not fit the way we expected, so we had to remake them. After remaking the pieces we fitted them again and checked that the frame was square. This part of the build took much longer than we planned because we had to redo several pieces before they were right.
3/23/2026 4:31 PM - Phase 3: Custom Machining and Fabrication (Continued)
We finished off the Z-axis frame problems from the previous session. After remaking the bad parts and refitting everything, the frame finally sat square and solid. We checked the alignment from multiple angles and confirmed it was straight. By the end of this session the Z-axis frame was done and ready to move on.
3/23/2026 4:36 PM - Phase 3: Custom Machining and Fabrication
We built the X-axis and got all the linear rails mounted onto it. Getting the two rails perfectly in the right angle to each other took the most time — if they are not exactly right angle the carriage will bind and not slide smoothly. We slid the carriage back and forth many times after each adjustment until it moved freely from one end to the other with no sticking.
3/23/2026 4:37 PM - Phase 3: Custom Machining and Fabrication (Continued)
We continued fitting the X-axis and testing the travel. We mounted the carriage onto the rails and ran it back and forth to check for smooth movement. There were a couple of spots where it dragged slightly, so we loosened the rail screws, nudged the rail slightly, and retightened until the movement was even across the full length.
3/23/2026 4:40 PM - Phase 3: Custom Machining and Fabrication (Continued)
We finished the X-axis work. The carriage was moving smoothly all the way across with no dragging or sticking. We did a final check of all the rail screws to make sure nothing would come loose during printing. The X-axis was now complete and we moved on to the stepper motor mounts.
3/23/2026 4:41 PM - Phase 3: Custom Machining and Fabrication
We designed and machined the steel stepper motor mounts. Since every axis needed its own mount and we had no existing design to copy, we figured out the shape for each one separately. We cut the first ones out and test fitted them to see if the motor sat at the right angle and height. A few needed small adjustments before they sat correctly.
3/23/2026 4:42 PM - Phase 3: Custom Machining and Fabrication (Continued)
We finished cutting and fitting all the stepper motor mounts. Each one was shaped, filed down where needed, and test fitted to its axis before we moved on to the next. By the end we had mounts done for all axes and they all held the motors in the right position without any wobble.
3/23/2026 4:46 PM - Phase 3: Custom Machining and Fabrication
We started making the main bed holder. This piece needed to hold the heated bed flat and steady, so we were careful about keeping the dimensions exact. We cut the steel to size and started drilling the mounting holes. We kept checking our measurements as we went because a warped or uneven bed holder would cause problems with every single print.
3/23/2026 4:47 PM - Phase 3: Custom Machining and Fabrication (Continued)
We continued refining the bed holder. We test fitted it multiple times and removed small amounts of material where it was not sitting flat. Getting it to sit perfectly took several rounds of fitting and adjusting. We used a flat surface to check how level it was after each adjustment.
3/23/2026 4:49 PM - Phase 3: Custom Machining and Fabrication (Continued)
We finished the bed holder. After the final round of adjustments it sat flat and solid with no rocking. We drilled the last mounting holes and confirmed the fit one more time. With the bed holder done we moved on to planning the wire management for the whole machine.
3/23/2026 4:50 PM - Phase 3: Custom Machining and Fabrication
We planned out how all the cables would be routed inside the printer. We looked at where every wire needed to go — from the motors, the heated bed, the thermistors — and mapped a path for each one that would keep them away from moving parts and hot areas. Once we had a plan we marked where each routing hole needed to be drilled.
3/23/2026 4:52 PM - Phase 3: Custom Machining and Fabrication (Continued)
We drilled the cable routing holes through the frame and base. We went through each planned hole one by one, drilling carefully so nothing cracked or split. After drilling each hole we deburred it so the cable insulation would not get damaged when wires were pushed through later.
3/23/2026 4:53 PM - Phase 3: Custom Machining and Fabrication (Continued)
We finished all the routing holes. We then did a test run with a piece of wire to check that each hole was in the right position and that the wire could pass through cleanly. All paths were confirmed to be clear and the routing plan was ready to be used during the wiring stage later.
3/23/2026 4:57 PM - Phase 3: Custom Machining and Fabrication
We mounted the PSU inside the base and started securing it in place. We bolted it down and checked that it sat firmly without any movement. Once it was fixed in place we started running the first wires from the PSU toward the mainboard, keeping them tidy and following the routing holes we had drilled earlier.
3/23/2026 5:02 PM - Phase 3: Custom Machining and Fabrication (Continued)
We continued wiring from the PSU and finished securing it completely. All the bolts were tightened down and the wires that had been run so far were clipped into place along their routing paths. The PSU was now fully installed and its connections were ready to meet the mainboard once that was in position.
3/23/2026 5:05 PM - Phase 3: Custom Machining and Fabrication (Continued)
We put the mainboard into its housing. We used standoffs to lift it off the metal so it would not short circuit against the frame. We positioned it so that all its connectors would line up with the port holes we would cut later. Once it was in the right spot we started connecting the first cables from the PSU to the board.
3/23/2026 5:11 PM - Phase 3: Custom Machining and Fabrication (Continued)
We continued connecting cables to the mainboard. We worked through each connection one at a time and checked it against the wiring diagram before moving on. Getting this right was important because a wrong connection could damage the board or the motors when we first power it on.
BTW sorry for the bad title of my journal below. I cannot change it for now since my project is in review.
3/23/2026 5:15 PM - Phase 3: Custom Machining and Fabrication (Continued)
We finished the mainboard cable connections. All the wires were connected and we went through the full wiring diagram one more time to confirm nothing was missed or plugged into the wrong spot. Once we were happy with it all we secured the cables with clips so they could not pull loose.
3/23/2026 5:17 PM - Phase 3: Custom Machining and Fabrication
We cut the port holes in the base so the mainboard's connectors could be accessed from outside. We marked each hole directly from the board's connector positions and cut them out carefully. Too small and the plugs would not fit, too big and it would look messy. After cutting we filed each hole smooth so no sharp edges were left.
3/23/2026 5:20 PM - Phase 3: Custom Machining and Fabrication (Continued)
We filed and cleaned up all the port holes. Each one got a pass with the file to remove any burrs and rough edges. We then test fitted a plug through each hole to confirm the size was right. Everything lined up correctly with the mainboard connectors behind it.
3/23/2026 5:22 PM - Phase 3: Custom Machining and Fabrication (Continued)
We made the extruder mount and started drilling the ventilation holes in the base. The extruder mount was cut from steel and shaped to hold the extruder in the right position on the X-axis carriage. The ventilation holes were drilled in the areas near the PSU and mainboard where heat builds up the most during long prints.
3/23/2026 5:23 PM - Phase 3: Custom Machining and Fabrication (Continued)
We finished drilling all the ventilation holes. We deburred each hole and checked that the airflow path through the base made sense. With that done, Phase 3 was complete. Every part of the frame and base had been machined, all the mounting points were in place, and the machine was ready to be fully assembled.
3/23/2026 6:00 PM - Phase 4: Assembly, Troubleshooting, and Final Touches
We assembled the heated bed frame. This meant bringing all the separate pieces together and bolting them into their final positions. We checked the frame was square as we went and made sure the surface the bed would sit on was flat. We also started running the heated bed wiring at the same time so we would not have to take things apart again later.
3/23/2026 6:01 PM - Phase 4: Assembly, Troubleshooting, and Final Touches (Conti
We continued the heated bed frame assembly and wiring. The wiring was routed carefully through the routing holes and secured with clips. We made sure the cable had enough slack to move with the bed as it travels on the Y-axis but not so much that it would drag on the frame or get caught on anything.
3/23/2026 6:02 PM - Phase 4: Assembly, Troubleshooting, and Final Touches (Conti
We finished the heated bed frame. All the bolts were tightened down and the wiring was fully secured. We checked the frame one last time to make sure it was level and that nothing was loose. With the bed frame done we moved on to assembling the X-axis components.
3/23/2026 6:03 PM - Phase 4: Assembly, Troubleshooting, and Final Touches
We put the X-axis together. We fitted the carriage onto the rails and started connecting all the parts that mount onto it. We tested the travel as we built it up to make sure adding more parts did not cause any binding. The carriage moved smoothly so we kept going and got all the main X-axis parts bolted into place.
3/23/2026 6:04 PM - Phase 4: Assembly, Troubleshooting, and Final Touches (Conti
We continued the X-axis assembly, focusing on belt routing and tensioning. We ran the belt through the carriage and around the motor pulley and idler, then tightened it until the belt had the right amount of tension. Too loose and the carriage would have backlash, too tight and it would put too much load on the motor.
3/23/2026 6:05 PM - Phase 4: Assembly, Troubleshooting, and Final Touches (Conti
We finished the X-axis. The belt was tensioned correctly and the carriage moved smoothly across the full travel with no slack or binding. We did a final check of all the bolts and confirmed everything was tight. The X-axis was fully assembled and working correctly.
3/23/2026 6:14 PM - Phase 4: Assembly, Troubleshooting, and Final Touches
We assembled the Y-axis. We fitted the bed carriage onto the Y-axis rods and started building up the assembly. We tensioned the belt at the same time as fitting the parts so we could fine tune both together. The bed carriage slid along the rods and we kept testing it as we went to make sure everything stayed aligned.
3/23/2026 6:16 PM - Phase 4: Assembly, Troubleshooting, and Final Touches (Conti
We finished the Y-axis. The carriage was moving smoothly across its full range with consistent belt tension. All bolts were tightened and we ran a final travel test. The Y-axis was done and working as expected so we moved on to fitting the extruder assembly.
3/23/2026 6:20 PM - Phase 4: Assembly, Troubleshooting, and Final Touches
We fitted the extruder mount onto the X-axis carriage and attached the extruder to it. We positioned the mount carefully to make sure the nozzle would end up at the right height above the bed. Once it was in the right spot we tightened all the bolts down and checked that the extruder was sitting straight with no tilt.
3/23/2026 6:21 PM - Phase 4: Assembly, Troubleshooting, and Final Touches (Conti
We tightened down all the bolts on the extruder mount and checked the nozzle height. We moved the carriage to different positions across the bed and measured the gap between the nozzle and the bed surface at each spot to make sure it was consistent. A consistent height means the first layer of any print will come out evenly.
3/23/2026 6:23 PM - Phase 4: Assembly, Troubleshooting, and Final Touches
We finished the extruder assembly. All bolts were fully secured and the final nozzle height check confirmed it was sitting correctly across the whole bed area. With the extruder done the printer had all its main moving parts fully assembled for the first time.
3/23/2026 6:26 PM - Phase 4: Assembly, Troubleshooting, and Final Touches
We ran into a problem with the Z-axis — it was binding as it moved up and down. It would move a little then stick or grind slightly. We started by looking at the rod to see if they were straight. We found that the rod was slightly out of alignment and that was causing the binding. We loosened the mounts to start fixing it.
3/23/2026 6:29 PM - Phase 4: Assembly, Troubleshooting, and Final Touches (Conti
We realigned the Z-axis rod. We loosened the clamps at the top and bottom of the rod and carefully moved it until the rod was sitting parallel. We used a square and a ruler to check the spacing at multiple points along the height. After each small adjustment we moved the axis by hand to see if the binding was getting better.
3/23/2026 6:30 PM - Phase 4: Assembly, Troubleshooting, and Final Touches (Conti
We finished fixing the Z-axis. After several rounds of adjusting and testing the rods was aligned and the axis moved smoothly all the way up and down with no sticking. We tightened all the clamps back down and tested the full travel again to confirm the fix was solid before moving on.
3/23/2026 6:32 PM - Phase 4: Assembly, Troubleshooting, and Final Touches
We mounted the build plate and fitted the leveling springs. The build plate sits on four corners each held up by a spring and a thumb screw. We set each spring to roughly the same compression so the bed was starting from a level-ish position. Getting the springs even meant we would not have to make huge adjustments when we did the proper leveling later.
3/23/2026 6:34 PM - Phase 4: Assembly, Troubleshooting, and Final Touches (Conti
We adjusted the spring tension at each corner and did a first manual level of the bed. We moved the nozzle to each corner and adjusted the thumb screw under each spring until the gap between the nozzle and the bed was the same at all four corners. This is called tramming and it is the starting point before the probe can do its job.
3/23/2026 6:37 PM - Phase 4: Assembly, Troubleshooting, and Final Touches (Conti
We found that the Y-axis bed could only move about three quarters of the distance it was supposed to. It was hitting a physical limit before reaching the end of its travel range. We looked at where the issue was coming from and found that the way the bed was mounted was blocking it from going further. We started planning how to rework the mounting to fix this.
3/23/2026 6:47 PM - Phase 4: Assembly, Troubleshooting, and Final Touches (Conti
We reworked the Y-axis mounting geometry. We unbolted the relevant parts, repositioned the mounting points, and reassembled. After each change we tested how far the bed could travel. It took a few attempts to find the right position but by the end of this session the bed was getting much closer to its full travel range.
3/23/2026 6:48 PM - We reworked the Y-axis mounting geometry. We unbolted the re
We finished fixing the Y-axis travel issue. After the final mounting adjustment the bed was able to reach its full intended travel length with clearance at both ends. We ran it back and forth many times to confirm it was consistent and that nothing was catching. The Y-axis was now working correctly.
3/23/2026 6:49 PM - Phase 4: Assembly, Troubleshooting, and Final Touches
We installed the front display screen and mounted the BTT Eddy probe. The display was screwed into its cutout on the front of the base and wired up to the mainboard. The probe was mounted next to the nozzle at a set distance so the firmware would know exactly how far the probe is from the nozzle when calculating bed level compensation.
3/23/2026 6:53 PM - Phase 4: Assembly, Troubleshooting, and Final Touches (more)
We finished wiring the display and the BTT Eddy probe. All cables were run through the routing holes to the mainboard and connected to the correct pins. We checked each connection before powering anything on. The display lit up and showed the interface correctly, which confirmed the mainboard was working and the wiring was right.
3/23/2026 6:54 PM - Phase 4: Assembly, Troubleshooting, and Final Touches (more)
We connected the final cables. This was the wiring for all the motors, and thermistors. We went through each one systematically, connecting it to the right pin on the mainboard and securing it in place. By the end of this session every single wire in the printer was connected and the machine was electrically complete.
3/23/2026 6:55 PM - Phase 4: Assembly, Troubleshooting, and Final Touches (more)
We went through all the wiring one more time to double check every connection. We also tidied up the cables, bundled them together where possible, and secured them properly with cable ties and clips. The inside of the base now looked clean and organized with no loose wires hanging around.
3/23/2026 6:56 PM - Phase 4: Assembly, Troubleshooting, and Final Touches (more)
We painted the frame and parts with the first coat of black paint. We let it dry fully before deciding if another coat was needed. The first coat covered most areas well but there were a few thin spots that needed another pass. We kept the coats thin so the paint would not run or drip.
3/23/2026 6:57 PM - Phase 4: Assembly, Troubleshooting, and Final Touches (more)
We applied more coats of paint and let each one cure before adding the next. By the end the finish was solid and even with no thin spots or drips. The frame looked clean and professional in black. Once the paint was fully cured we started putting the disassembled parts back together.
3/23/2026 6:58 PM - Phase 5: Klipper Installation and Configuration
We set up the BTT CB1 to run Klipper. We flashed the CB1 with its OS image, connected it to our network, and got SSH access working so we could type commands into it from a computer. This was the first step before we could install any software onto it.
3/23/2026 7:01 PM - Phase 5: Klipper Installation and Configuration (Continued)
We compiled Klipper manually and flashed it to the mainboard. We downloaded the Klipper code, set the right options for our specific mainboard chip, and built the firmware file. We then connected the mainboard to the CB1 over USB and flashed the firmware onto it. When it was done the mainboard was running Klipper firmware and the CB1 could talk to it.
3/23/2026 7:02 PM - Phase 5: Klipper Installation and Configuration (Continued)
We installed Moonraker and set up Mainsail. Moonraker is the software that sits between Klipper and the web interface. Mainsail is the web page we use to control the printer. After installing both and setting them up we opened Mainsail in a browser and saw the dashboard for the first time. It was connected to Klipper and showing the printer status.
3/23/2026 7:03 PM - Phase 5: Klipper Installation and Configuration (Continued)
We wrote the printer.cfg file from scratch. This file tells Klipper everything about our printer — which pin controls which motor, which pin reads which endstop, what thermistor type is on the hotend and bed, and so on. Because we built the printer ourselves we had to map every single pin manually by looking at our own wiring.
3/23/2026 7:04 PM - Phase 5: Klipper Installation and Configuration (Continued)
We tested each axis through Mainsail after writing the config. We jogged each motor from the interface and watched which direction it moved. Some motors were going the wrong way so we added a direction invert in the config and tested again. We also triggered each endstop by hand and confirmed Klipper detected it correctly.
3/23/2026 7:05 PM - Phase 5: Klipper Installation and Configuration (Continued)
We finished correcting the motor directions and endstop logic in the config. All three axes were now moving in the right direction and homing correctly. The printer could home itself without crashing into anything. This was a big step because it meant the basic config was working and we could start doing the real calibration.
3/23/2026 7:06 PM - Phase 5: Klipper Installation and Configuration
We ran PID tuning on the hotend and the heated bed. PID tuning makes the temperature control stable — without it the temperature would overshoot and drop repeatedly instead of staying steady. Klipper has a built in command to do this automatically. We ran it for the hotend, saved the result, then ran it for the bed and saved that too.
3/23/2026 7:07 PM - Phase 5: Klipper Installation and Configuration (Continued)
We calibrated the extruder rotation distance. We marked 100mm of filament with a marker, told Klipper to push 100mm through the extruder, and then measured how much filament actually moved. It was not exactly 100mm so we calculated the correct rotation distance value and updated the config. We repeated this a few times until it was pushing exactly the right amount.
3/23/2026 7:11 PM - Phase 5: Klipper Installation and Configuration (Continued)
We configured the BTT Eddy probe and ran a bed mesh calibration. The probe scans a grid of points across the bed surface and maps out any high or low spots. Klipper uses this map to automatically adjust the Z height as the print head moves, so even if the bed is not perfectly flat the first layer still comes out even.
3/23/2026 7:12 PM - Phase 5: Klipper Installation and Configuration (Continued)
We ran our first real test prints. We printed a small flat square to check the first layer and a small cube to check the overall dimensions. The first layer had some adhesion issues in a few spots and the cube came out slightly over-extruded. We took notes on exactly what was wrong so we could fix each issue one at a time. Sorry I threw them away.
3/23/2026 7:13 PM - Phase 5: Klipper Installation and Configuration (Continued)
We fixed the first layer adhesion issue by adjusting the z-offset. The nozzle was sitting slightly too far from the bed so the first layer was not squishing down properly. We lowered the z-offset a tiny amount and ran another test. The adhesion was much better and the first layer was sticking evenly across the whole surface.
3/23/2026 7:15 PM - Phase 5: Klipper Installation and Configuration (Continued)
We fixed the over-extrusion by fine tuning the rotation distance further. Even though we calibrated it earlier it needed a small correction. We printed another test cube, measured it with calipers, and calculated how much to adjust the value. After one more correction the dimensions were much closer to what they should be.
3/23/2026 7:16 PM - Phase 5: Klipper Installation and Configuration (Continued)
We ran into bigger problems during printing. The prints were showing inconsistent layers and in some cases the print head would shift position mid-print. We suspected there might be a hardware issue rather than just a config problem so we started checking the machine physically — looking at belt tension, checking for any loose bolts, and inspecting all the wiring connections.
3/23/2026 7:17 PM - Phase 5: Klipper Installation and Configuration (Continued)
We found a loose connection in the wiring during our hardware check. One of the crimped connectors going to the mainboard was not making solid contact. We re-crimped it and re-seated it firmly. We also went around and checked every other connector to make sure nothing else was about to come loose.
3/23/2026 7:18 PM - Phase 5: Klipper Installation and Configuration (Continued)
We checked the stepper motor driver current settings in the config. The drivers were set too low which can cause the motors to skip steps under load, which would explain the layer shifting. We increased the current to a more appropriate level for our motors and ran test prints again to see if the shifting had stopped.
3/23/2026 7:20 PM - Phase 5: Klipper Installation and Configuration (Continued)
The layer shifting was much better after the current fix but not completely gone. We printed more test pieces and carefully watched each print to see exactly when and where the shift was happening. We noticed it happened most often during fast moves so we lowered the print speed and acceleration in the config to reduce the load on the motors during those moves.
3/23/2026 7:21 PM - Phase 5: Klipper Installation and Configuration (Continued)
We ran into an issue with the extruder. The prints were showing inconsistent extrusion where some layers looked normal and others were under-extruded. We took the extruder apart and found that the tension on the filament grip was not consistent. We reassembled it and adjusted the tension screw to give the filament a firmer and more even grip.
3/23/2026 7:23 PM - Phase 5: Klipper Installation and Configuration (Continued)
After fixing the extruder grip tension we ran more test prints. The inconsistent extrusion was gone and the layers looked much more even. We then did another extruder calibration from scratch since we had physically changed the extruder setup. The new rotation distance value was slightly different from before and we saved it to the config.
3/23/2026 7:23 PM - Phase 5: Klipper Installation and Configuration (Continued)
We ran a fresh bed mesh calibration now that all the hardware and config problems were sorted out. The mesh results were much cleaner than the earlier attempts. We also re-did the z-offset after the extruder work since anything that changes the nozzle height needs the offset to be rechecked. The first layer was printing consistently across the whole bed.
3/23/2026 7:27 PM - Phase 5: Klipper Installation and Configuration (Continued)
We ran a set of longer and more complex test prints to check that the printer was working reliably over an extended period. We printed multi-layer pieces that took over an 20 minutes each. They came out with no layer shifting, consistent extrusion, and good adhesion all the way through. This was the first time the printer had produced good quality prints consistently. But I threw them away since they were not required but later I needed to calibrate the printer again since it started to print worse.
3/23/2026 7:27 PM - Phase 5: Klipper Installation and Configuration (Continued)
We used calipers to measure several printed test pieces and compare them to the intended dimensions from the slicer. Most were within 0.1 to 0.2mm which is acceptable for a printer like this. We made small adjustments to the rotation distance for the axes to get the dimensions even closer, then printed and measured again to confirm the improvement.
3/23/2026 7:28 PM - Phase 5: Klipper Installation and Configuration (Continued)
We ran a final bed mesh calibration and locked in the z-offset. We also did a final PID tune for the hotend and bed now that the printer was fully stable. All the results were saved to the config. The printer was now producing consistent output with accurate dimensions and a reliable first layer on every print.
3/23/2026 7:29 PM - Phase 5: Klipper Installation and Configuration (Continued)
We cleaned up the printer.cfg file. We removed old test values, organized the sections, and added comments to explain what each setting does and why we set it to that value. A clean and well-commented config file makes it much easier to make changes later without breaking something by accident.
3/23/2026 7:31 PM - Phase 5: Klipper Installation and Configuration (Continued)
We did a final review of all the key settings in the config — rotation distances, PID values, z-offset, bed mesh, speed and acceleration limits. Each one was confirmed as correct and the printer was printing reliably. This session closed out the calibration phase and marked the end of ~400 hours of work from the first piece of steel to a fully working custom 3D printer.
3/23/2026 7:34 PM - Phase 5: Klipper Installation and Configuration (Continued)
We ran stress test prints to make sure the printer held up over longer sessions. We ran prints for several hours at a time and checked them periodically. The temperatures stayed stable, the axes moved consistently, and there were no failures. The printer was working reliably under sustained use.
3/23/2026 7:34 PM - Phase 5: Klipper Installation and Configuration (Continued)
We ran a final bed mesh after all the testing to make sure nothing had shifted from the extended use. The mesh was clean and matched our previous results closely which confirmed the mechanical side of the printer was stable. We saved the final mesh and locked all the settings in the config.
3/23/2026 7:36 PM - Phase 5: Klipper Installation and Configuration (Continued)
We printed a final batch of test pieces to verify everything one last time. All prints came out accurate, consistent, and with no defects. We measured the key dimensions and they were all within tolerance. The printer was fully calibrated and working as intended, closing out the entire build and calibration process at 410
hours.
3/23/2026 7:38 PM - Phase 5: Klipper Installation and Configuration (Continued)
We did the final tidy up — the config file was organized, all the settings were documented with comments, and the printer was cleaned up physically. Any leftover swarf or paint marks were cleaned off. The printer was now completely finished. From the first material test at hour 0 to this final session at hour 415, my grandfather and I built a fully working 3D printer entirely from scratch.
3/23/2026 7:47 PM - Address the potential questions for this project
Firstly I want to thank everyone that helped me out. The next thing that I would like to address is the hours that I have put (they are an estimate and if you think the job does not match the hours, I get it. But they were evenly spread out since I had the journals made before I uploaded them. So the total hours that are up there those are real it took me a lot of time. So I hope you understand.) The next thing are the titles. They are sometimes not finished That is because I did not count the Characters. I really hope that you understand this and thank you.
3/29/2026 - Address the video
So on my video there is a bad print since I got some issues with extruding, overflow and underflow and I did not have time since I needed to make my video. Hope you understand...