Rohideck
A cyberdeck that I am building for Blueprint YSWS :)
Created by
 Rohit
Rohit
Tier 1
56 views
2 followers
Timeline
 CAN ⚡🚀
approved Rohideck ago
CAN ⚡🚀
approved Rohideck ago
Tier approved: 1
Grant approved: $420.00
Rohit
submitted Rohideck for review ago
Rohit
added to the journal ago
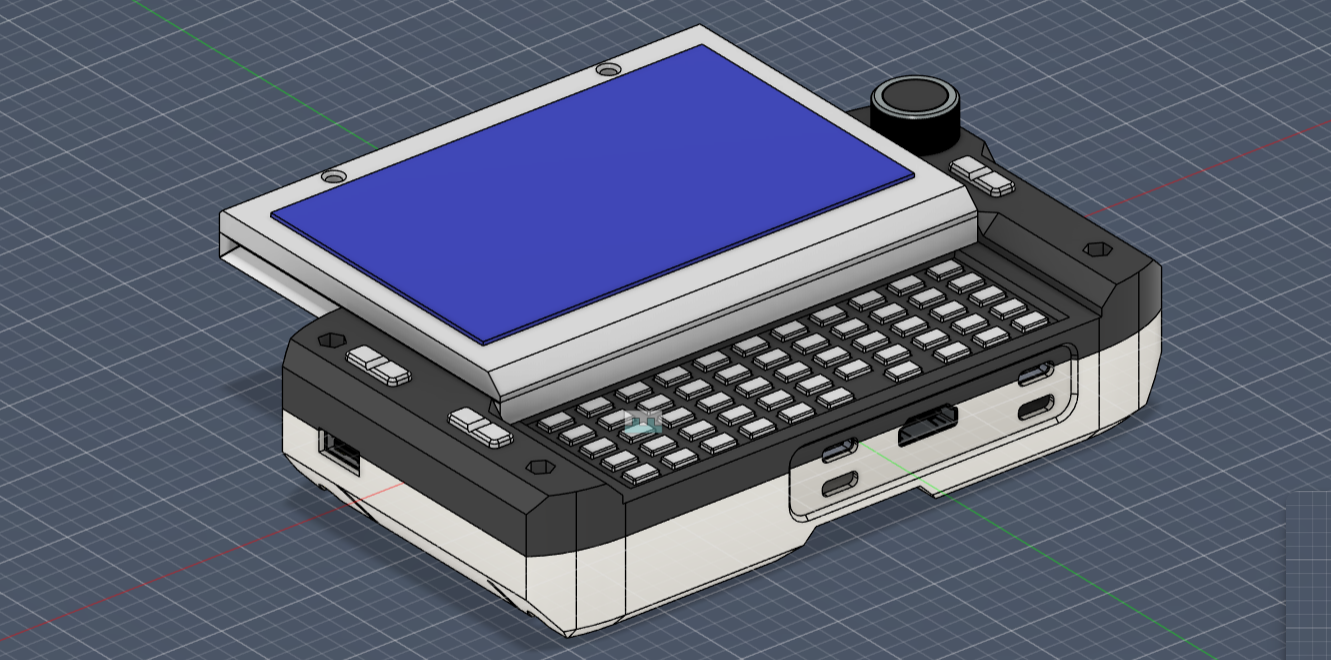
Assembled all the parts and uploaded stuff to my github repo
Today, I finally finished assembling all of the parts I had been working on in Fusion 360. merged all of the individual components into a single, comprehensive assembly, including the display PCB, the top and bottom halves of the case, the mounts, and all of the tiny parts. It was immensely satisfying to see everything come together in 3D after spending so much time designing each component independently.
Of course, it wasn't all smooth. I had to fix a few alignment issues when putting the parts together. Some faces weren't mating correctly, and some screw holes weren't as neatly aligned as I had hoped.
Rohit
added to the journal ago
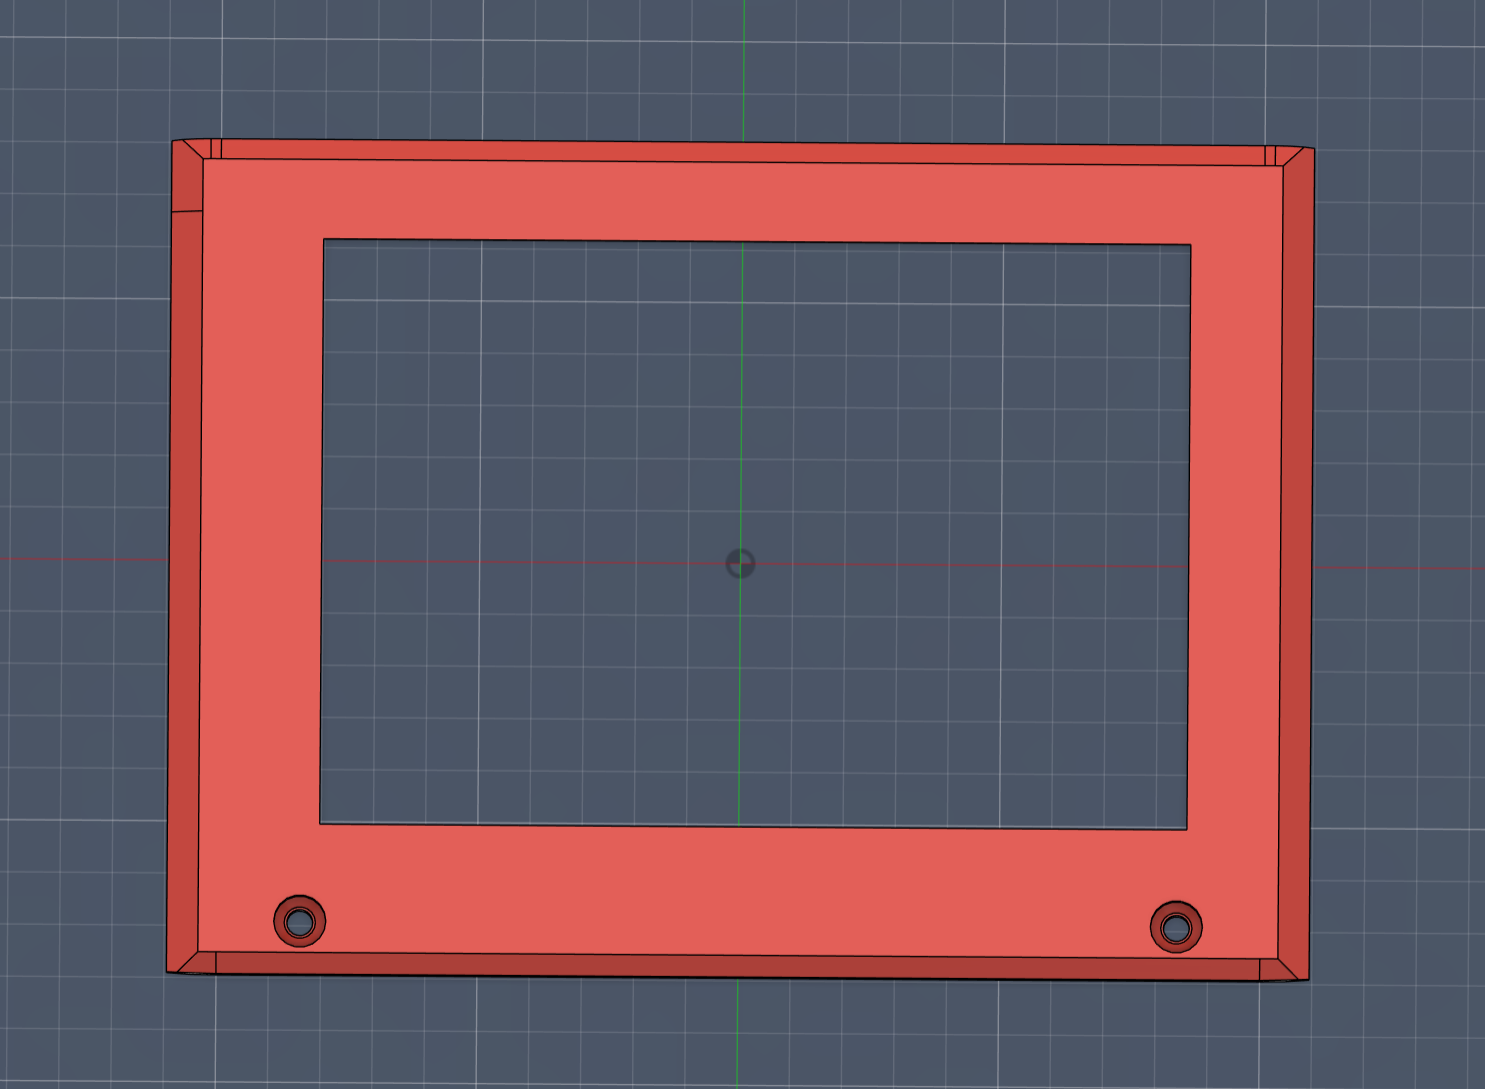
the top half of the display case
spent most of the time just modeling the top half of the display case. it honestly took longer than expected lining everything up with the pcb was kind of a pain. had to double check the display cutout, standoff placement, and make sure nothing would crash into the components later. i played around with the screen window quite a bit… didn’t want it to look bulky, but also didn’t want it too snug and risk it scraping the screen when assembled. added a few guiding walls inside so the pcb can sort of “slot in” when it’s time. should help with alignment too. tweaked tolerances here and there, especially around the screen opening. might still need adjustments after the first print, but visually it’s looking nice. not the most fun part of the build, but we’re getting there.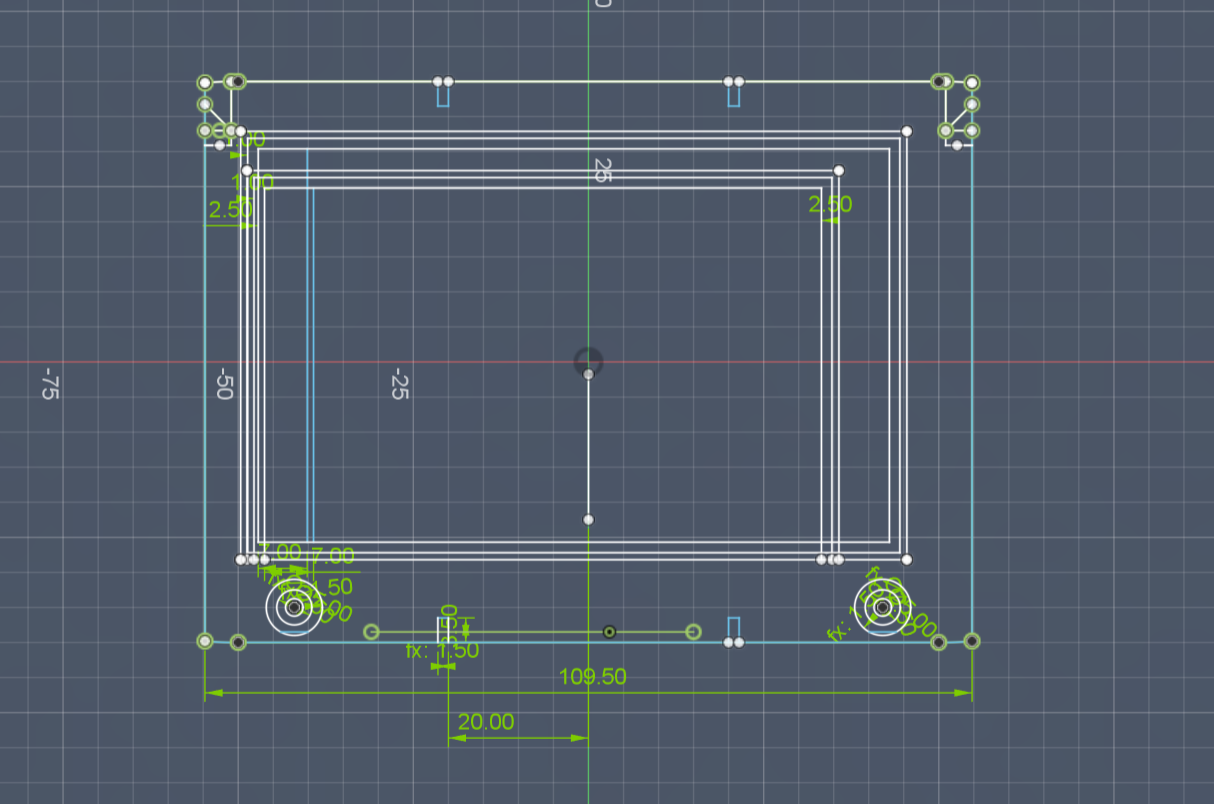
Rohit
added to the journal ago
started work on the top half of the case
I started working on the top half of the case. This part was kind of annoying, to be honest. I had to figure out the exact cutout for the display and ensure it sat flush without pressing too hard on the screen. It took a few tries to get the depth right. I kept toggling between the model and the actual display dimensions just to be sure.Then came the USB port clearance, which was a real hassle. Tiny shifts made it either not fit or too loose. I finally added a small beveled area around it so it wouldn’t scrape while plugging things in. I also had to make sure the mounting holes lined up perfectly with the bottom half. I used offsets and several measuring tools in Fusion to get it right. I added a little lip around the edges to help with alignment when snapping it on, and I created some space inside for routing wires from the display. It’s not the prettiest lid, but it gets the job done. I might refine the outer surface later to make it look cleaner. For now, I’m just focused on function.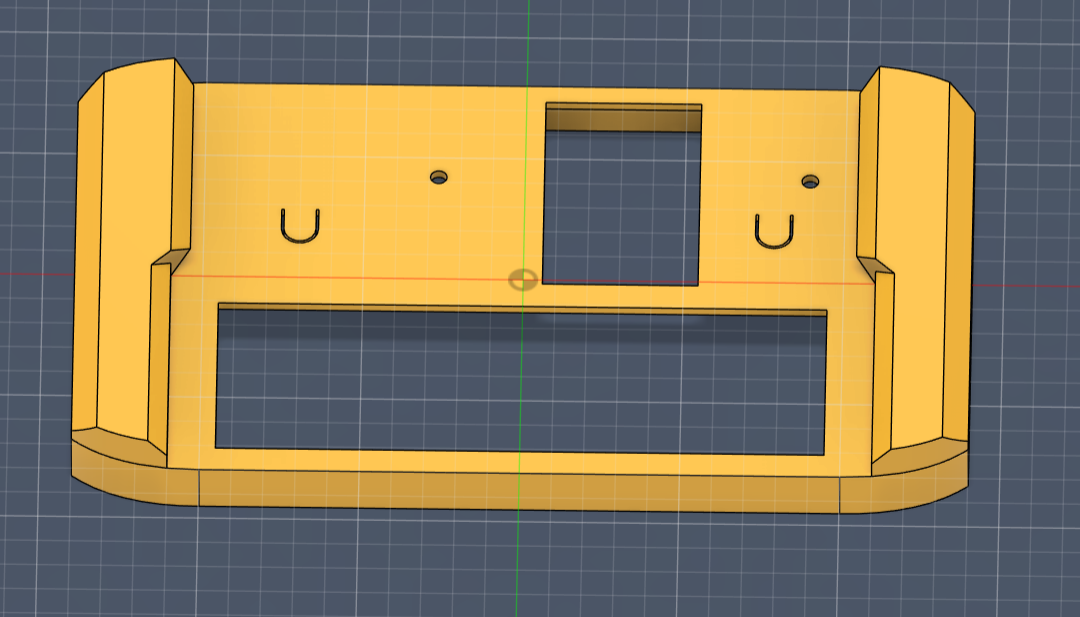
Rohit
added to the journal ago
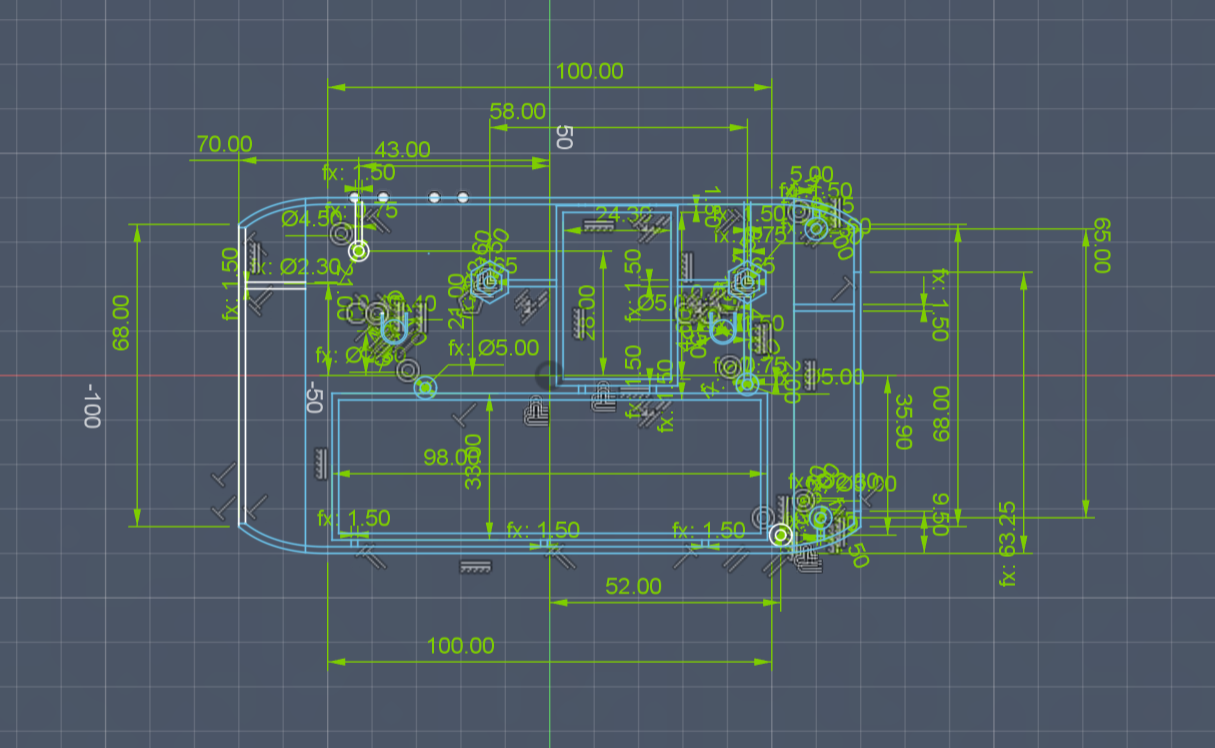
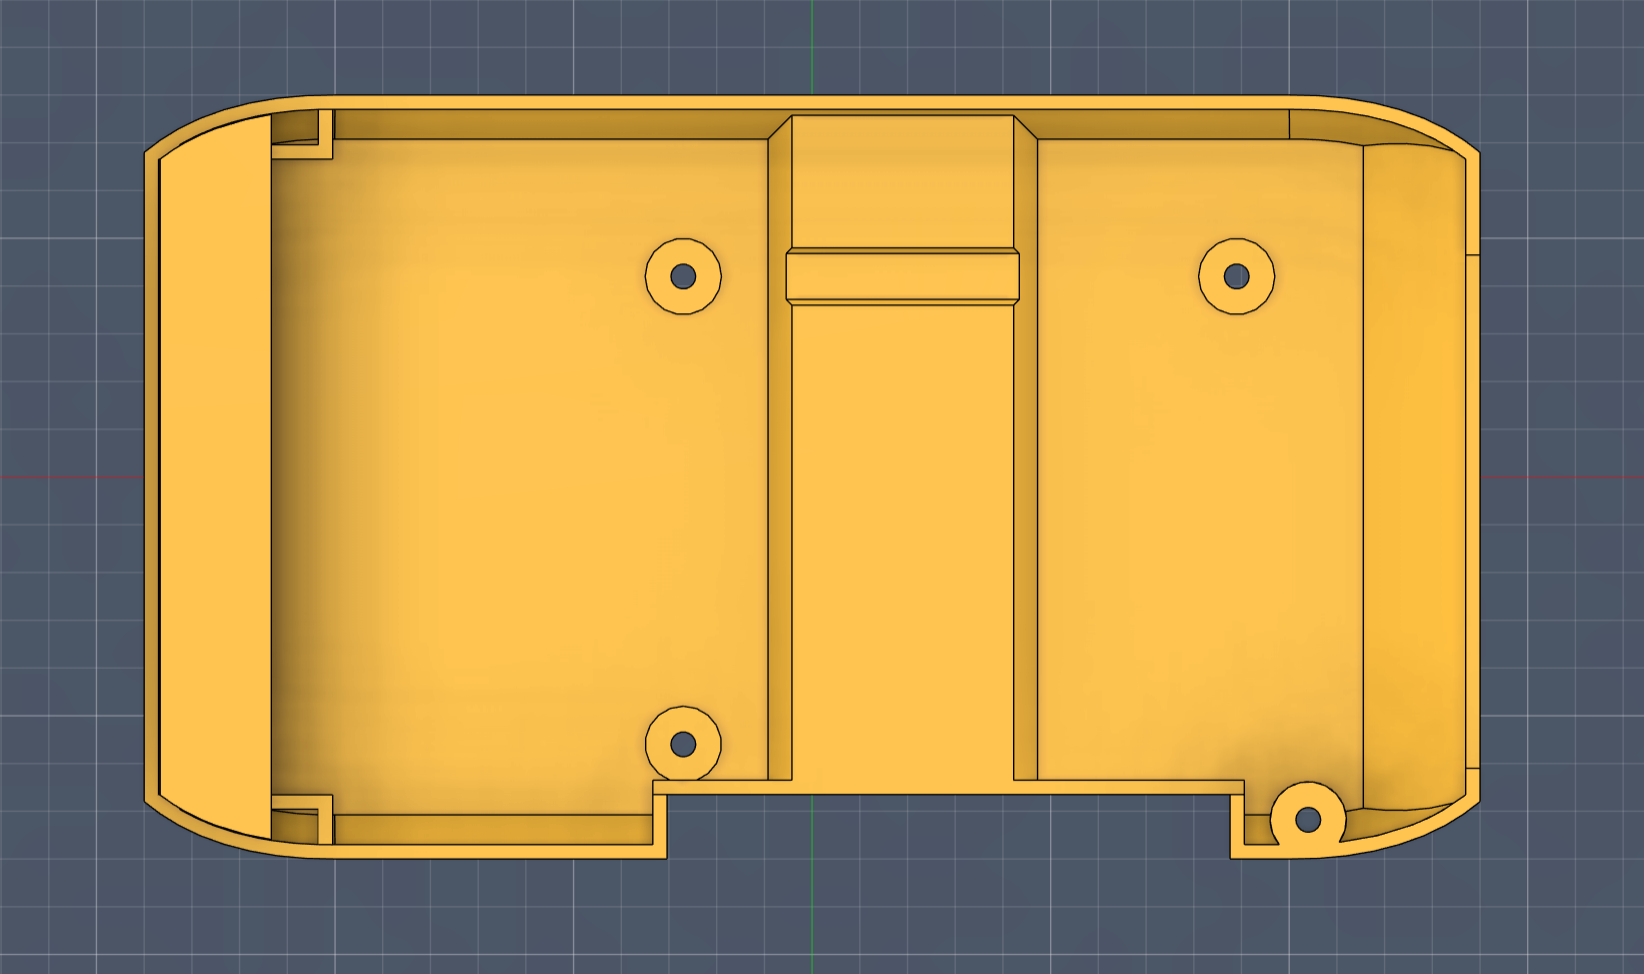
finished bottom half of the display case
Worked on the bottom half of the display case again today and yeah, this one turned into a bit of a headache. Thought I had everything lined up perfectly from the last time, but once I started checking against the PCB, a bunch of small mistakes popped up. Hole spacing was slightly off, one of the mounting bosses was shifted, and somehow the screen cutout ended up a few millimeters too low. Spent the next three hours just correcting dimensions, realigning parts, and re-exporting the model like ten times.
It was one of those “looks fine until you zoom in” kind of days. Eventually got everything to line up properly holes, ports, and screen area all matching the PCB layout. Painful process, but the bottom half finally fits like it should now. Definitely learned to double-check my reference planes before locking in dimensions.
Rohit
added to the journal ago
finished the case for the display PCB
Did a round of redesigns on the display PCB case today. The fit was way off the board wasn’t sitting properly, and a couple of mounting points were slightly misaligned. Spent a good chunk of time figuring out where the interference was happening. Turns out a few standoffs were just a millimeter too tall, and one of the inner walls was pushing against the header pins. Ended up reworking that entire section, lowered the standoffs a bit, and shifted the internal supports to line up cleanly with the PCB. Also widened the slot near the connector since it was way too tight. Not the most exciting part of the build, but necessary. The new version should finally snap together without forcing it.
Rohit
added to the journal ago
bottom half of the display case
Started designing the bottom half of the display case. The goal was to keep it simple but still make sure everything lines up clean. Took a bit of time messing with dimensions mainly double checking hole positions it matched the PCB layout. Rounded off the corners to make it less boxy and added a small notch for cable clearance later if I need it. The cutouts for the screen area and the mounts came out nice in the 3D preview.
Honestly just getting the case to sit right with the PCB was half the battle, but it looks solid now. Ready to move on to the top half next.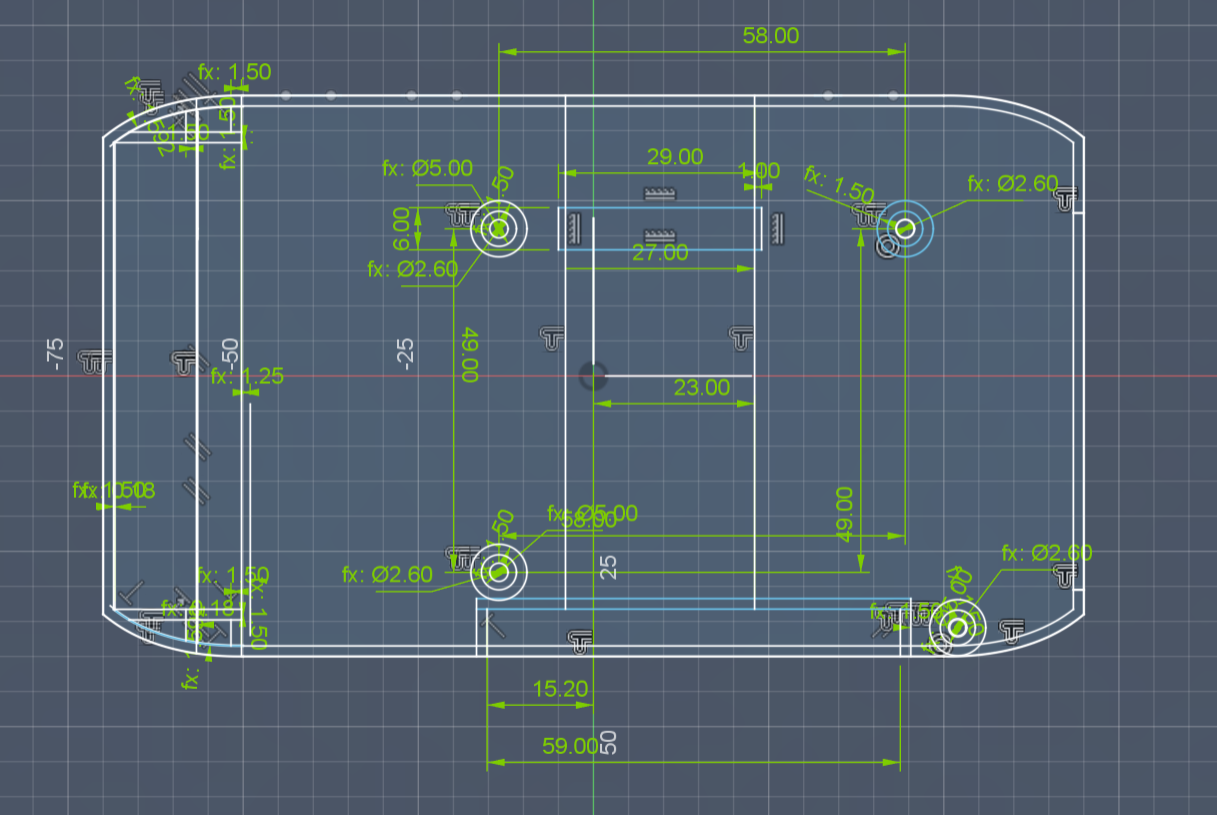
Rohit
added to the journal ago
work on the case for the display PCB
Did more work on the case for the display PCB today. Most of the time went into figuring out the outer dimensions so the board actually fits in clean. Kept adjusting a few mm here and there to match the rough size I had in my head. Took way longer than it should’ve. Once that was sorted, I started adding the cutouts and screw holes. made sure the ports had breathing room, and triple-checked all the hole spacing. Don’t wanna be that guy who forgets to leave space for the USB port. Didn’t bother adding fillets or rounded corners yet just getting the basic shape right for now. Might tweak the aesthetics later once I test fit the first cut. But yeah, it’s finally starting to look like a proper case.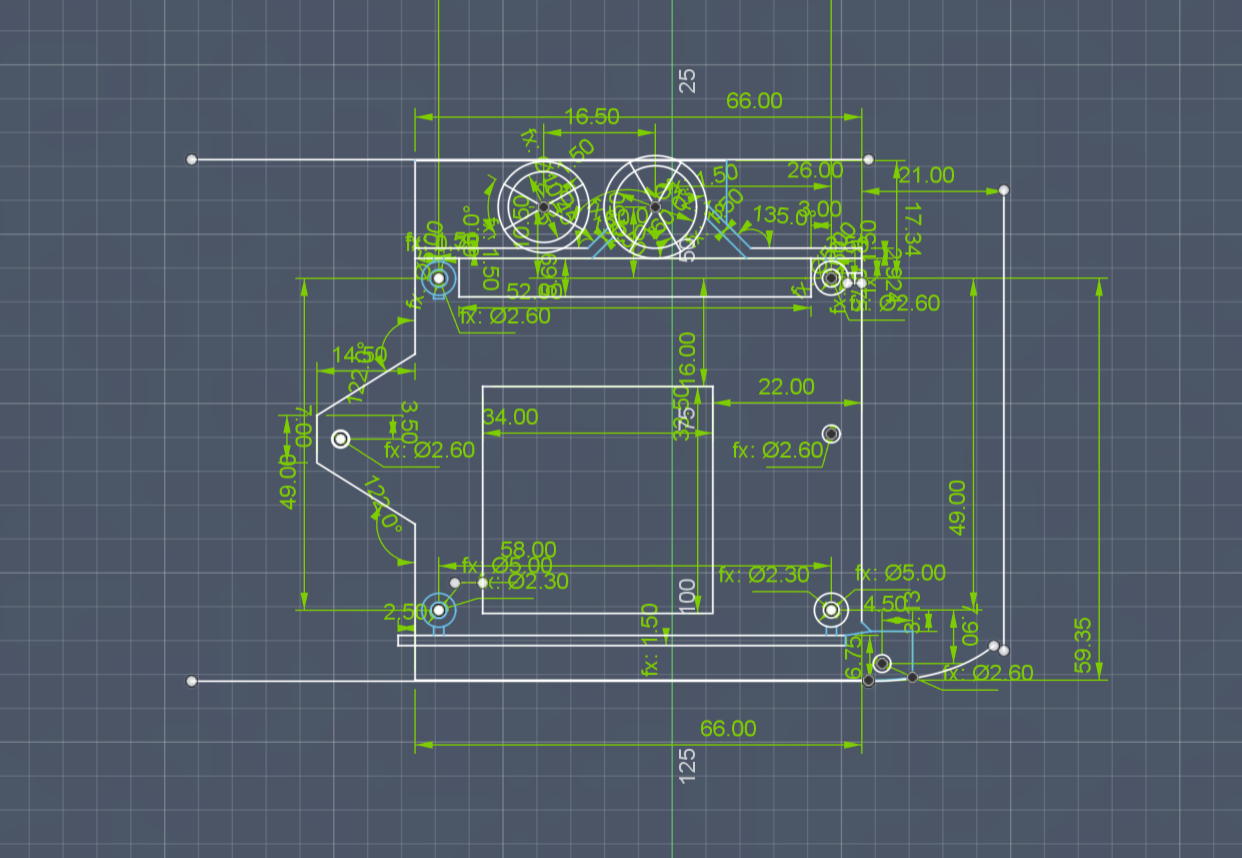
Rohit
added to the journal ago
final layout of the main PCB, all the chaos finally connecte
big day finished up the main PCB layout and it’s giving boss battle energy
revisited every sheet and double checked for footprint mismatches or missing caps
replaced some jank passives from earlier with proper parts and cleaned up nets
went full sent on layout had to rip up the power plane.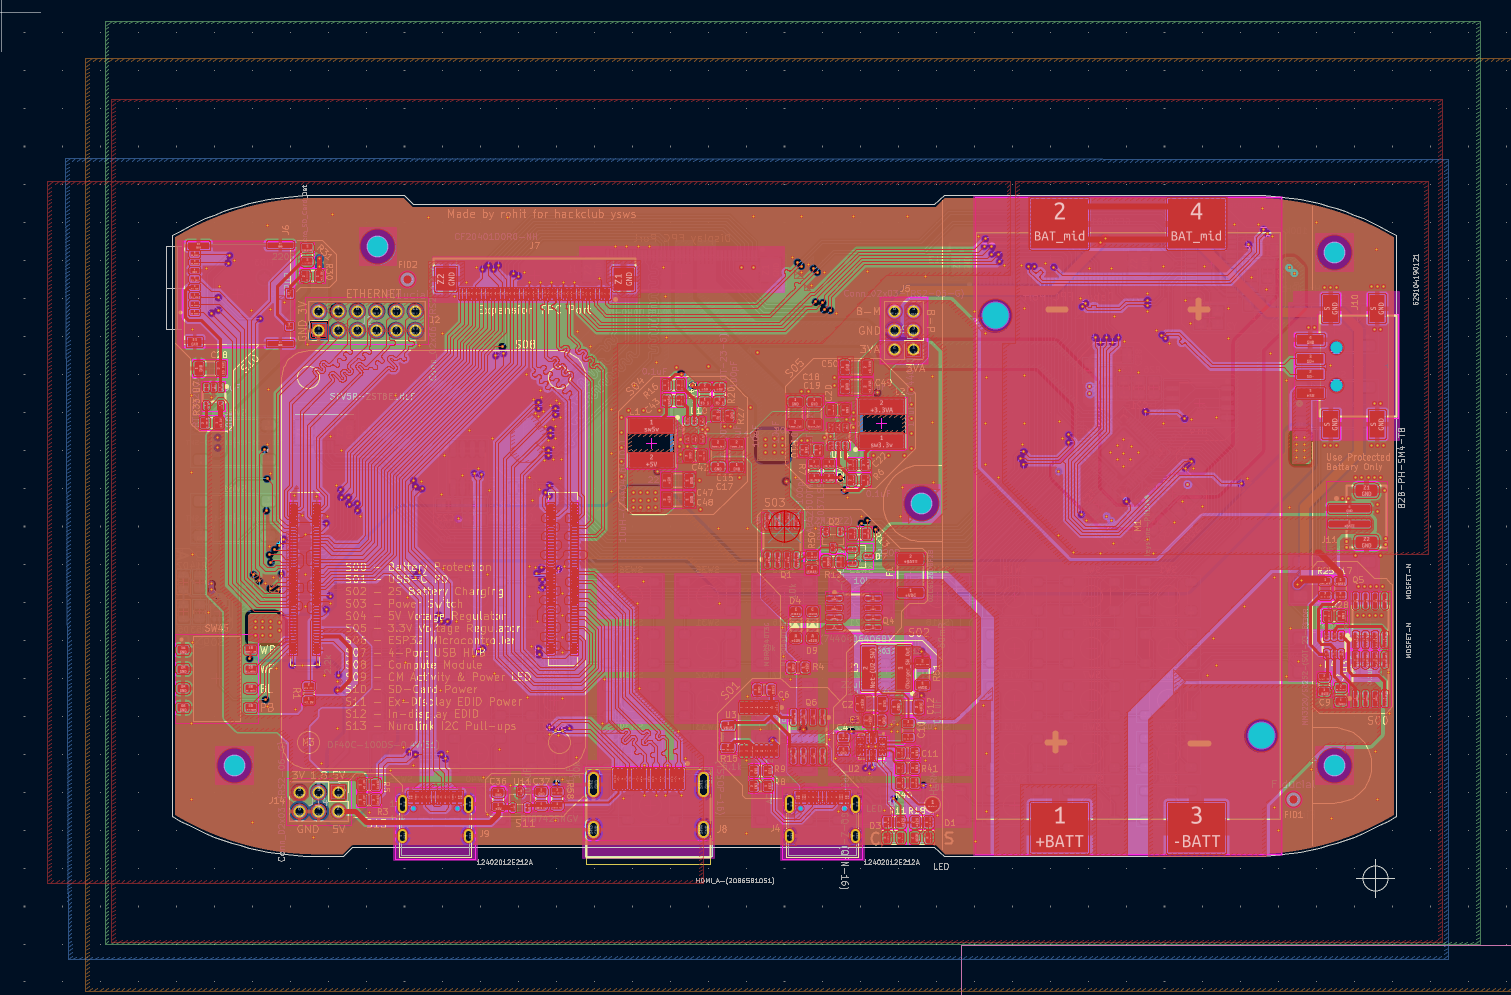
Rohit
added to the journal ago
final round of cleanup and review
wrapped up the final round of cleanup and review today
triple-checked pinouts, footprints, and power rails for errors
added fiducials, test points, and random extras like boot jumpers
also finalized the USB-C and HDMI protection stuff. worked on deciding the dimensions for the pcb borders and made sure that it fit my case dimensions that i have planned, also many components i placed on the board, just the process of deciding the border length took a lot of time, started routing the pcb and i finished abtu 20% of it, i am thinking of importing it to easy eda pro and autorouting it but i want the source files so ill keep it. today i finished routing the display pcb, and started routing the main pcb, it did take a lot of retries since i had to replace parts and i finally found a suitable arrangement, routig all the parts in the main pcb was pretty hectic, ive finished like 70% of it, i've got school stuff to do now so imma take the night off
Rohit
added to the journal ago
finished the display PCB design, it’s looking clean and mini
started work on the display PCB and honestly this one's way calmer than the main board
got the basic stuff in first power input, the FPC connector for the screen, and some random passives
had to rotate the layout like 3 times to make the FPC orientation make sense
added pull-up resistors.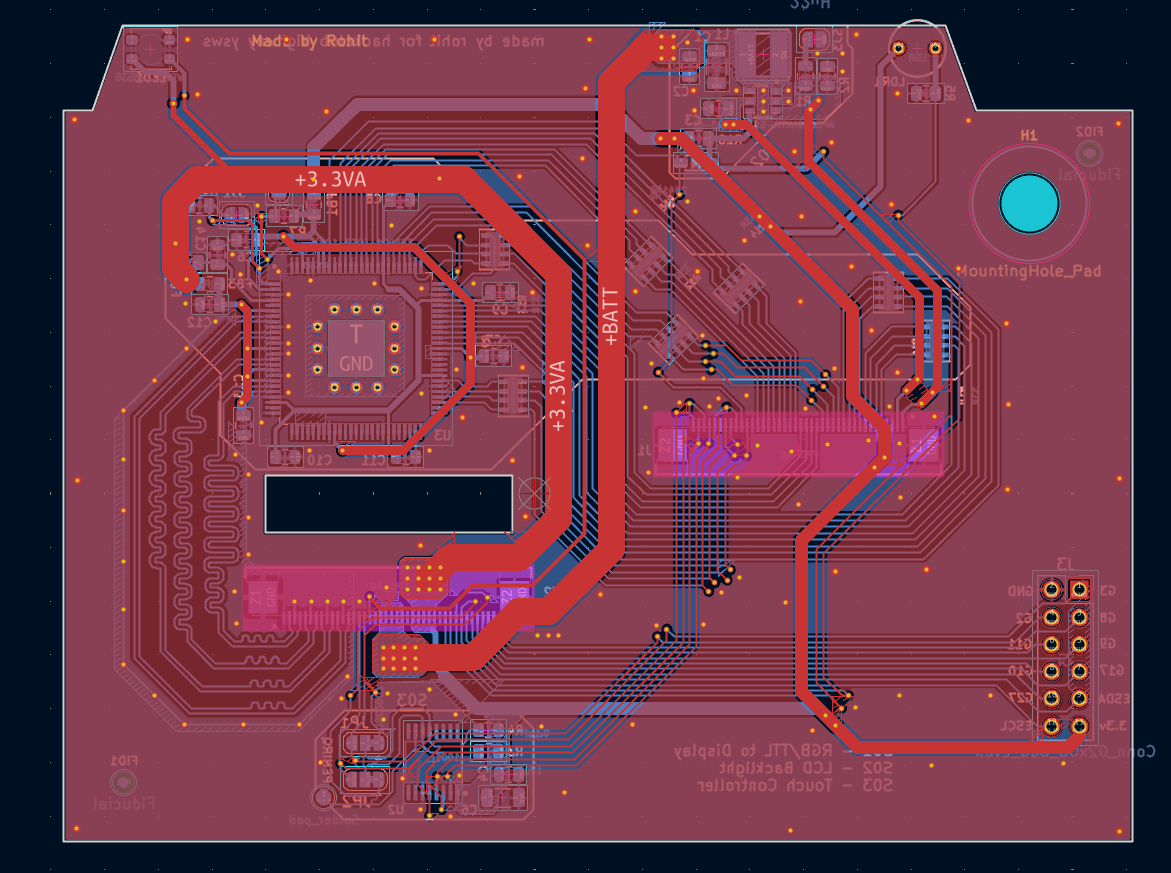
Rohit
added to the journal ago
display interface is finally somewhat sane
this one was about the screen and making sure it won’t fry
hooked up the LCD interface and added ESD resistors on all the touch lines
tried to keep traces short even though I’m still in schematic mode
double checked the display’s backlight, touchscreen, and data lines
added a debug header just to probe signals later if things don’t work
organized the connector pins to make layout easier
this part was clean.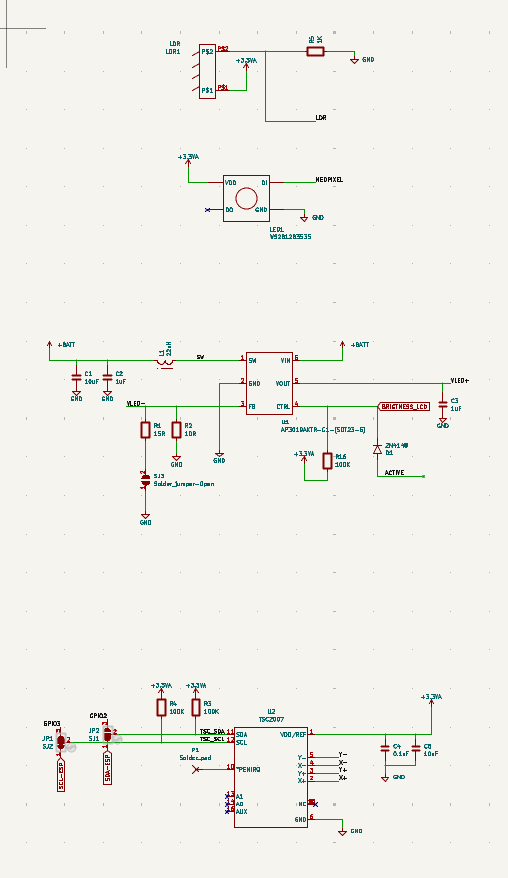
Rohit
added to the journal ago
general cleanup and better power domain separation
long session , mostly organizing the whole schematic properly
split things into hierarchy sheets because the top level was getting out of control
reassigned power domains and labeled them to make layout cleaner later
caught a bunch of dumb mistakes like misnamed nets and flipped diodes
also started writing notes inside schematic blocks to help future-me
deleted some sketchy looking wires and redrew for clarity
design now feels like an actual engineering thing and not a spaghetti nightmare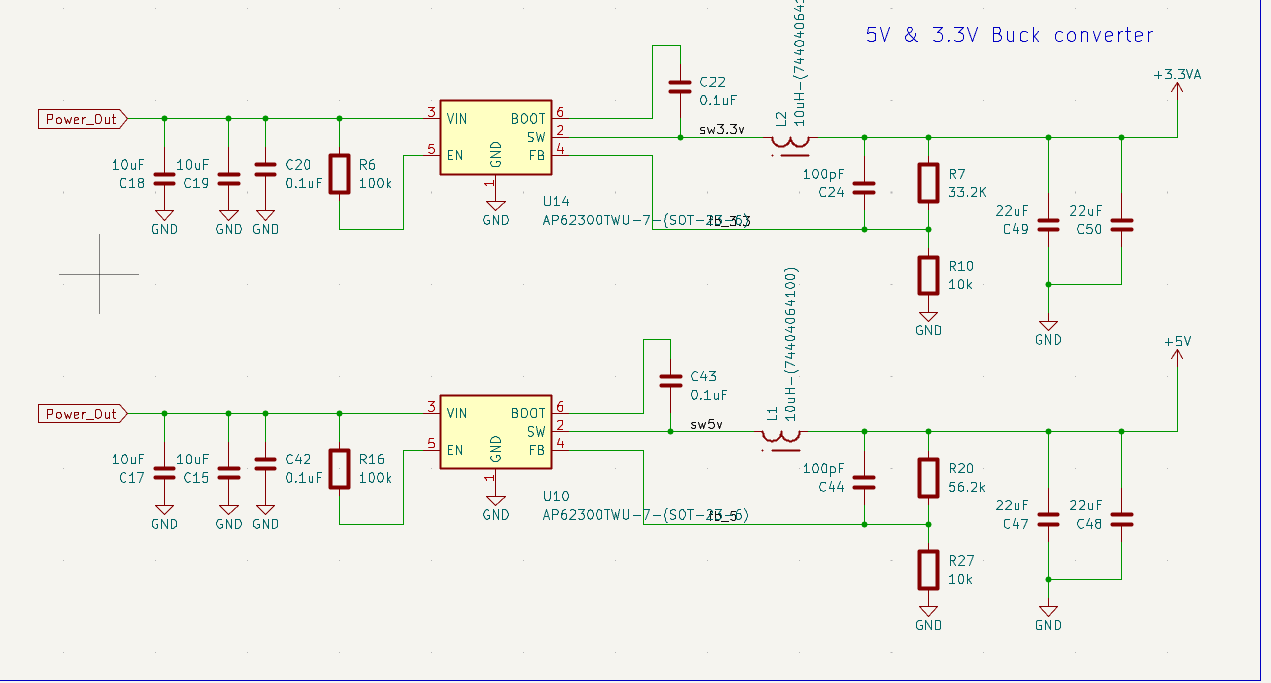
Rohit
added to the journal ago
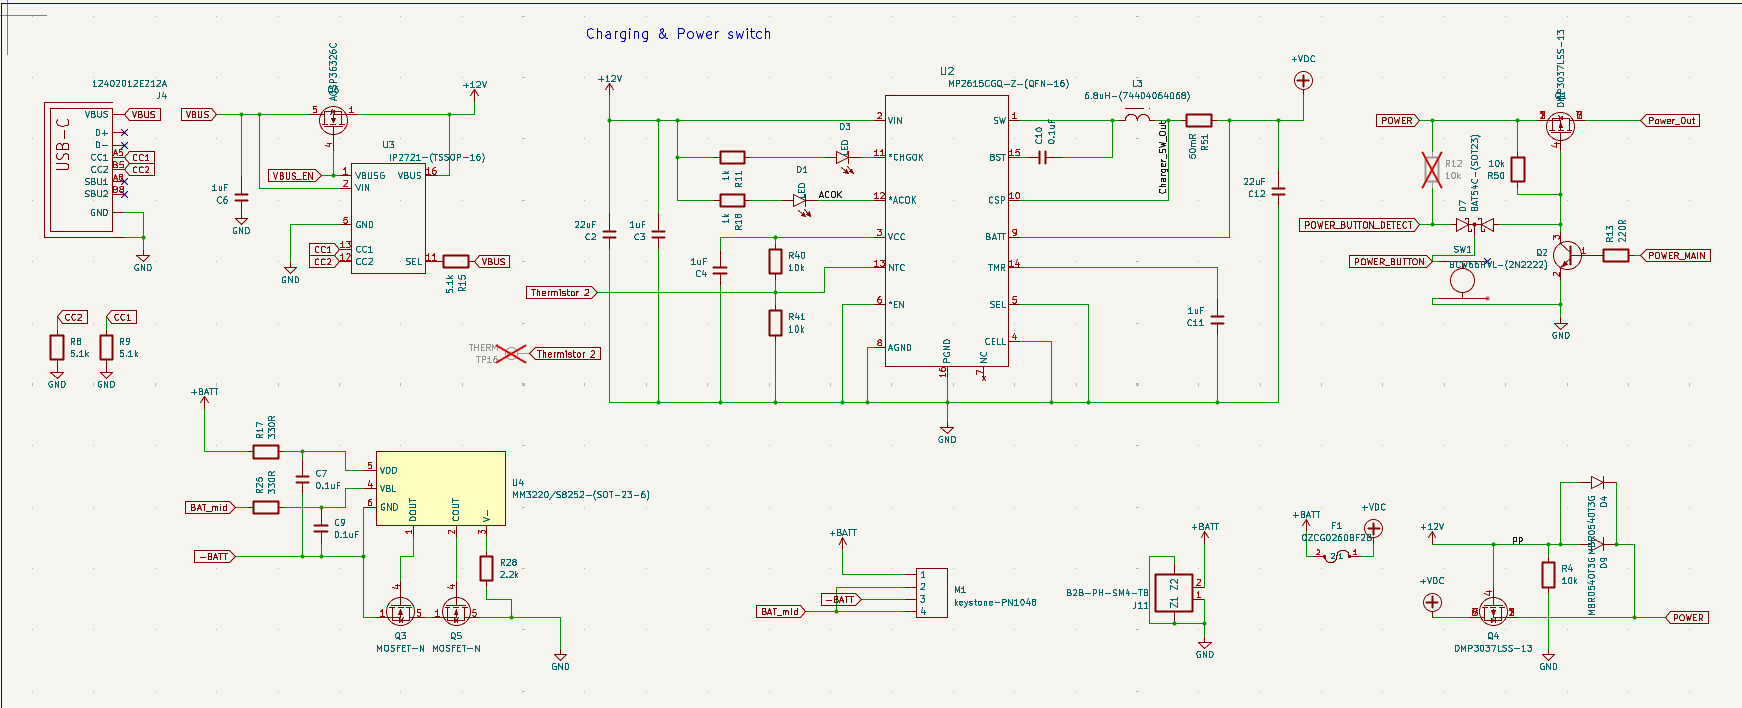
threw in the power switch logic
focused entirely on the battery and power switch logic today
added charging ICs, battery monitor, and some MOSFET magic for switching
realized I forgot to add thermistor protection, so threw that in last minute
checked current sense resistor values like 5 times because battery fires aren’t cool
rewired the main power path so everything’s a bit safer
design is power-heavy now but kinda elegant
will probably still debug it with a fire extinguisher nearby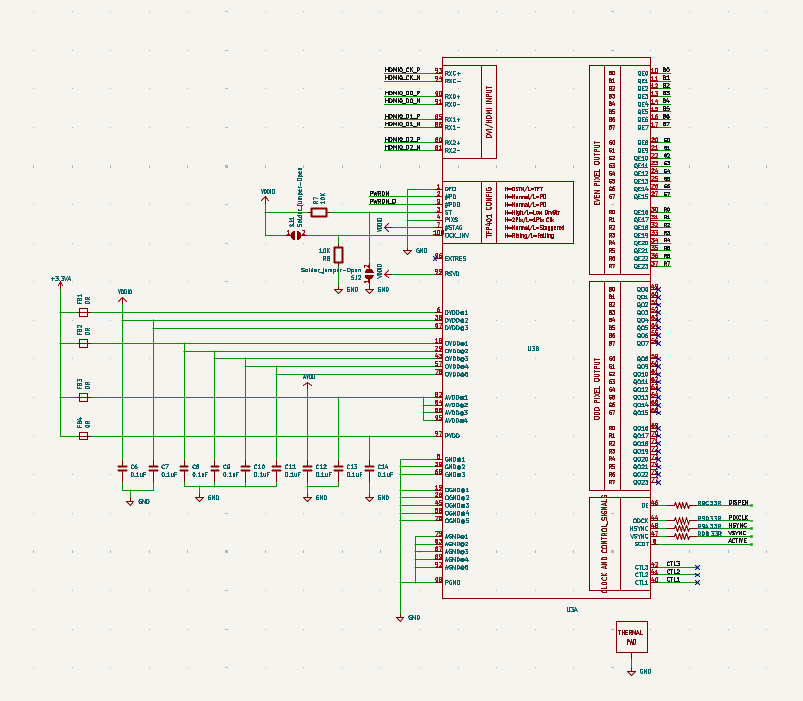
Rohit
added to the journal ago
added a bunch of buttons, switches, and gpio expands
felt like expanding the UI side today, so buttons and switches got added
dropped in an IO expander to control all the random toggles I want
added RGB LED, backlight control, and the mandatory cyberpunk toggle
also threw in debug pads and labeled everything just in case I forget stuff later
double checked how the esp talks to the neopixel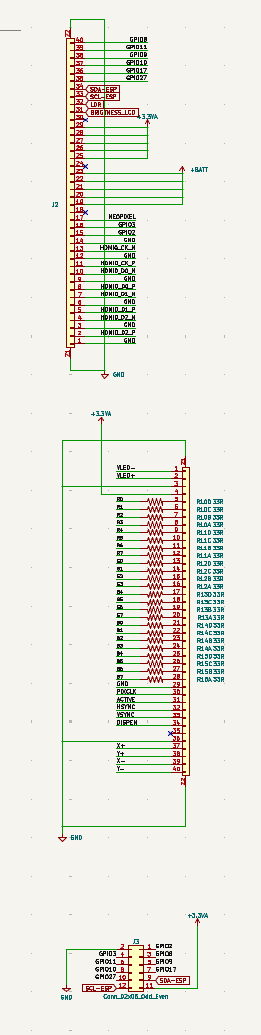
Rohit
added to the journal ago
the gpio, ethernet, sd signals etc., are getting crowded
this was cleanup day, had to declutter a lot of overlapping nets
focused on GPIO and voltage domains because things were starting to get scary
double checked voltage levels everywhere and pulled back any accidental 5V hits
renamed nets to stuff like USBD+ and PWRBTN so I don’t get lost later
added a few jumpers where I needed config flexibility
Rohit
added to the journal ago
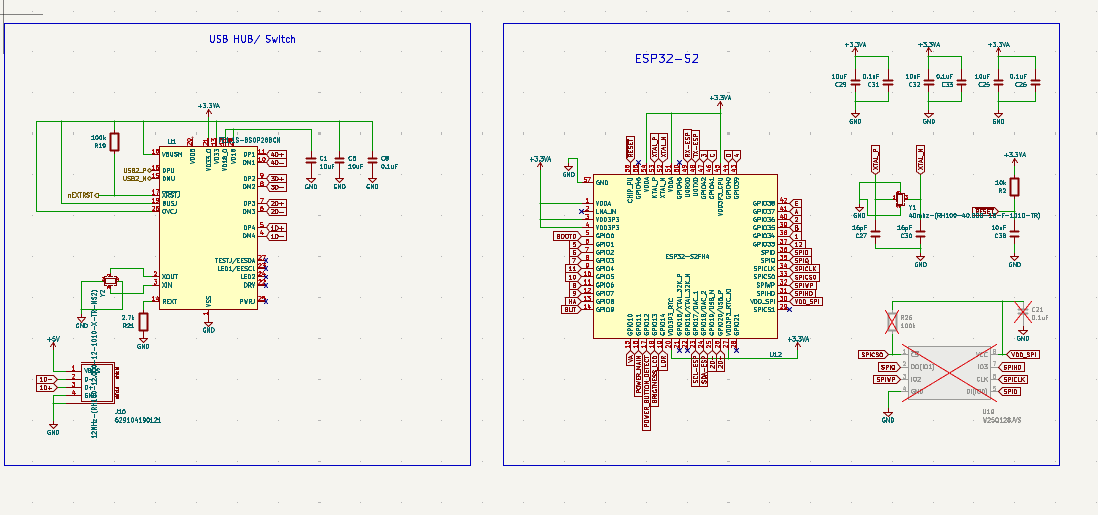
hooked up the esp and usb hub chip
today was about the esp32 and the USB hub, two chips I really like but hate wiring
added the esp32 footprint and spent too long assigning IOs
for the usb hub, I was constantly bouncing between the datasheet and KiCad
wired up USB upstream/downstream lines and crossed my fingers on signal integrity
threw in some debug headers and left room for ESD stuff I haven’t decided on yet
also started routing logic enable signals to give me more control later
kinda messy but functionally complete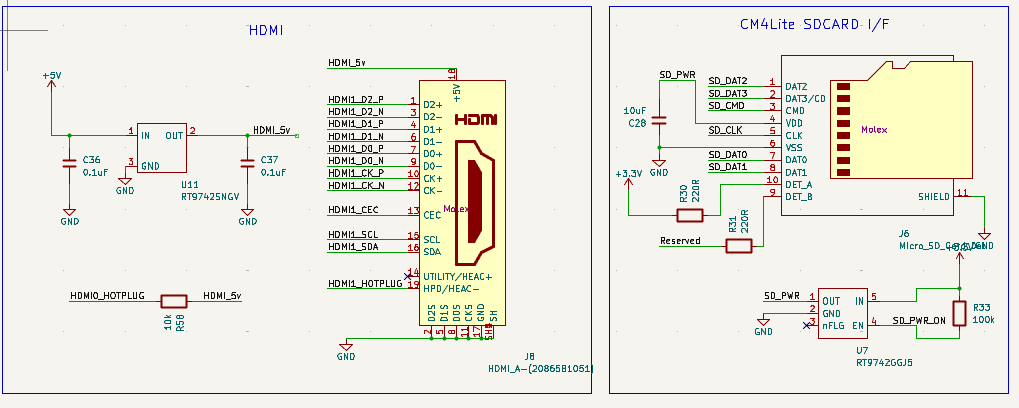
Rohit
added to the journal ago
added the cm4 lite footprint and some essentials around it
today was CM4 Lite day, and man this thing has a crazy number of pins
literally had to scroll through three different PDFs to not mess up the IO mapping
figured out where to connect PCIe and eMMC signals even though I’m not using either
started drawing out the main headers and labeling them so I wouldn’t cry later
threw in level shifters and testpoints just to be safe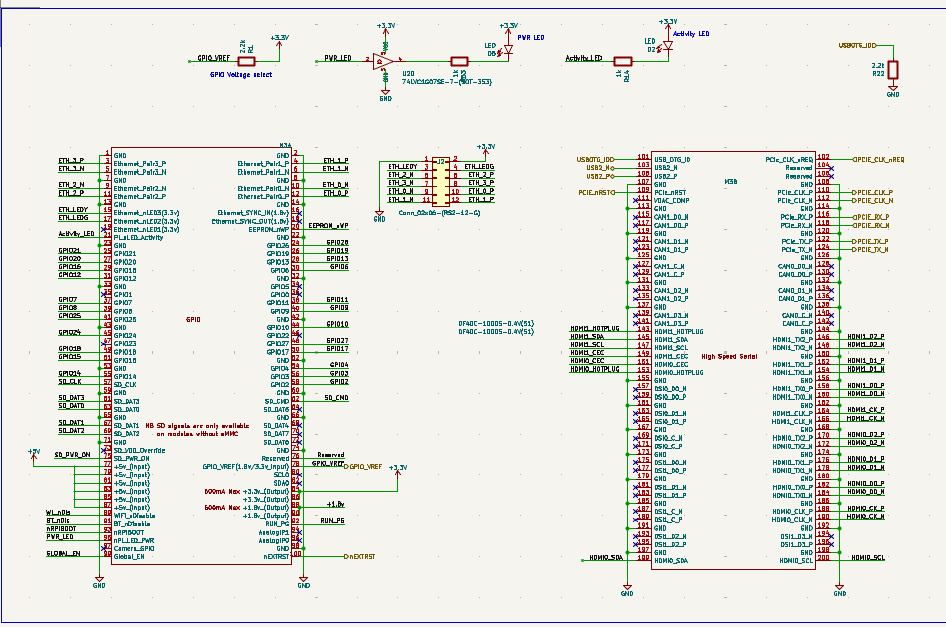
Rohit
added to the journal ago
threw in the hdmi stuff
dove headfirst into HDMI today and instantly regretted it!
the connector footprint was cursed and I had to double-check every diff pair
wired up the HDMI chip and some tiny filter caps for signal integrity
had to decide whether to bother with hotplug detection and i just YOLO’d it in
tried to keep traces as short as possible even though I haven’t routed anything
also added pull-ups and random ESD protection that I may or may not actually populate
got through it alive, but just barely
Rohit
added to the journal ago
got the power rails and buck converters roughly figured out
got started with the power stuff today because that felt like a good anchor
opened up a blank KiCad sheet and just kinda sat there before committing to the first buck converter
threw in a couple AP62300s, added some random caps that looked about right
did basic power rails like +3.3VA and +5V, mostly by guessing current draw
honestly spent more time figuring out resistor values than placing parts
it's still super rough, but at least the board’s not completely empty anymore
definitely not thinking about routing yet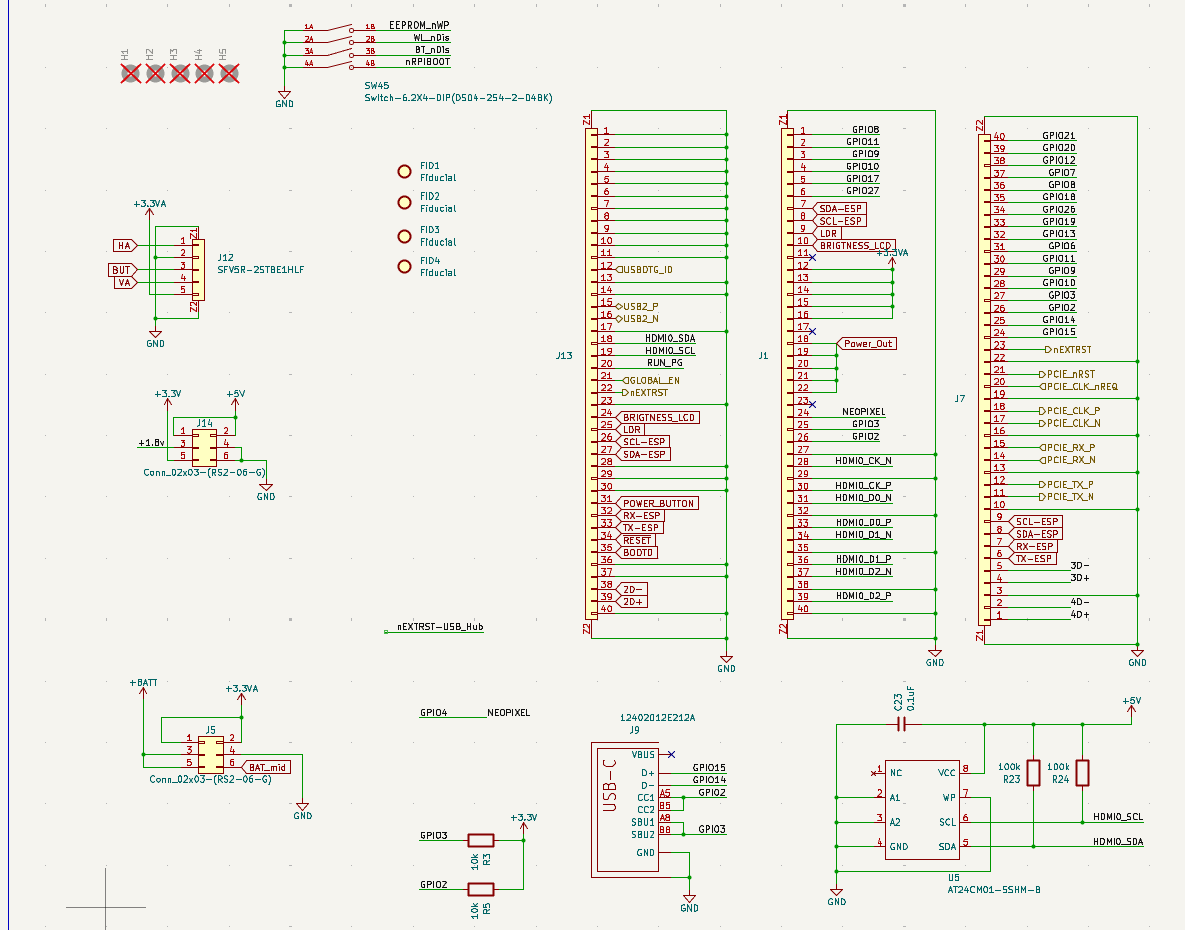
Rohit
started Rohideck ago